如何编写 CSI 插件
一、为什么需要 CSI
在 Kubernetes 以前的版本中,其所有受官方支持的存储驱动全部在 Kubernetes 的主干代码中,其他第三方开发的自定义插件通过 FlexVolume 插件的形势提供服务;相对于 kubernetes 的源码树来说,内置的存储我们称之为 “树内存储”,外部第三方实现我们称之为 “树外存储”;在很长一段时间里树内存储和树外存储并行开发和使用,但是随着时间推移渐渐的就出现了很严重的问题:
- 想要添加官方支持的存储必须在树内修改,这意味着需要 Kubernetes 发版
- 如果树内存储出现问题则也必须等待 Kubernetes 发版才能修复
为了解决这种尴尬的问题,Kubernetes 必须抽象出一个合适的存储接口,并将所有存储驱动全部适配到这个接口上,存储驱动最好与 Kubernetes 之间进行 RPC 调用完成解耦,这样就造就了 CSI(Container Storage Interface)。
二、CSI 基础知识
2.1、CSI Sidecar Containers
在开发 CSI 之前我们最好熟悉一下 CSI 开发中的一些常识;了解过 Kubernetes API 开发的朋友应该清楚,所有的资源定义(Deployment、Service…)在 Kubernetes 中其实就是一个 Object,此时可以将 Kubernetes 看作是一个 Database,无论是 Operator 还是 CSI 其核心本质都是不停的 Watch 特定的 Object,一但 kubectl 或者其他客户端 “动了” 这个 Object,我们的对应实现程序就 Watch 到变更然后作出相应的响应;对于 CSI 编写者来说,这些 Watch 动作已经不必自己实现 Custom Controller,官方为我们提供了 CSI Sidecar Containers;并且在新版本中这些 Sidecar Containers 实现极其完善,比如自动的多节点 HA(Etcd 选举)等。
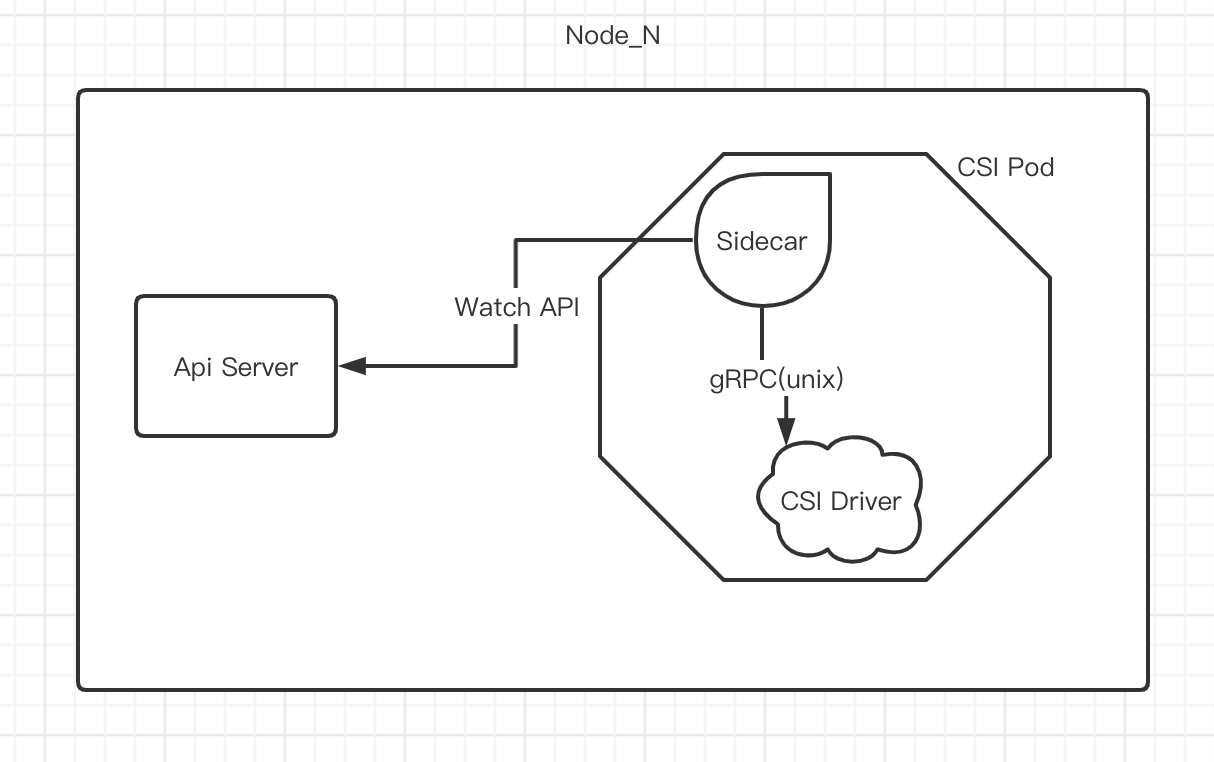
所以到迄今为止,所谓的 CSI 插件开发事实上并非面向 Kubernetes API 开发,而是面向 Sidecar Containers 的 gRPC 开发,Sidecar Containers 一般会和我们自己开发的 CSI 驱动程序在同一个 Pod 中启动,然后 Sidecar Containers Watch API 中 CSI 相关 Object 的变动,接着通过本地 unix 套接字调用我们编写的 CSI 驱动:
目前官方提供的 Sidecar Containers 如下:
- external-provisioner
- external-attacher
- external-snapshotter
- external-resizer
- node-driver-registrar
- cluster-driver-registrar (deprecated)
- livenessprobe
每个 Sidecar Container 的作用可以通过对应链接查看,需要注意的是 cluster-driver-registrar 已经停止维护,请改用 node-driver-registrar。
2.2、CSI 处理阶段
在理解了 CSI Sidecar Containers 以后,我们仍需要大致的了解 CSI 挂载过程中的大致流程,以此来针对性的实现每个阶段所需要的功能;CSI 整个流程实际上大致分为以下三大阶段:
2.2.1、Provisioning and Deleting
Provisioning and Deleting 阶段实现与外部存储供应商协调卷的创建/删除处理,简单地说就是需要实现 CreateVolume 和 DeleteVolume;假设外部存储供应商为阿里云存储那么此阶段应该完成在阿里云存储商创建一个指定大小的块设备,或者在用户删除 volume 时完成在阿里云存储上删除这个块设备;除此之外此阶段还应当响应存储拓扑分布从而保证 volume 分布在正确的集群拓扑上(此处描述不算清晰,推荐查看设计文档)。
2.2.2、Attaching and Detaching
Attaching and Detaching 阶段实现将外部存储供应商提供好的卷设备挂载到本地或者从本地卸载,简单地说就是实现 ControllerPublishVolume 和 ControllerUnpublishVolume;同样以外部存储供应商为阿里云存储为例,在 Provisioning 阶段创建好的卷的块设备,在此阶段应该实现将其挂载到服务器本地或从本地卸载,在必要的情况下还需要进行格式化等操作。
2.2.3、Mount and Umount
这个阶段在 CSI 设计文档中没有做详细描述,在前两个阶段完成后,当一个目标 Pod 在某个 Node 节点上调度时,kubelet 会根据前两个阶段返回的结果来创建这个 Pod;同样以外部存储供应商为阿里云存储为例,此阶段将会把已经 Attaching 的本地块设备以目录形式挂载到 Pod 中或者从 Pod 中卸载这个块设备。
2.3、CSI gRPC Server
CSI 的三大阶段实际上更细粒度的划分到 CSI Sidecar Containers 中,上面已经说过我们开发 CSI 实际上是面向 CSI Sidecar Containers 编程,针对于 CSI Sidecar Containers 我们主要需要实现以下三个 gRPC Server:
2.3.1、Identity Server
在当前 CSI Spec v1.3.0 中 IdentityServer 定义如下:
1 | |
从代码上可以看出 IdentityServer 主要负责像 Kubernetes 提供 CSI 插件名称可选功能等,所以此 Server 是必须实现的。
2.3.2、Node Server
同样当前 CSI v1.3.0 Spec 中 NodeServer 定义如下:
1 | |
在最小化的实现中,NodeServer 中仅仅需要实现 NodePublishVolume、NodeUnpublishVolume、NodeGetCapabilities 三个方法,在 Mount 阶段 kubelet 会通过 node-driver-registrar 容器调用这三个方法。
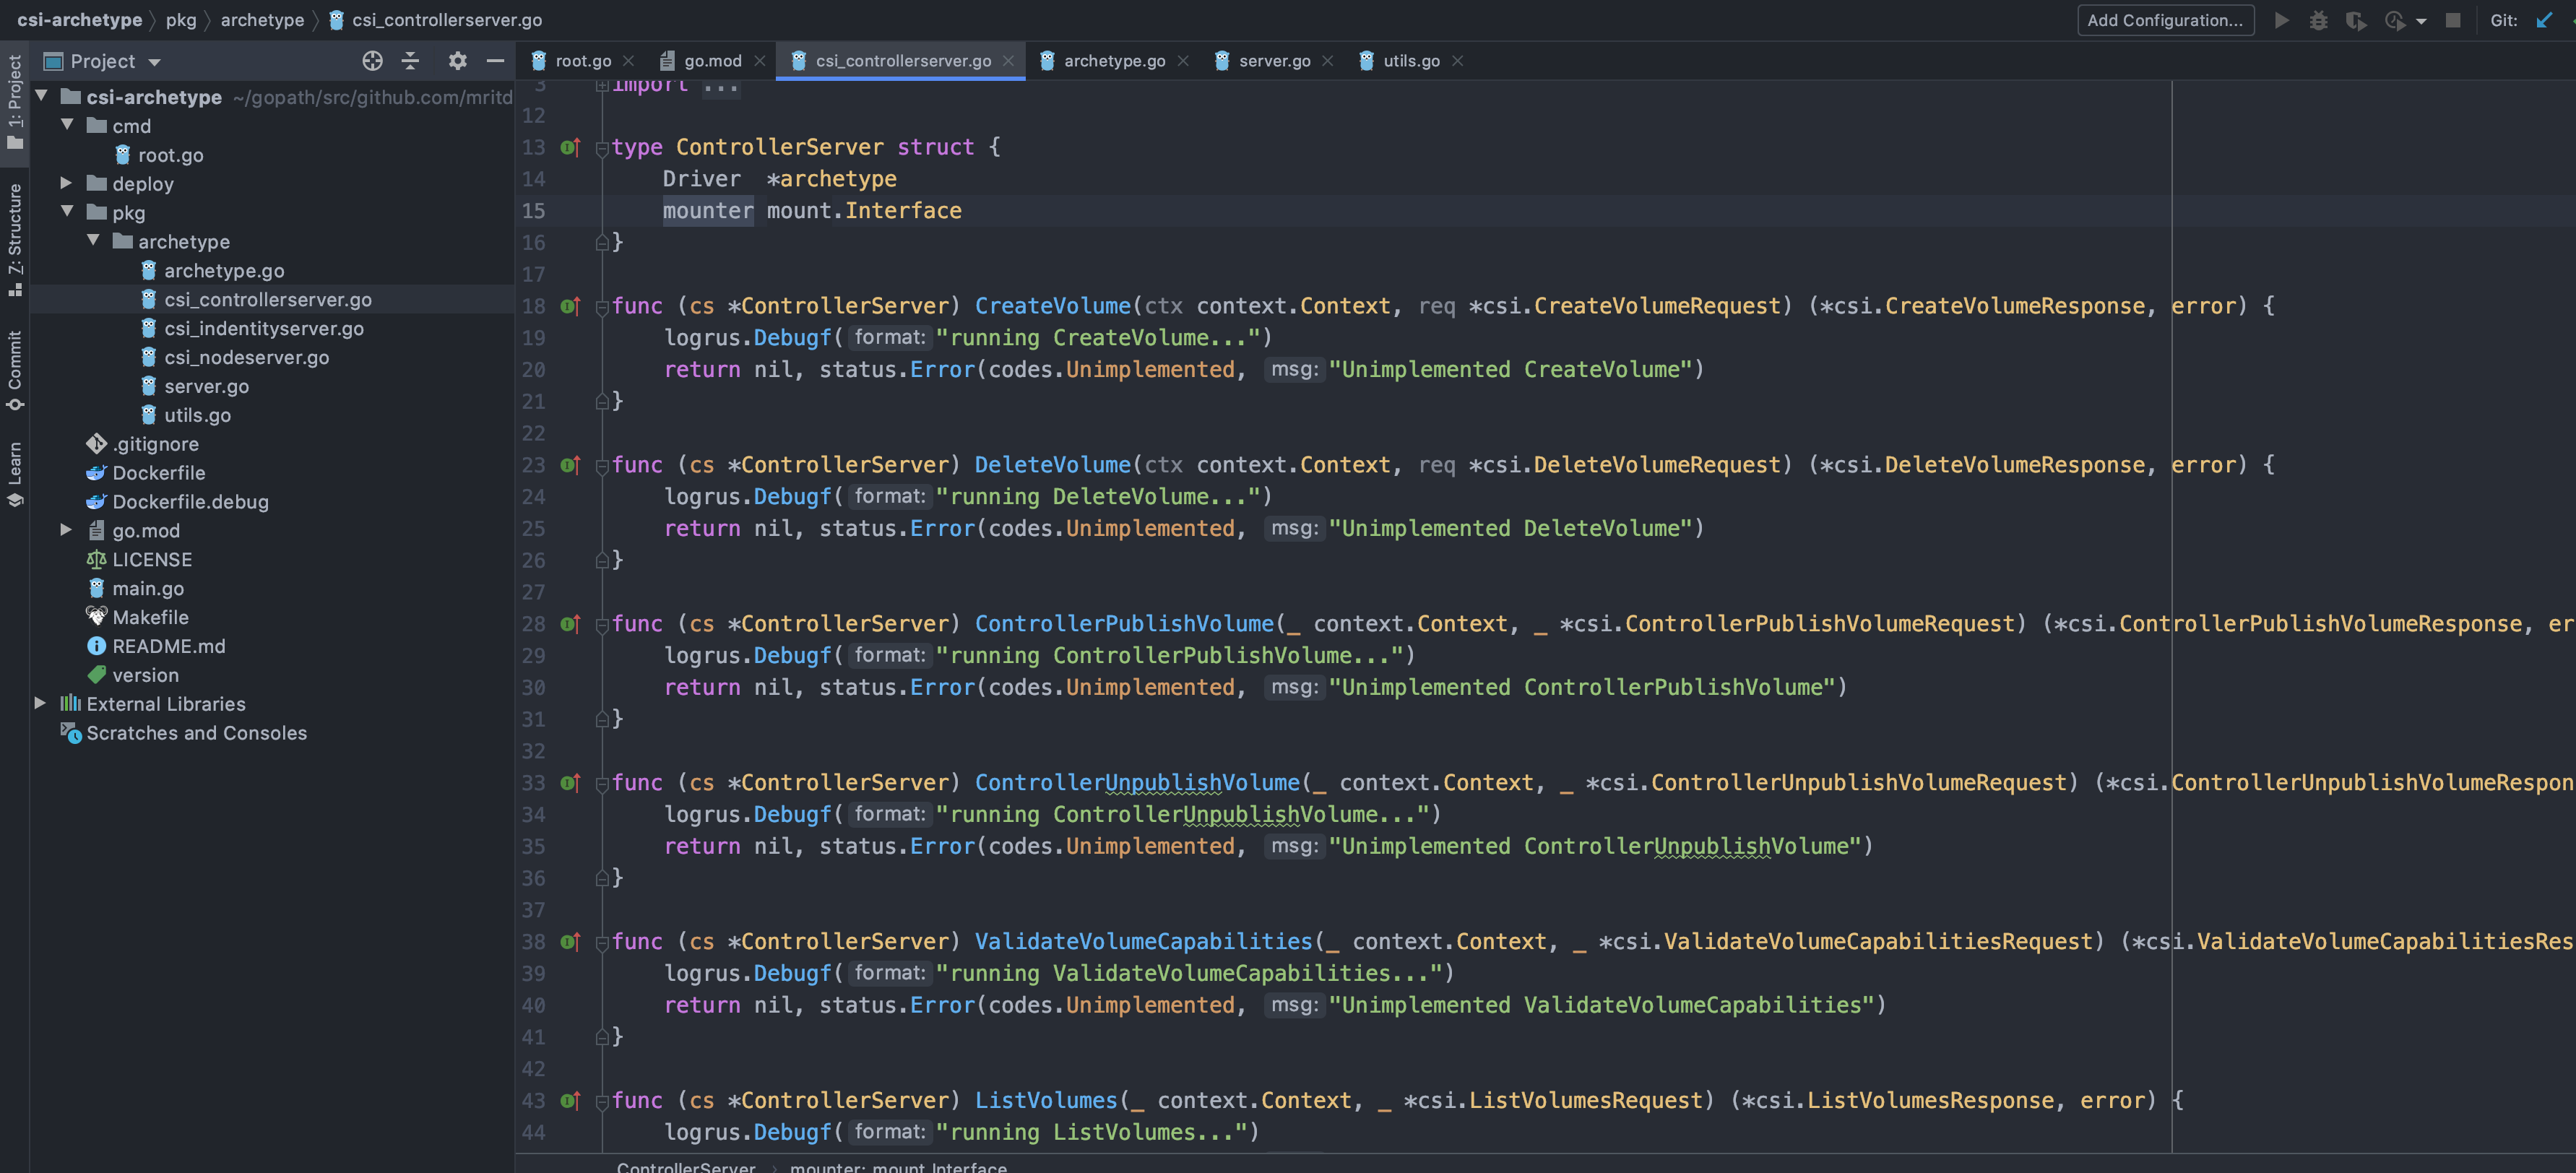
2.3.3、Controller Server
在当前 CSI Spec v1.3.0 ControllerServer 定义如下:
1 | |
从这些方法上可以看出,大部分的核心逻辑应该在 ControllerServer 中实现,比如创建/销毁 Volume,创建/销毁 Snapshot 等;在一般情况下我们自己编写的 CSI 都会实现 CreateVolume 和 DeleteVolume,至于其他方法根据业务需求以及外部存储供应商实际情况来决定是否进行实现。
2.3.4、整体部署加构图
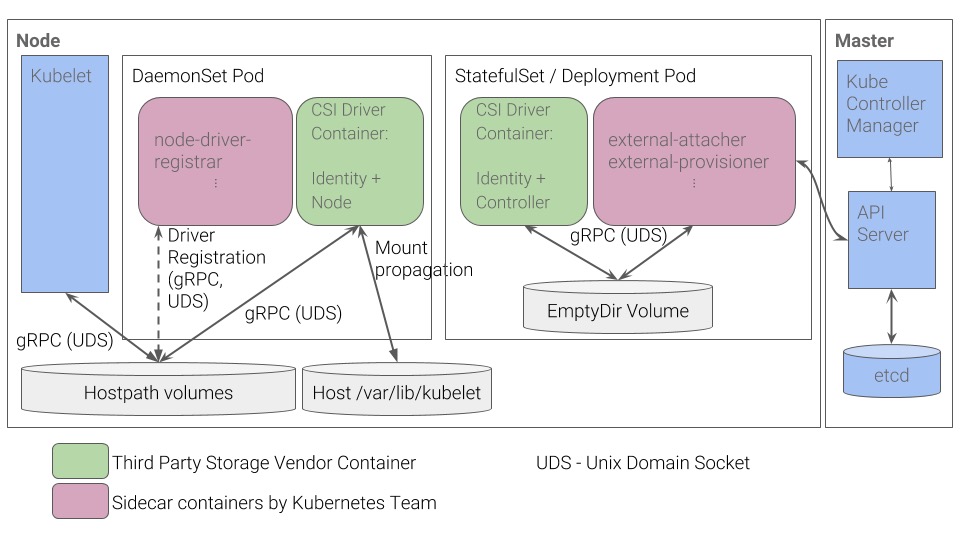
从这个部署架构图上可以看出在实际上 CSI 部署时,Mount and Umount 阶段(对应 Node Server 实现)以 Daemonset 方式保证其部署到每个节点,当 Volume 创建完成后由其挂载到 Pod 中;其他阶段(Provisioning and Deleting 和 Attaching and Detaching) 只要部署多个实例保证 HA 即可(最新版本的 Sidecar Containers 已经实现了多节点自动选举);每次 PV 创建时首先由其他两个阶段的 Sidecar Containers 做处理,处理完成后信息返回给 Kubernetes 再传递到 Node Driver(Node Server) 上,然后 Node Driver 将其 Mount 到 Pod 中。
三、编写一个 NFS CSI 插件
3.1、前置准备及分析
根据以上文档的描述,针对于需要编写一个 NFS CSI 插件这个需求,大致我们可以作出如下分析:
- 三大阶段中我们只需要实现 Provisioning and Deleting 和 Mount and Umount;因为以 NFS 作为外部存储供应商来说我们并非是块设备,所以也不需要挂载到宿主机(Attaching and Detaching)。
- Provisioning and Deleting 阶段我们需要实现
CreateVolume和DeleteVolume逻辑,其核心逻辑应该是针对每个 PV 在 NFS Server 目录下执行mkdir,并将生成的目录名称等信息返回给 Kubernetes。 - Mount and Umount 阶段需要实现 Node Server 的
NodePublishVolume和NodeUnpublishVolume方法,然后将上一阶段提供的目录名称等信息组合成挂载命令 Mount 到 Pod 即可。
在明确了这个需求以后我们需要开始编写 gRPC Server,当然不能盲目的自己乱造轮子,因为这些 gRPC Server 需要是 NonBlocking 的,所以最佳实践就是参考官方给出的样例项目 csi-driver-host-path,这是一名合格的 CCE 必备的技能(CCE = Ctrl C + Ctrl V + Engineer)。
3.2、Hostpath CSI 源码分析
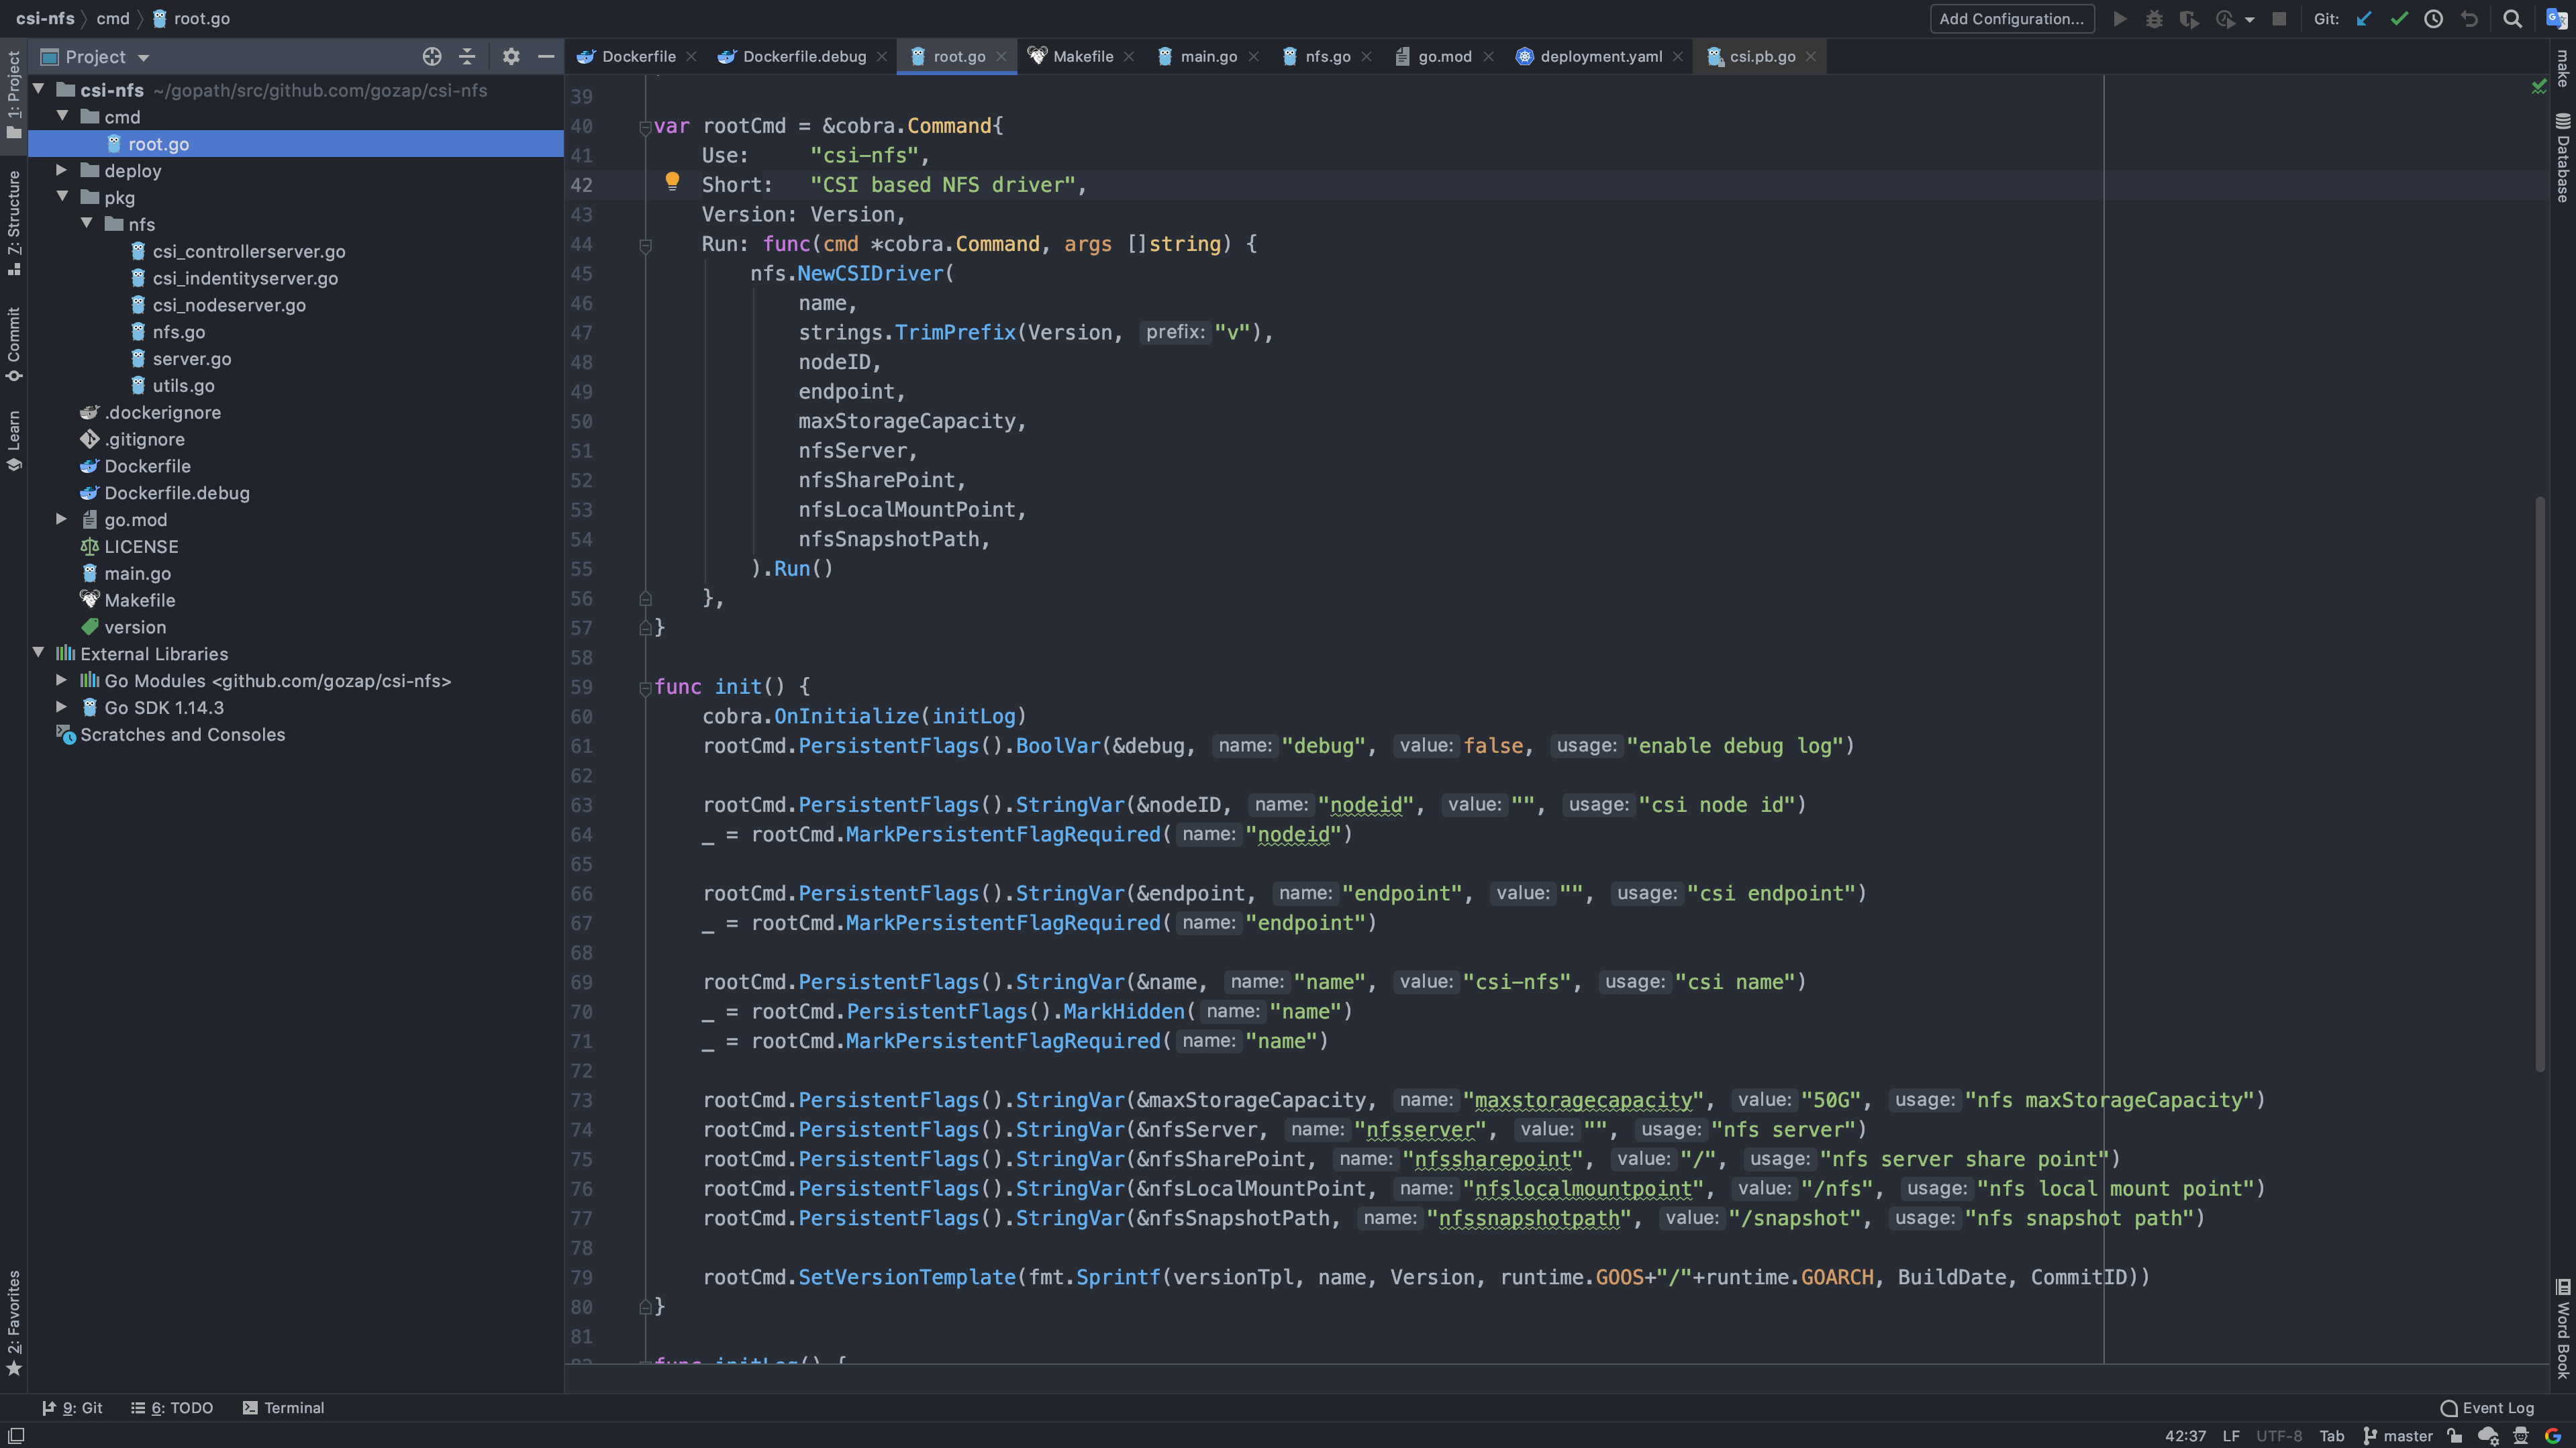
针对官方给出的 CSI 样例,首先把源码弄到本地,然后通过 IDE 打开;这里默认为读者熟悉 Go 语言相关语法以及 go mod 等依赖配置,开发 IDE 默认为 GoLand
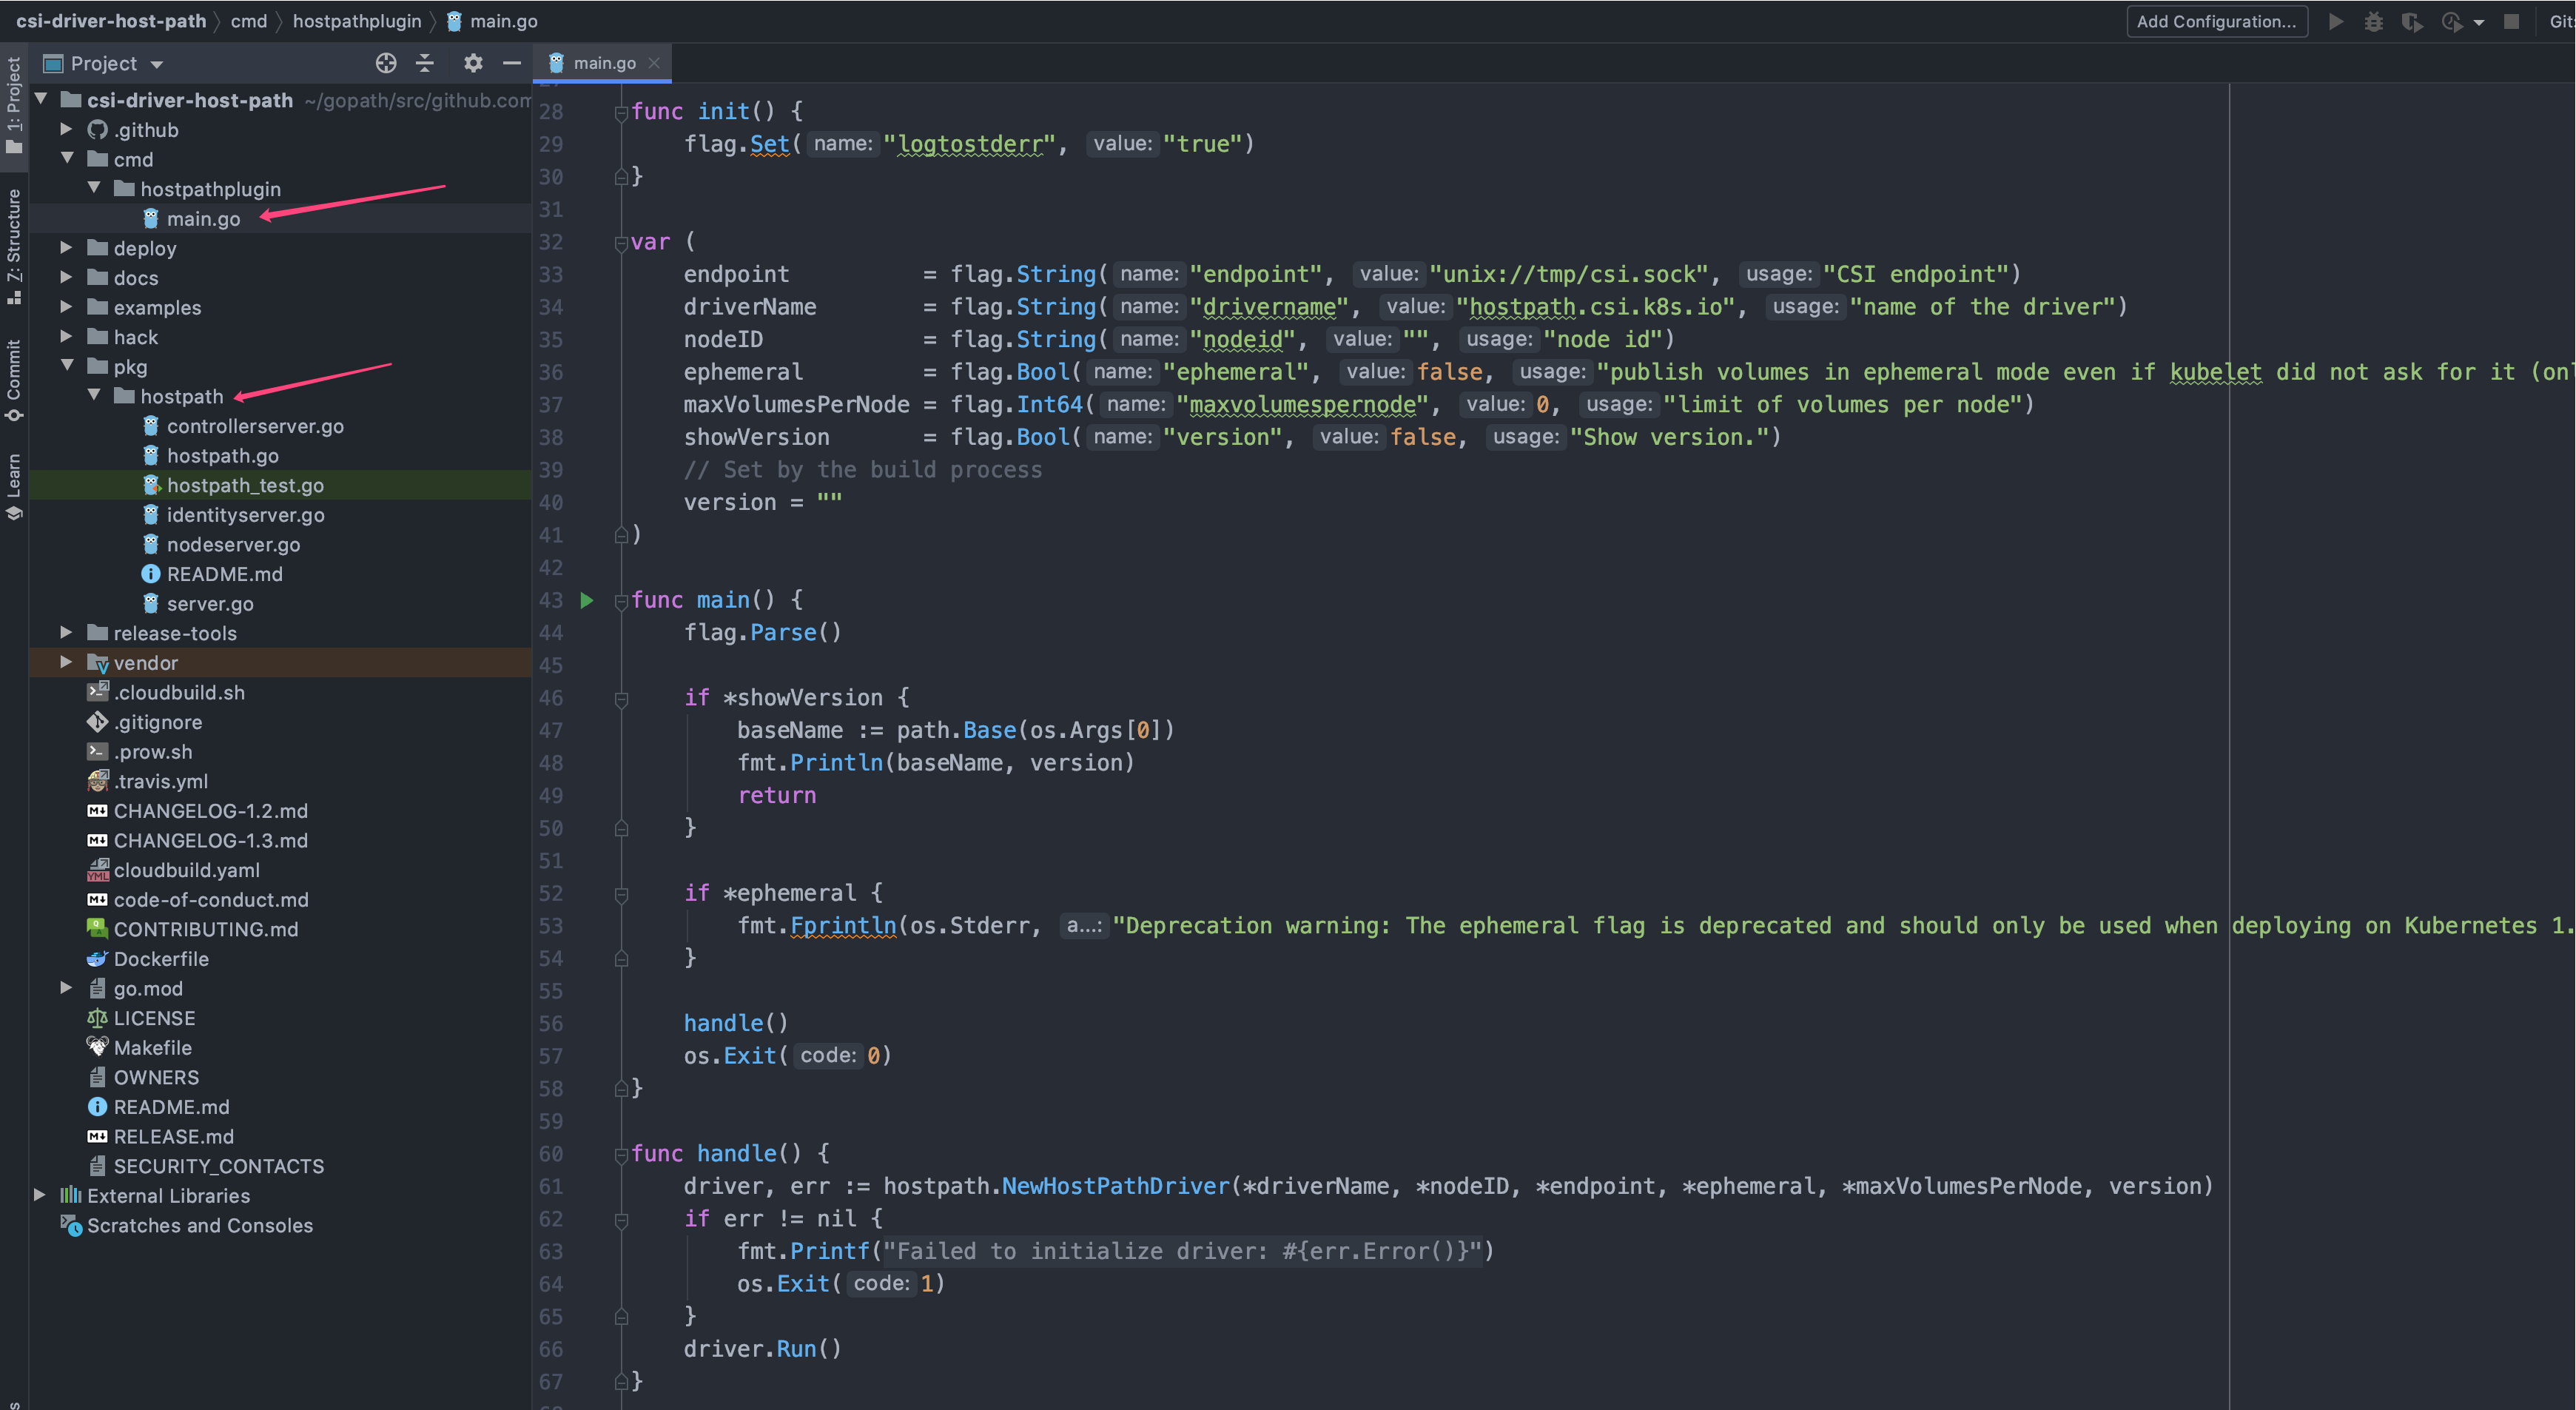
从源码树上可以看到,hostpath 的 CSI 实现非常简单;首先是 cmd 包下的命令行部分,main 方法在这里定义,然后就是 pkg/hostpath 包的具体实现部分,CSI 需要实现的三大 gRPC Server 全部在此。
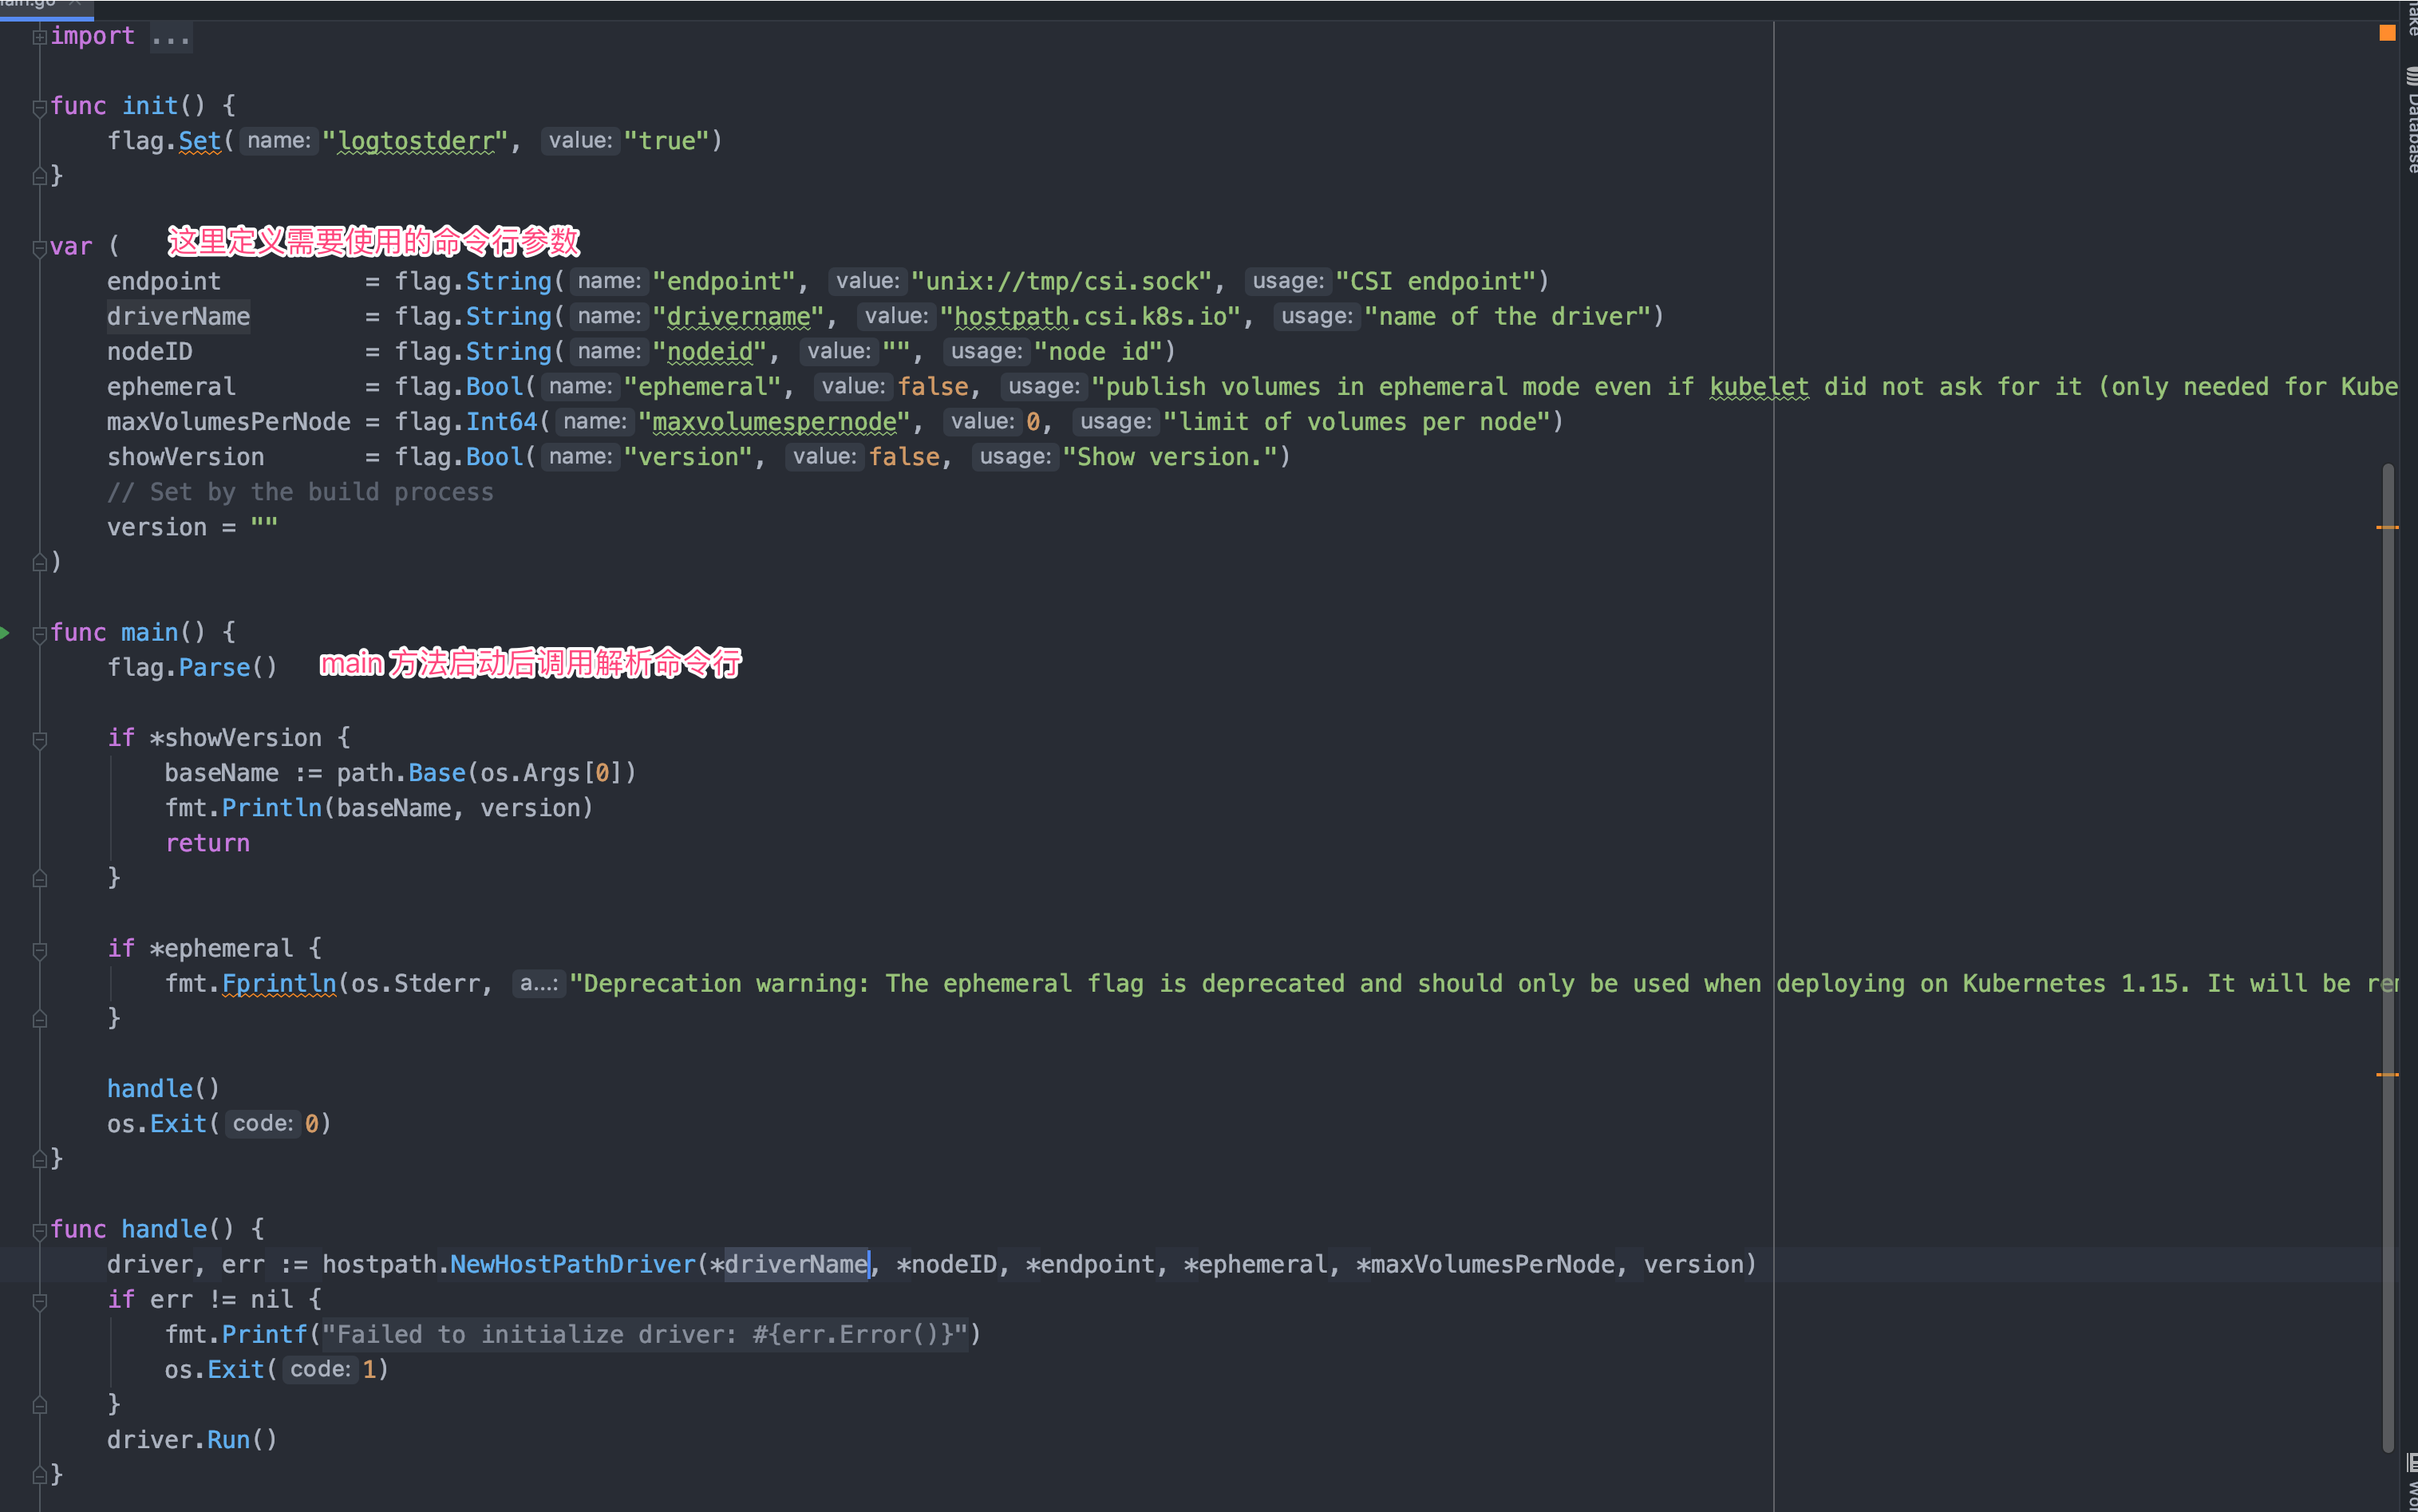
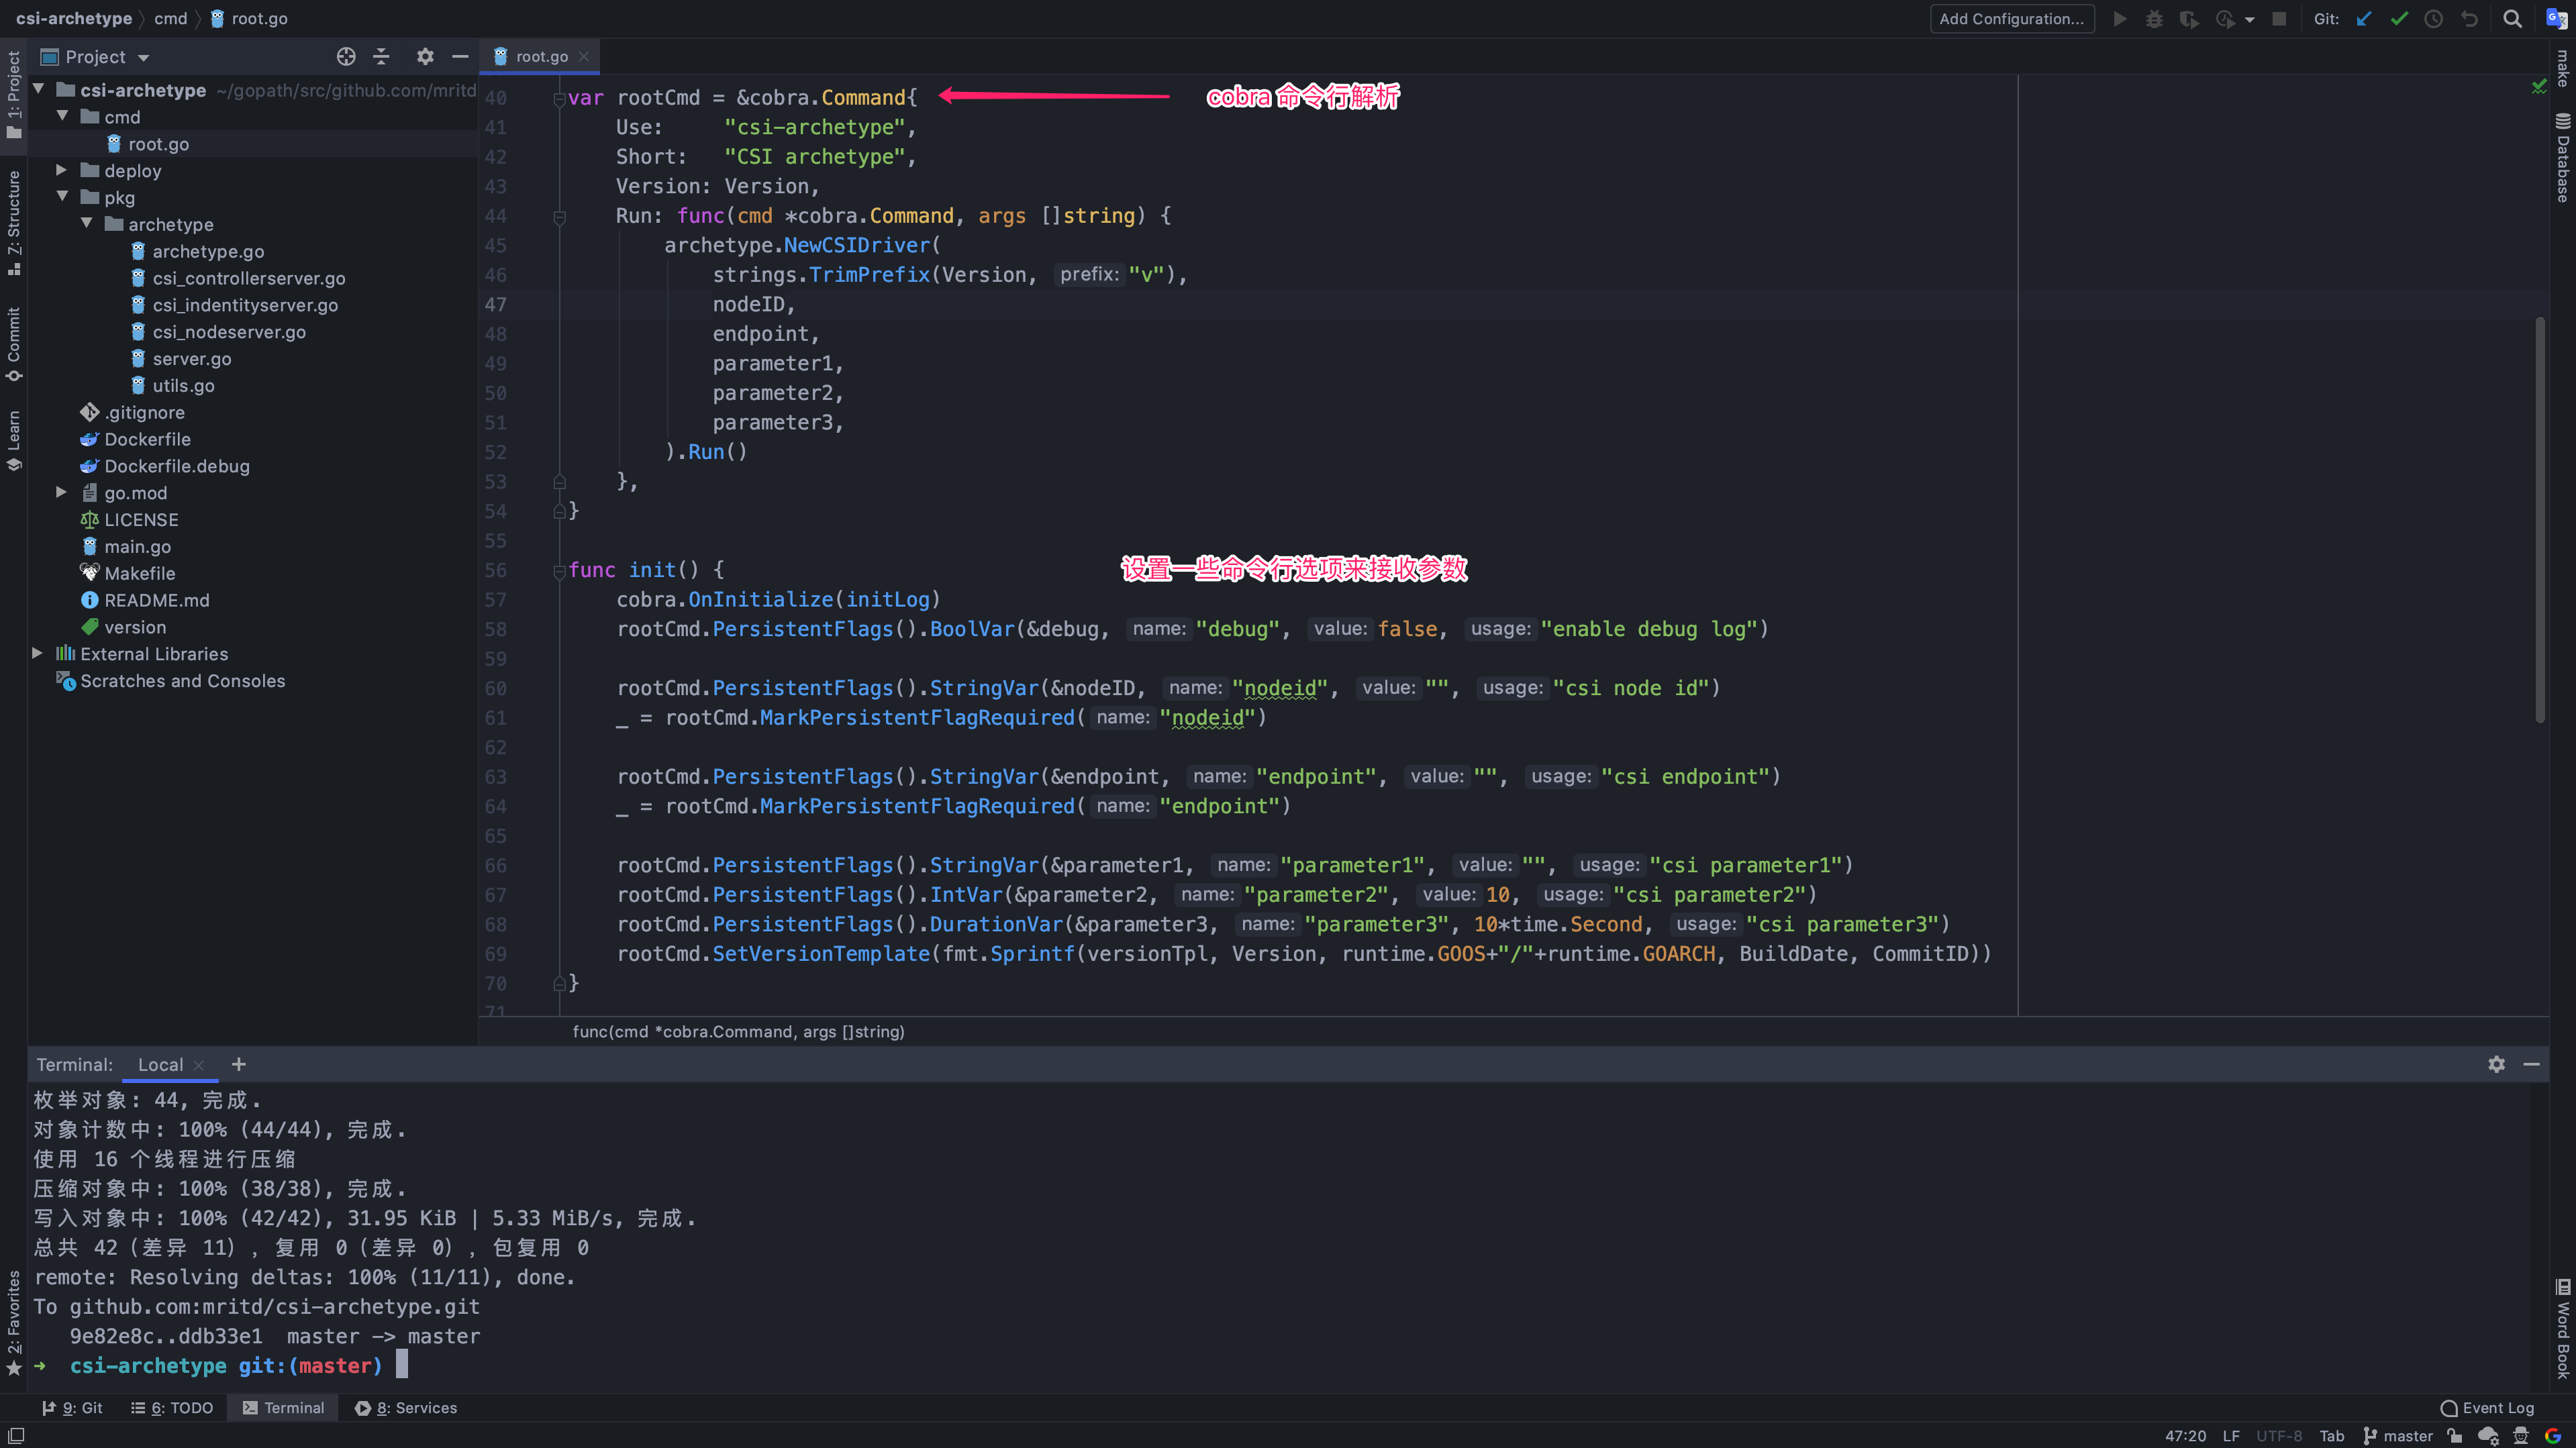
3.2.1、命令行解析
cmd 包下主要代码就是一些命令行解析,方便从外部传入一些参数供 CSI 使用;针对于 NFS CSI 我们需要从外部传入 NFS Server 地址、挂载目录等参数,如果外部存储供应商为其他云存储可能就需要从命令行传入 AccessKey、AccessToken 等参数。
目前 go 原生的命令行解析非常弱鸡,所以更推荐使用 cobra 命令行库完成解析。
3.2.2、Hostpath 结构体
从上面命令行解析的图中可以看到,在完成命令行解析后交由 handle 方法处理;handle 方法很简单,通过命令行拿到的参数创建一个 hostpath 结构体指针,然后 Run 起来就行了,所以接下来要着重看一下这个结构体
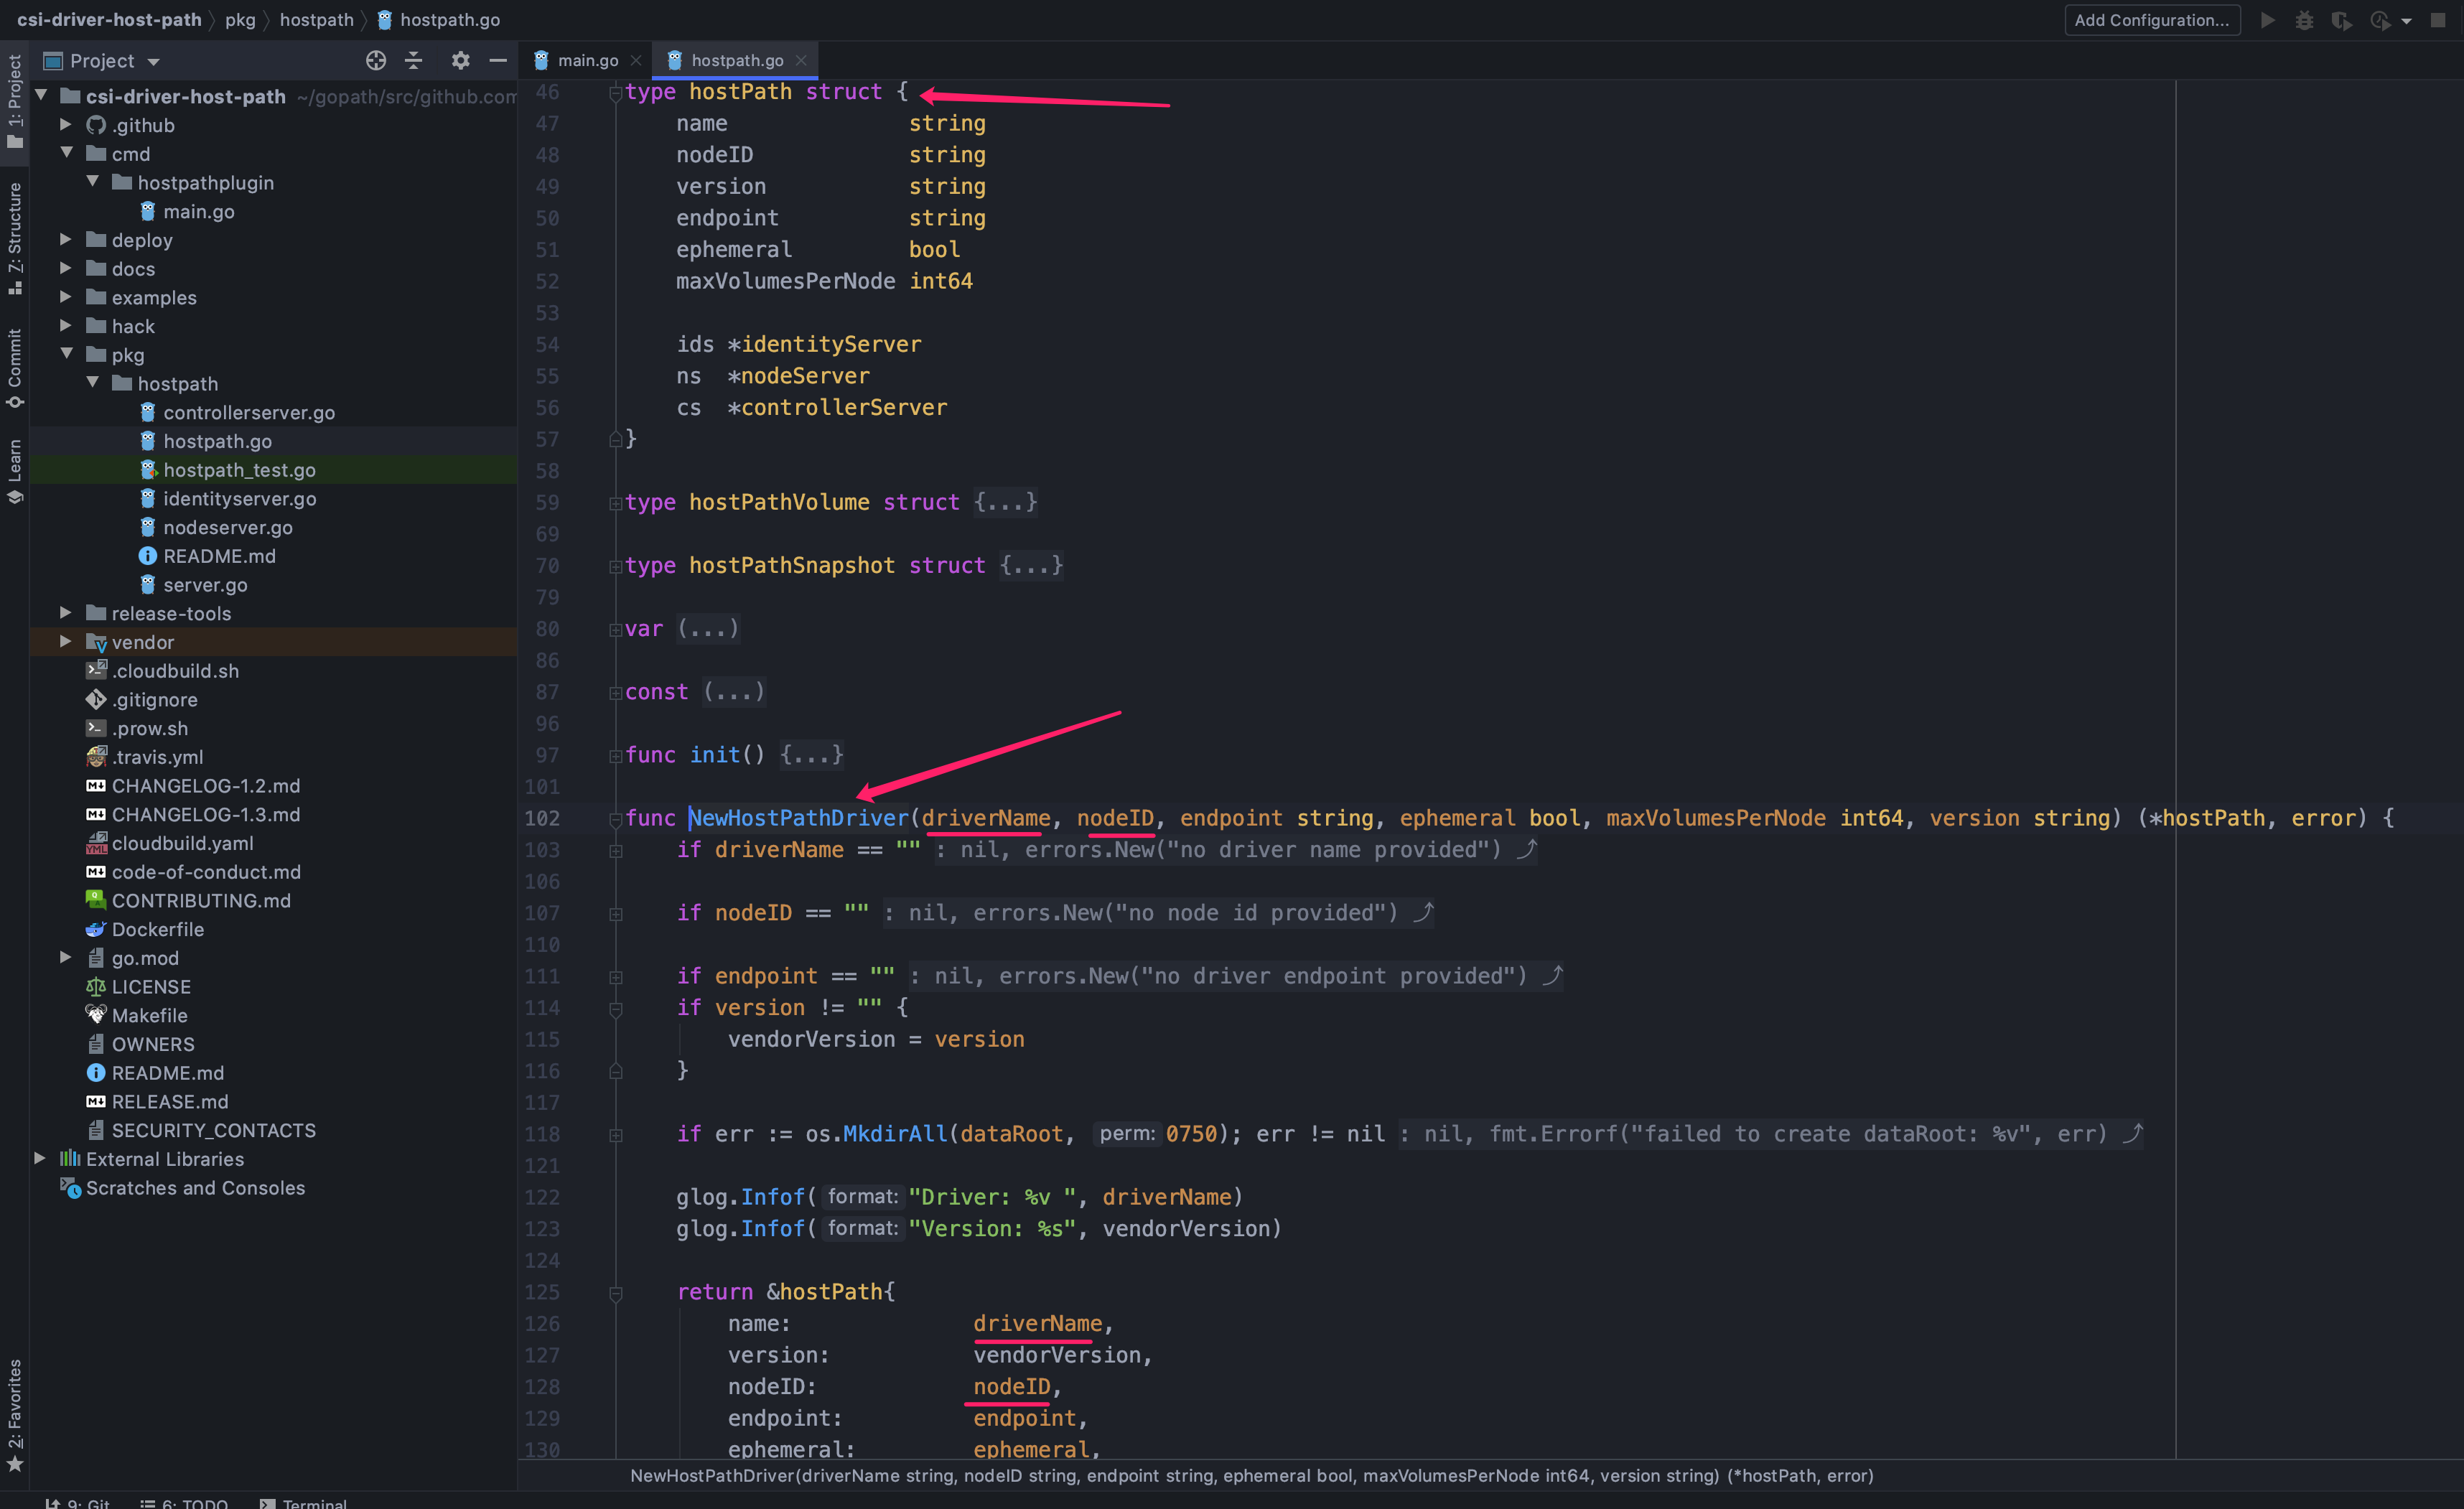
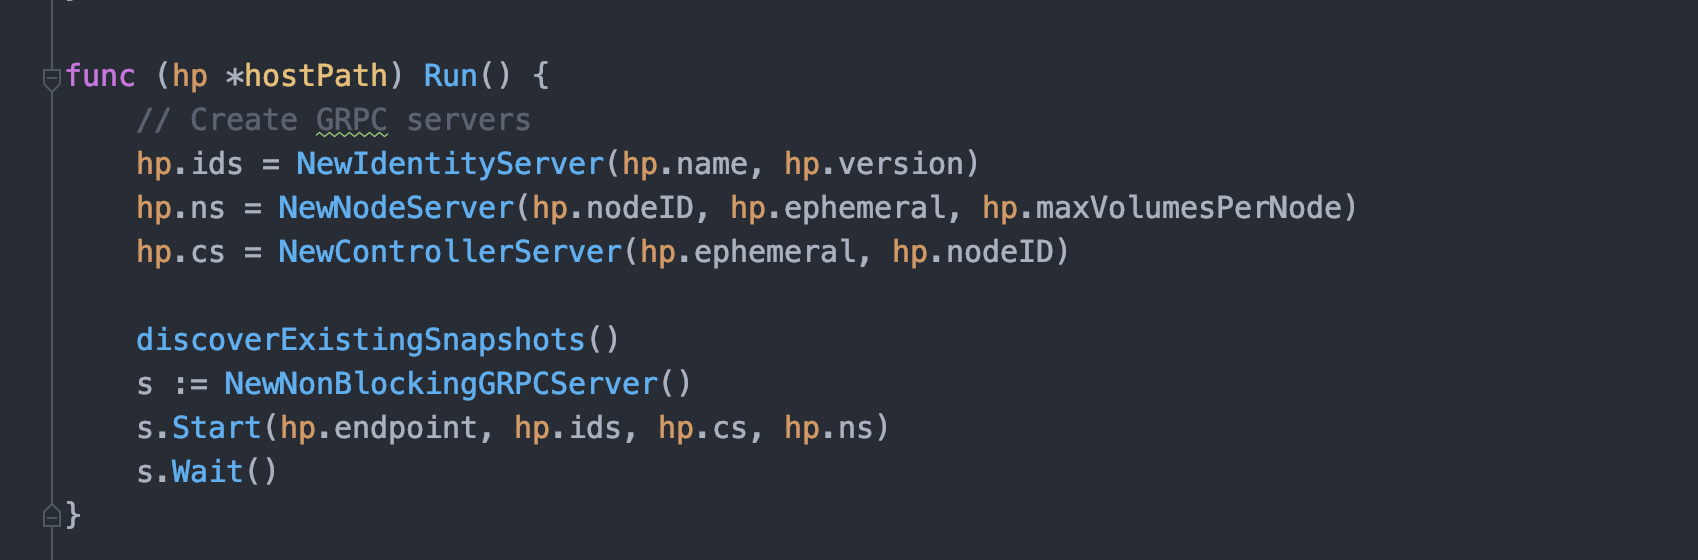
从代码上可以看到,hostpath 结构体内有一系列的字段用来存储命令行传入的特定参数,然后还有三个 gRPC Server 的引用;命令行参数解析完成后通过 NewHostPathDriver 方法设置到 hostpath 结构体内,然后通过调用结构体的 Run 方法创建三个 gRPC Server 并运行
3.2.3、代码分布
经过这么简单的一看,基本上一个最小化的 CSI 代码分布已经可以出来了:
- 首先需要做命令行解析,一般放在
cmd包 - 然后需要一个一般与 CSI 插件名称相同的结构体用来承载参数
- 结构体内持有三个 gRPC Server 引用,并通过适当的方法使用内部参数还初始化这个三个 gRPC Server
- 有了这些 gRPC Server 以后通过
server.go中的NewNonBlockingGRPCServer方法将其启动(这里也可以看出 server.go 里面的方法我们后面可以 copy 直接用)
3.3、创建 CSI 插件骨架
项目骨架已经提交到 Github mritd/csi-archetype 项目,可直接 clone 并使用。
大致的研究完 Hostpath 的 CSI 源码,我们就可以根据其实现细节抽象出一个项目 CSI 骨架:
在这个骨架中我们采用 corba 完成命令行参数解析,同时使用 logrus 作为日志输出库,这两个库都是 Kubernetes 以及 docker 比较常用的库;我们创建了一个叫 archetype 的结构体作为 CSI 的主承载类,这个结构体需要定义一些参数(parameter1…)方便后面初始化相关 gRPC Server 实现相关调用。
1 | |
与 Hostpath CSI 实现相同,我们创建一个 NewCSIDriver 方法来返回 archetype 结构体实例,在 NewCSIDriver 方法中将命令行解析得到的相关参数设置进结构体中并添加一些 AccessModes 和 ServiceCapabilities 方便后面 Identity Server 调用。
1 | |
整个骨架源码树中,命令行解析自己重构使用一些更加方便的命令行解析、日志输出库;结构体部分参考 Hostpath 结构体自己调整,server.go 用来创建 NonBlocking 的 gRPC Server(直接从 Hotspath 样例项目 copy 即可);然后就是三大 gRPC Server 的实现,由于是 “项目骨架” 所以相关方法我们都返回未实现,后续我们主要来实现这些方法就能让自己写的这个 CSI 插件 work。
3.4、创建 NFS CSI 插件骨架
有了 CSI 的项目骨架以后,我们只需要简单地修改名字将其重命名为 NFS CSI 插件即可;由于这篇文章是先实现好了 NFS CSI(已经 work) 再来写的,所以 NFS CSI 的源码可以直接参考 Gozap/csi-nfs 即可,下面的部分主要介绍三大 gRPC Server 的实现
3.5、实现 Identity Server
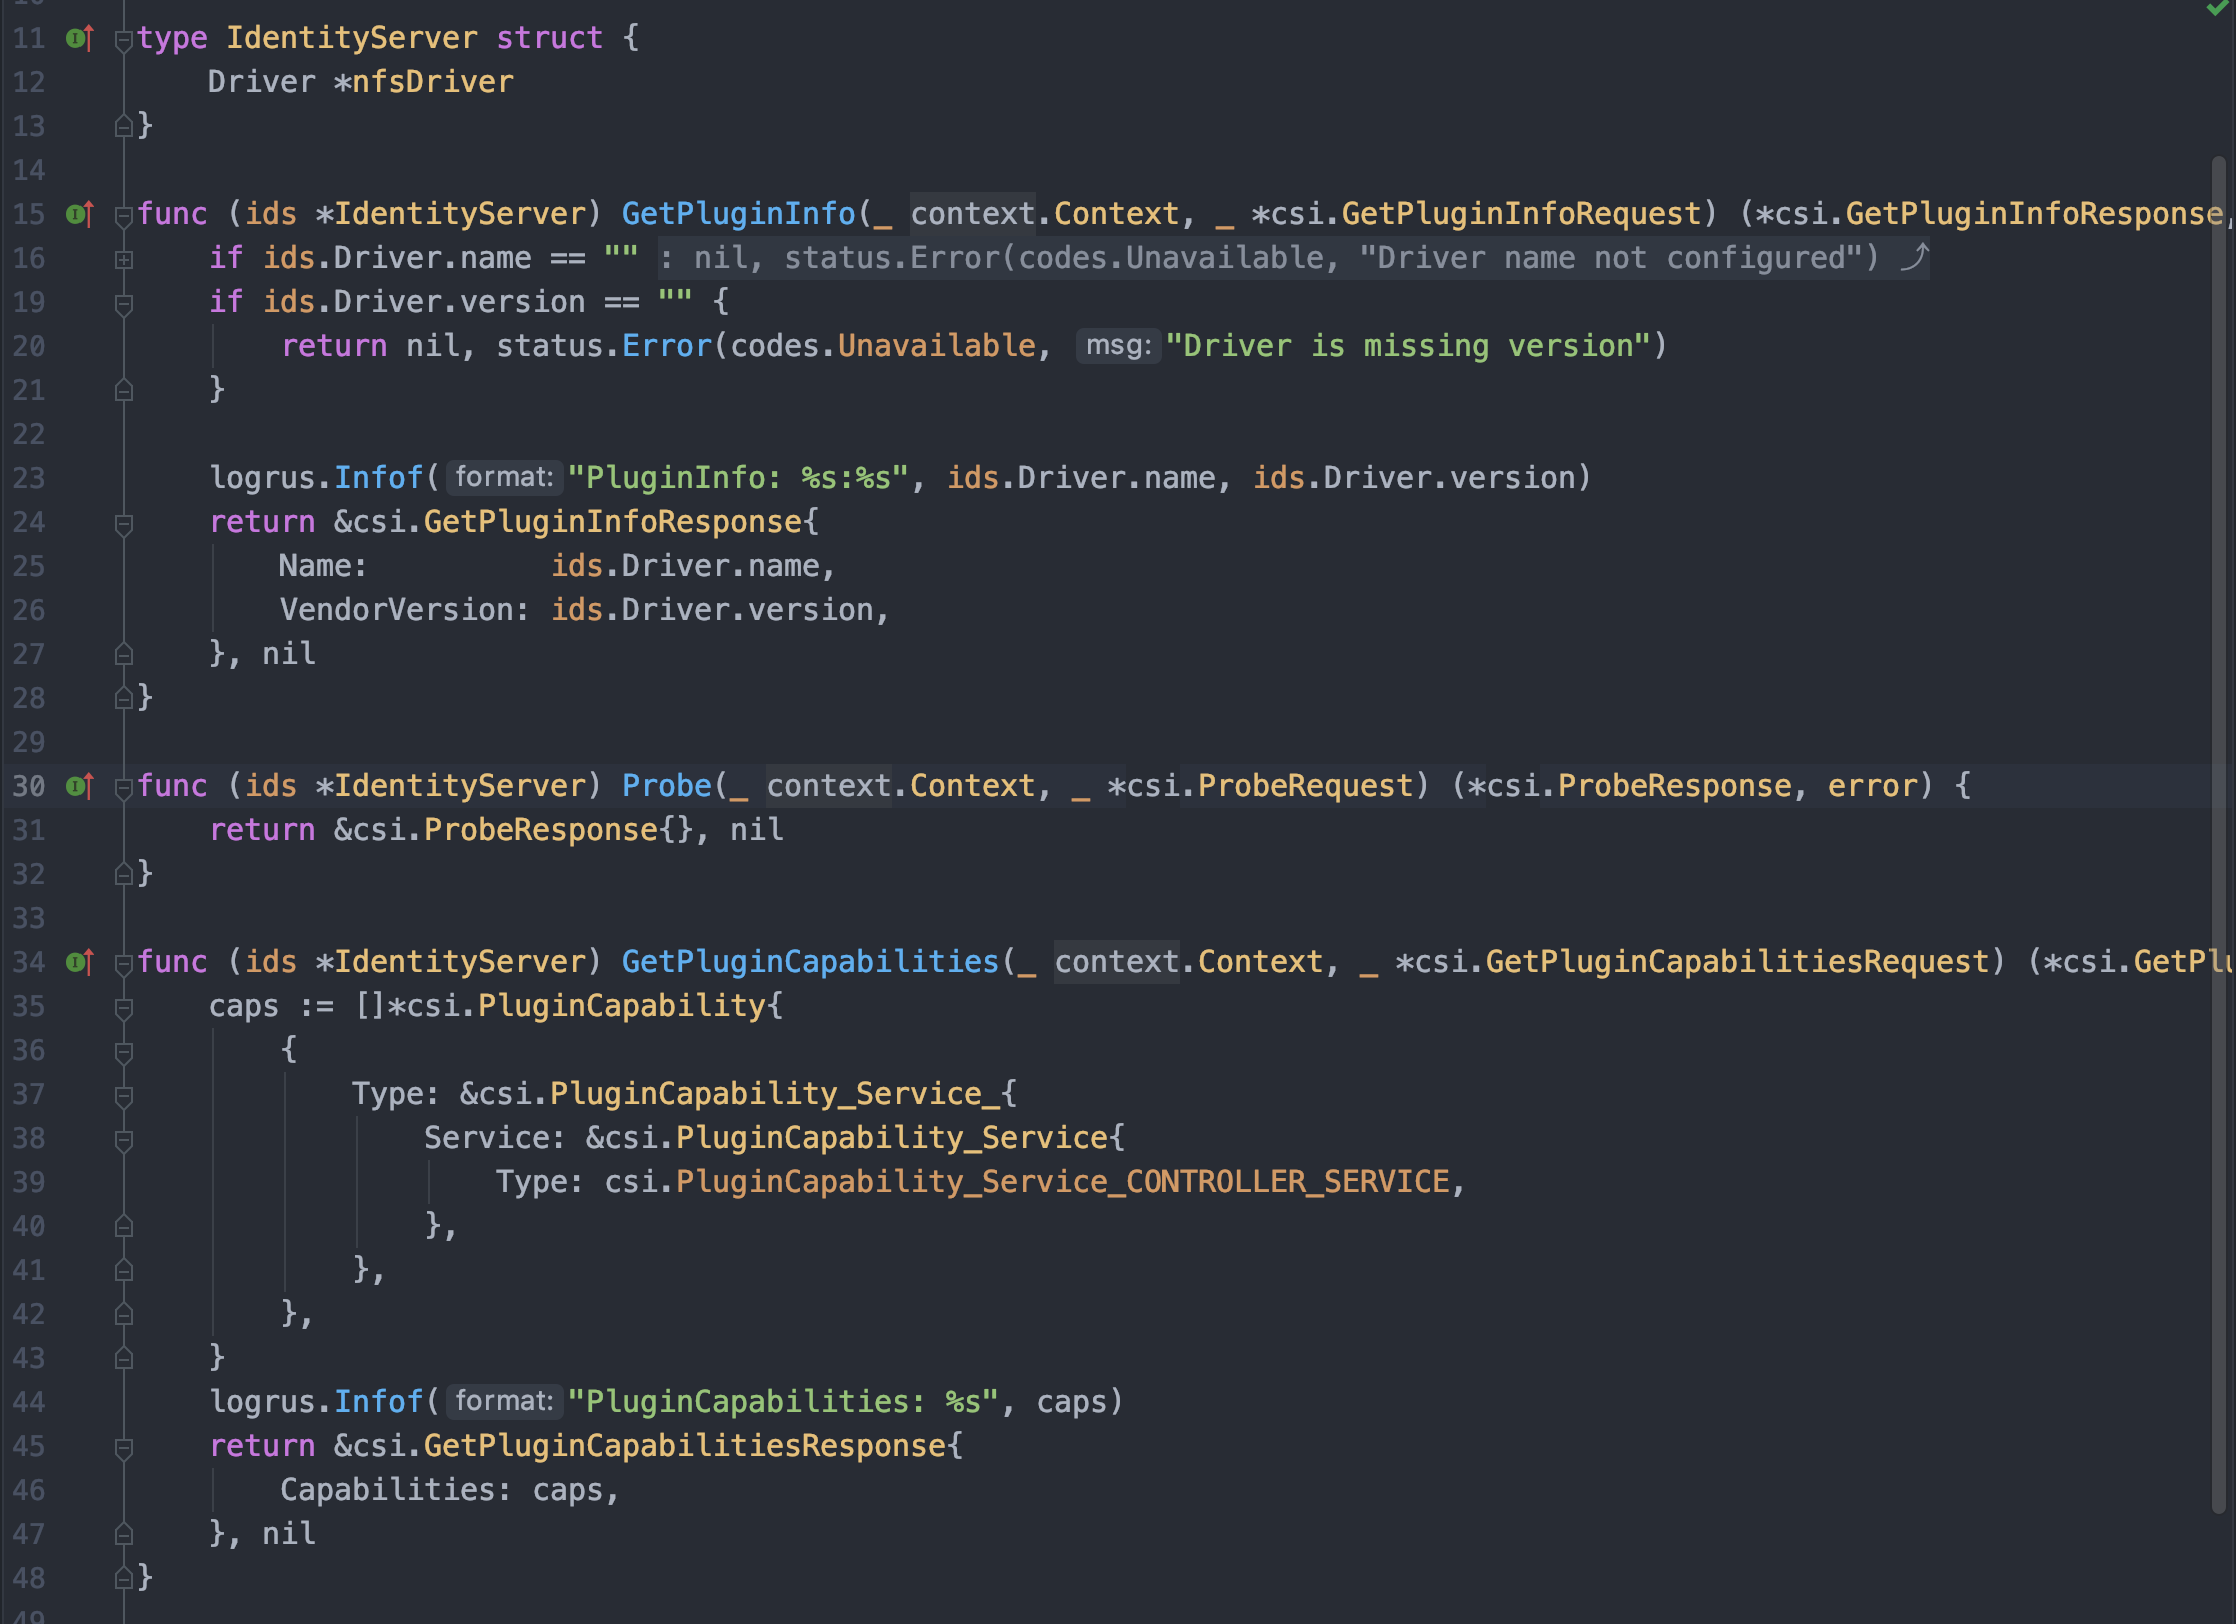
Identity Server 实现相对简单,总共就三个接口;GetPluginInfo 接口返回插件名称版本即可(注意版本号好像只能是 1.1.1 这种,v1.1.1 好像会报错);Probe 接口用来做健康检测可以直接返回空 response 即可,当然最理想的情况应该是做一些业务逻辑判活;GetPluginCapabilities 接口看起来简单但是要清楚返回的 Capabilities 含义,由于我们的 NFS 插件必然需要响应 CreateVolume 等请求(实现 Controller Server),所以 cap 必须给予 PluginCapability_Service_CONTROLLER_SERVICE,除此之外如果节点不支持均匀的创建外部存储供应商的 Volume,那么应当同时返回 PluginCapability_Service_VOLUME_ACCESSIBILITY_CONSTRAINTS 以表示 CSI 处理时需要根据集群拓扑作调整;具体的可以查看 gRPC 注释:
1 | |
3.6、实现 Controller Server
Controller Server 实际上对应着 Provisioning and Deleting 阶段;换句话说核心的创建/删除卷、快照等都应在此做实现,针对于本次编写的 NFS 插件仅做最小实现(创建/删除卷);需要注意的是除了核心的创建删除卷要实现以外还需要实现 ControllerGetCapabilities 方法,该方法返回 Controller Server 的 cap:

ControllerGetCapabilities 返回的实际上是在创建驱动时设置的 cscap:
1 | |
ControllerServiceCapability_RPC_CREATE_DELETE_VOLUME 表示这个 Controller Server 支持创建/删除卷,ControllerServiceCapability_RPC_CREATE_DELETE_SNAPSHOT 表示支持创建/删除快照(快照功能是后来闲的没事加的);应该明确的是我们返回了特定的 cap 那就要针对特定方法做实现,因为你一旦声明了这些 cap Kubernetes 就认为有相应请求可以让你处理(你不能吹完牛逼然后关键时刻掉链子)。针对于可以返回哪些 cscap 可以通过这些 gRPC 常量来查看:
1 | |
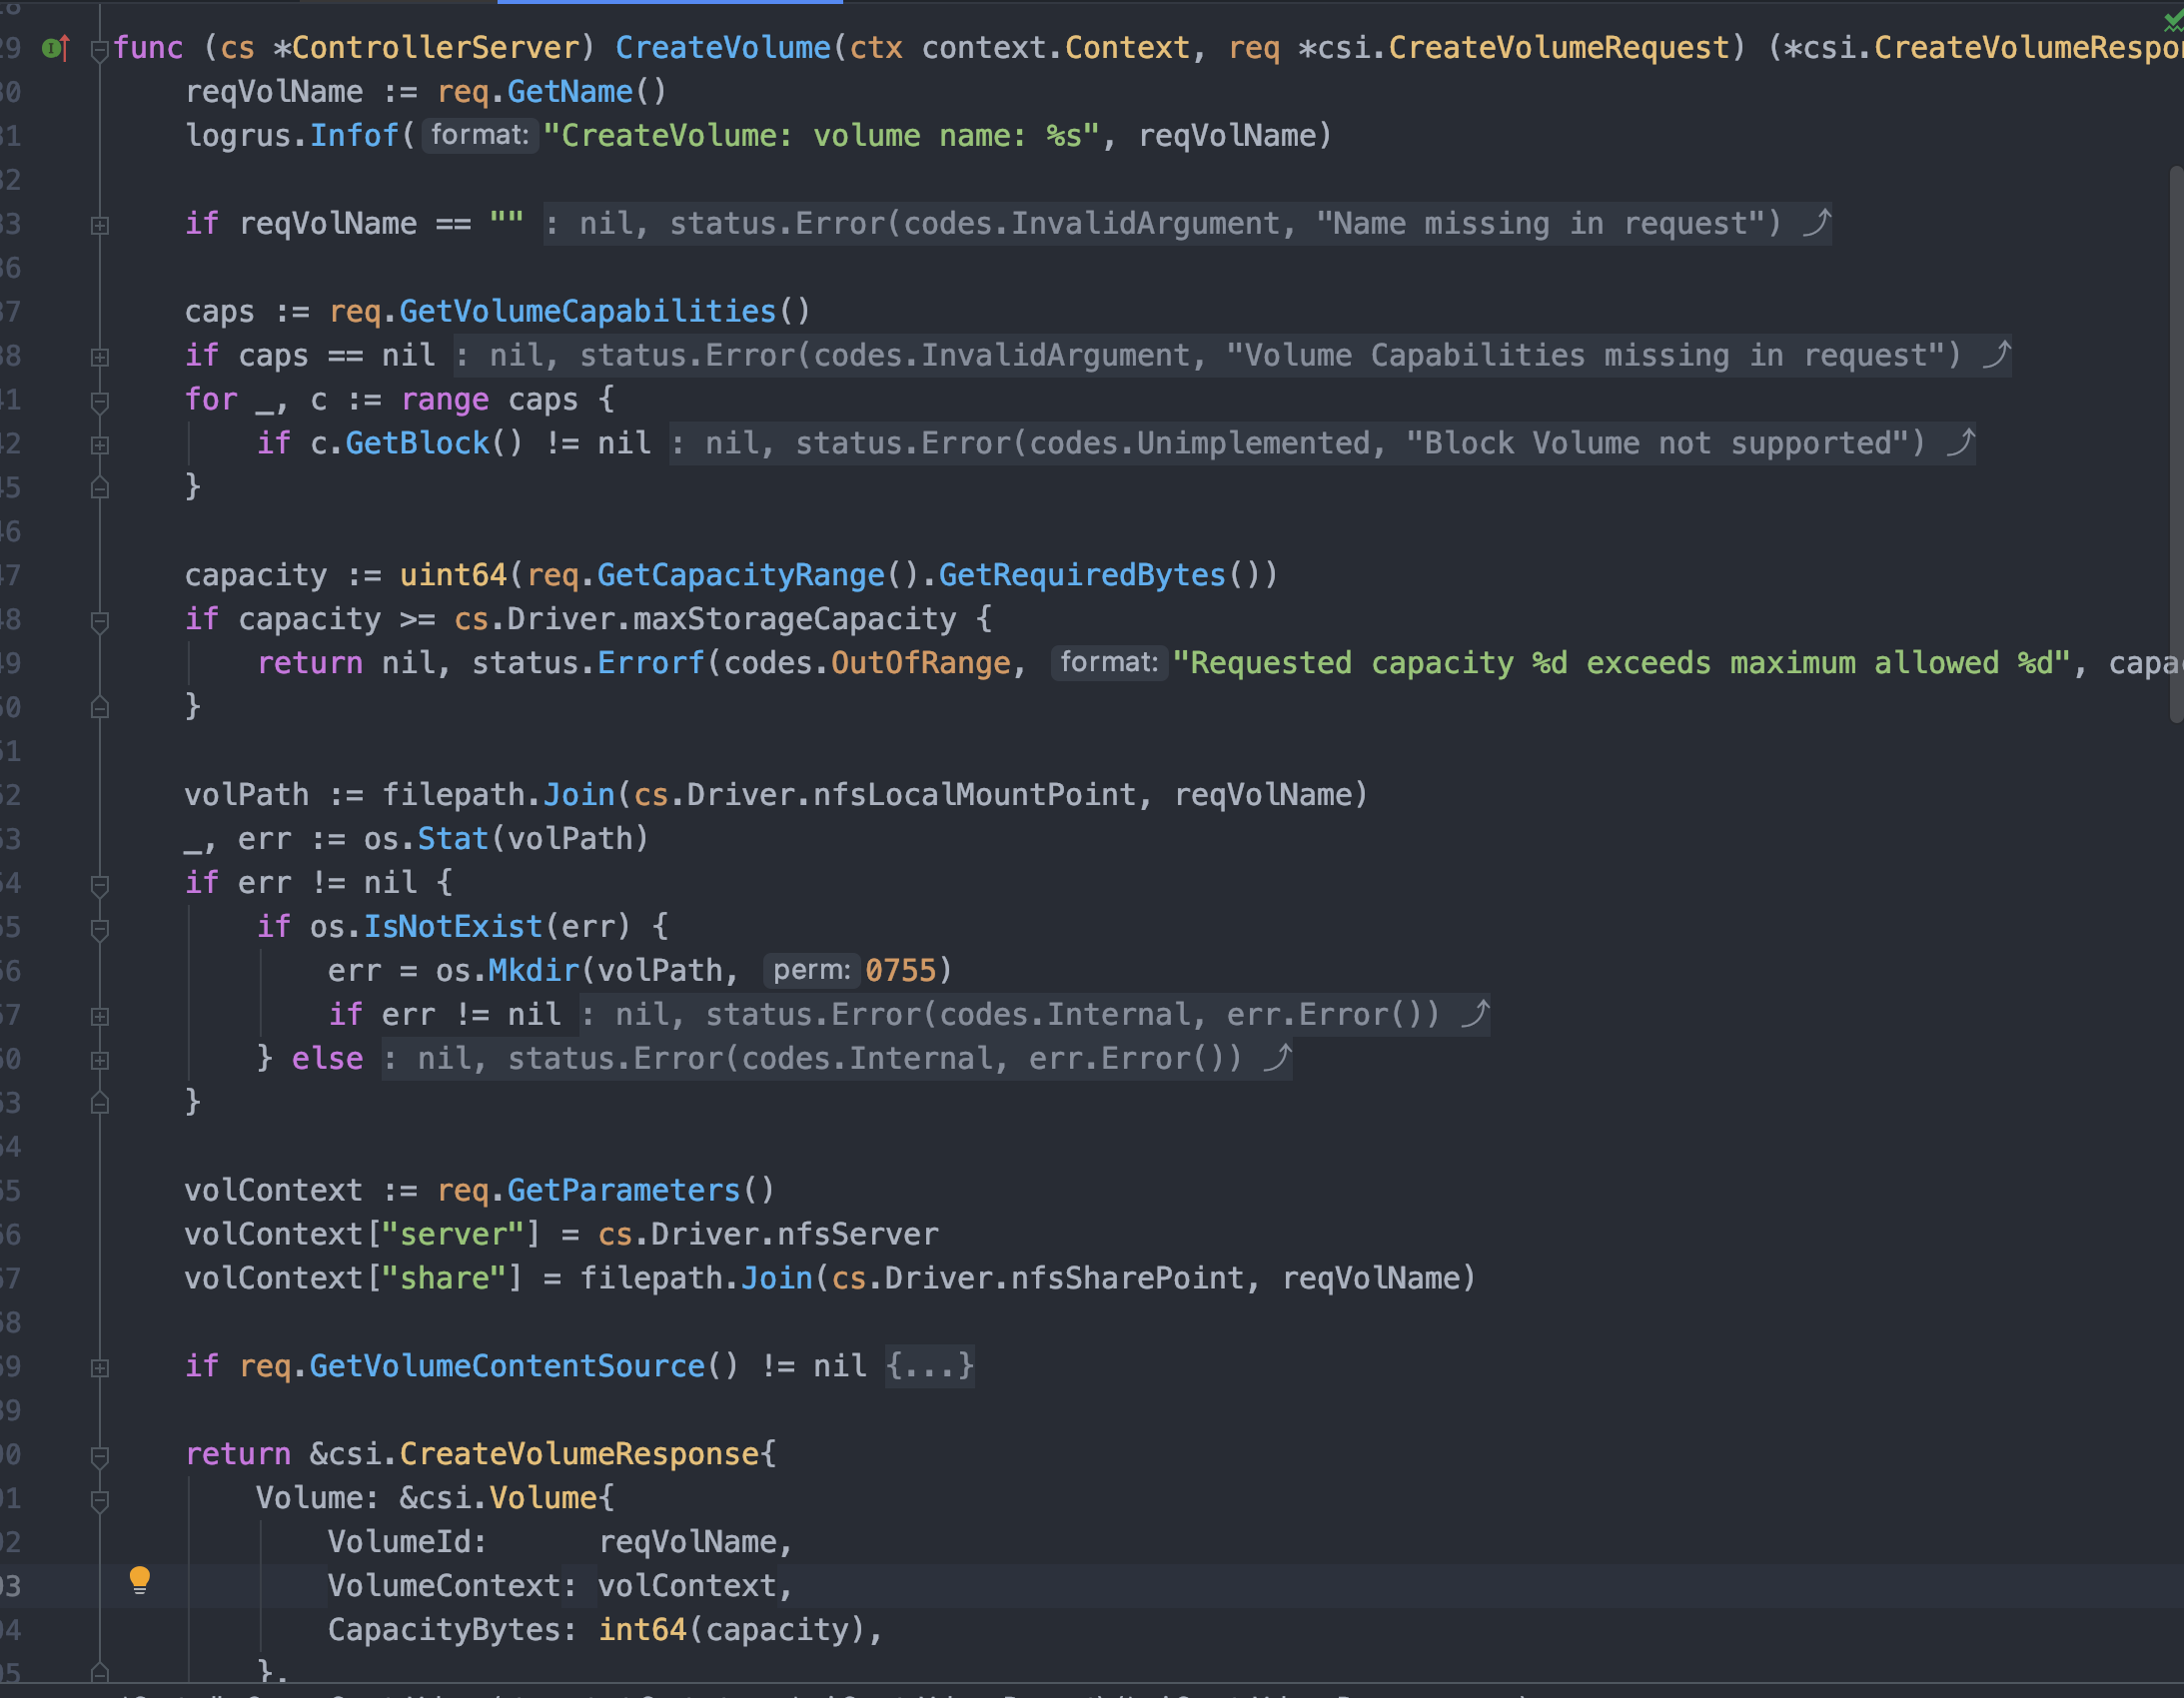
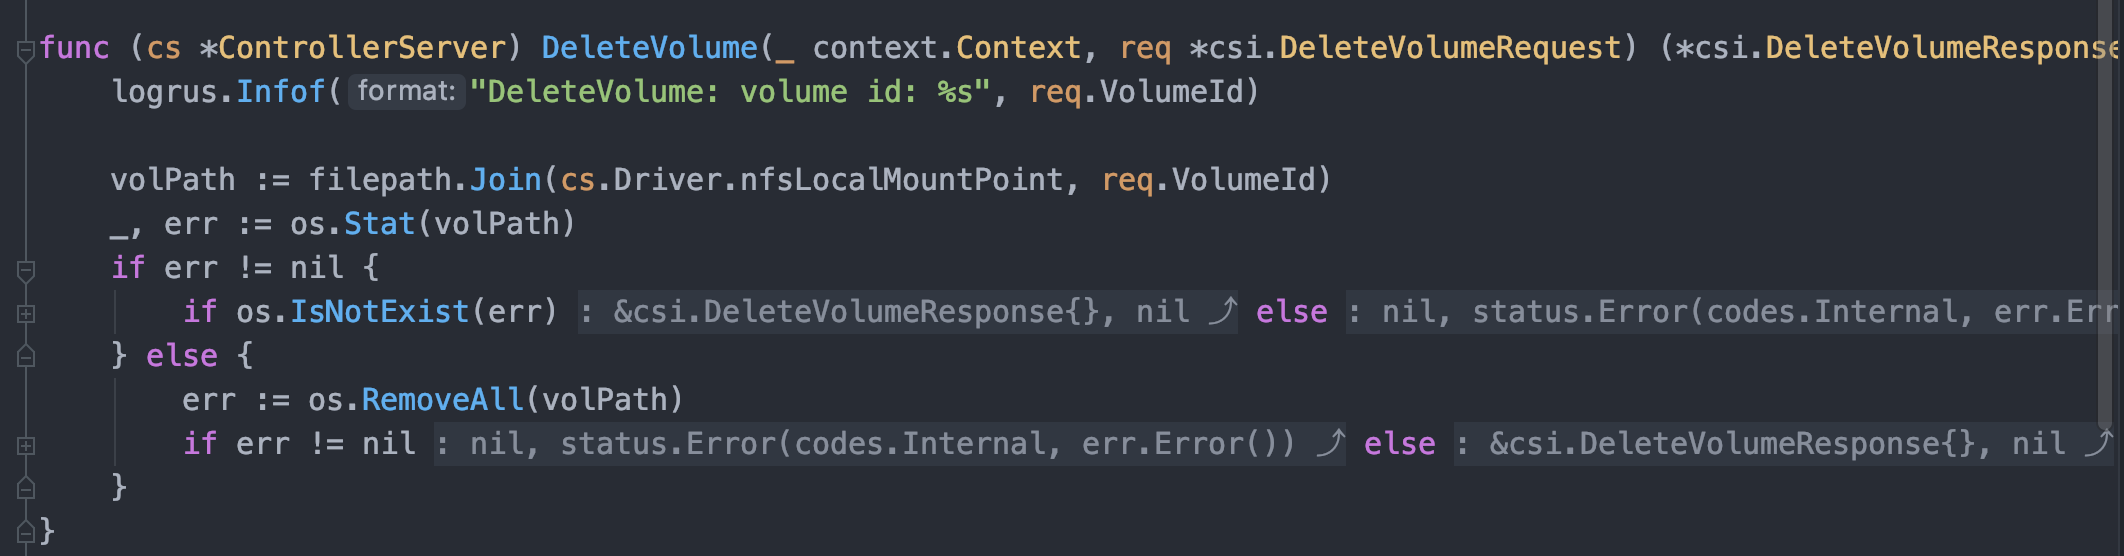
当声明了 ControllerServiceCapability_RPC_CREATE_DELETE_VOLUME 以后针对创建删除卷方法 CreateVolume、DeleteVolume 做实现即可;这两个方法实现就是常规的业务逻辑层面没什么技术含量,对于外部存储供应商是 NFS 来说无非就是接到一个 CreateVolumeRequest ,然后根据 request 给的 volume name 啥的信息自己执行一下在 NFS Server 上 mkdir ,删除卷处理就是反向的 rm -rf dir;在两个方法的处理中可能额外掺杂一些校验等其他的辅助实现。
最后有几点需要注意的地方:
- 幂等性: Kubernetes 可能由于一些其他原因会重复发出请求(比如超时重试),此时一定要保证创建/删除卷实现的幂等性,简单地说 Kubernetes 连续两次调用同一个卷创建 CSI 插件应当实现自动去重过滤,不能调用两次返回两个新卷。
- 数据回写: 要明白的是 Controller Server 是 Provisioning and Deleting 阶段,此时还没有真正挂载到 Pod,所以就本地使用 NFS 作为存储后端来说
mkdir以后要把目录、NFS Server 地址等必要信息通过 VolumeContext 返回给 Kubernetes,Kubernetes 接下来会传递给 Node Driver(Mount/Umount)用。 - 预挂载: 当然这个问题目前只存在在 NFS 作为存储后端中,问题核心在于在创建卷进行
mkdir之前,NFS 应该已经确保 mount 到了 Controller Server 容器本地,所以目前的做法就是启动 Controller Server 时就执行 NFS 挂载;如果用其他的后端存储比如阿里云存储时也要考虑在创建卷之前相关的 API Client 是否可用。
3.7、实现 Node Server
Node Server 实际上就是 Node Driver,简单地说当 Controller Server 完成一个卷的创建,并且已经 Attach 到 Node 以后(当然这里的 NFS 不需要 Attach),Node Server 就需要实现根据给定的信息将卷 Mount 到 Pod 或者从 Pod Umount 掉卷;同样的 Node Server 也许要返回一些信息来告诉 Kubernetes 自己的详细情况,这部份由两个方法完成 NodeGetInfo 和 NodeGetCapabilities
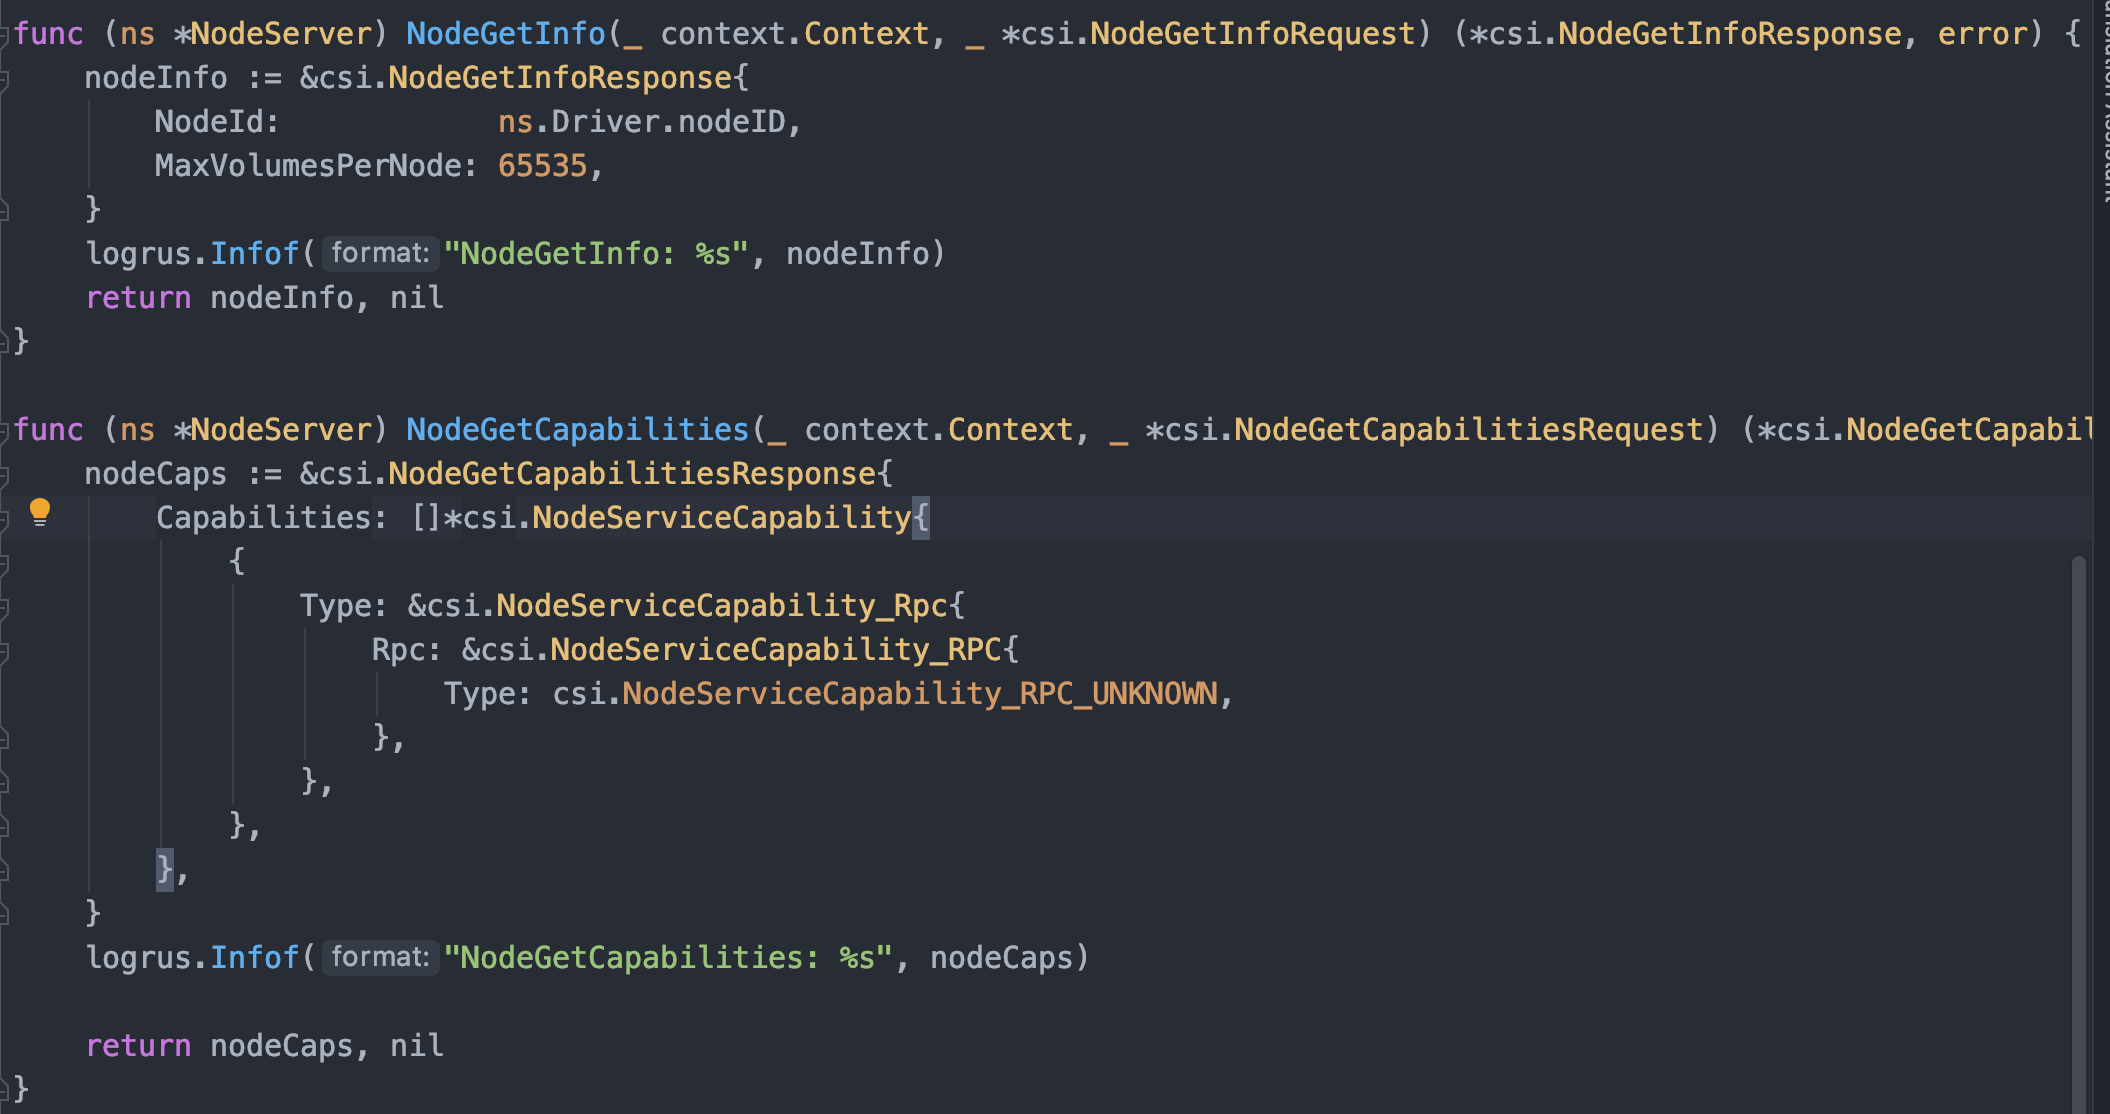
NodeGetInfo 中返回节点的常规信息,比如 Node ID、最大允许的 Volume 数量、集群拓扑信息等;NodeGetCapabilities 返回这个 Node 的 cap,由于我们的 NFS 是真的啥也不支持,所以只好返回 NodeServiceCapability_RPC_UNKNOWN,至于其他的 cap 如下(含义自己看注释):
1 | |
剩下的核心方法 NodePublishVolume 和 NodeUnpublishVolume 挂载/卸载卷同 Controller Server 创建删除卷一样都是业务处理,没啥可说的,按步就班的调用一下 Mount 上就行;唯一需要注意的点就是这里也要保证幂等性,同时由于要操作 Pod 目录,所以要把宿主机的 /var/lib/kubelet/pods 目录挂载到 Node Server 容器里。
3.8、部署测试 NFS 插件
NFS 插件写完以后就可以实体环境做测试了,测试方法不同插件可能并不相同,本 NFS 插件可以直接使用源码项目的 deploy 目录创建相关容器做测试(需要根据自己的 NFS Server 修改一些参数)。针对于如何部署下面做一下简单说明:
三大阶段笼统的其实对应着三个 Sidecar Container:
- Provisioning and Deleting: external-provisioner
- Attaching and Detaching: external-attacher
- Mount and Umount: node-driver-registrar
我们的 NFS CSI 插件不需要 Attach,所以 external-attacher 也不需要部署;external-provisioner 只响应创建删除卷请求,所以通过 Deployment 部署足够多的复本保证 HA 就行;由于 Pod 不一定会落到那个节点上,理论上任意 Node 都可能有 Mount/Umount 行为,所以 node-driver-registrar 要以 Daemonset 方式部署保证每个节点都有一个。
四、其他说明
4.1、前期调试
在前期代码编写时一般都是 “盲狙”,就是按照自己的理解无脑实现,这时候可能离实际部署还很远,但是只是单纯的想知道某个 Request 里面到底是什么个东西,这时候你可以利用 mritd/socket2tcp 容器模拟监听 socket 文件,然后将请求转发到你的 IDE 监听端口上,然后再进行 Debug。
可能有人会问: “我直接在 Sidecar Containers 里写个 tcp 地址不就行了,还转发毛线,这不是脱裤子放屁多此一举么?”,但是这里我友情提醒一下,Sidecar Containers 指定 CSI 地址时填写非 socket 类型的地址是不好使的,会直接启动失败。
4.2、后期调试
等到代码编写到后期其实就开始 “真机” 调试了,这时候其实不必使用原始的打日志调试方法,NFS CSI 的项目源码中的 Dockerfile.debug 提供了使用 dlv 做远程调试的样例;具体怎么配合 IDE 做远程调试请自行 Google。
4.3、其他功能实现
其他功能根据需要可以自己酌情实现,比如创建/删除快照功能;对于 NFS 插件来说 NFS Server 又没有 API,所以最简单最 low 的办法当然是 tar -zcvf 了(哈哈哈(超大声)),当然性能么就不要提了。
五、总结
CSI 开发其实是针对 Kubernetes CSI Sidecar Containers 的 gRPC 开发,根据自己需求实现三大阶段中对应三大 gRPC Server 相应方法即可;相关功能要保证幂等性,cap 要看文档根据实际情况返回。