Nexus 2.11 CentOS搭建教程

Nexus Logo

一、简介

Nexus是一个高效的Maven私有服务器,用过Maven的都知道,一般公司开发都会搭建一个私服;然后项目中通过POM文件或者Maven的setting.xml指向私服地址,这样我们便可以通过私服管理jar包;可自定义jar包坐标,高效的构建项目。

二、前期准备

  1. 首先,你得有台能连接公网的CentOS系统服务器(可使用虚拟机,但网络必须桥接,保证内网独立IP)。
  2. 然后下载jdk和 nexus Nexus下载地址
  3. 注意事项:Nexus 有其对应的 jdk版本,请参考官网,截至目前最高版本2.11.4-01 需要jdk7

三、搭建Nexus私服

啰嗦一句,由于也是刚刚开始搞,以前虽然搞过,但版本比较低,配置已经变了;还有刚刚被一篇博客坑了;算了,不说了,都是眼泪,喝瓶养乐多压压惊……

  1. 配置jdk和nexus环境变量
  • 首先上传jdk到Linux服务器(nexus顺带也传上去),推荐xshell工具,先执行 yum install lrzsz ,然后把jdk往命令行一拖就上传成功,当然你有其他办法我也不阻止,反正搞上去就行。
    Maven-Nexus-uploadfileo

  • 解压 jdk 和 nexus 执行以下命令

1
2
3
4
#解压 jdk
tar -zxvf jdk-7u79-linux-x64.tar.gz
#解压 nexus
tar -zxvf nexus-latest-bundle.tar.gz
  • 解压后如下
    Maven-Nexus-unzipfile1

  • 创建 并移动 解压后的目录到 /usr/local/java

    1
    2
    3
    4
    5
    6
    cd /usr/local
    mkdir java
    cd ~
    mv jdk1.7.0_79 /usr/local/java
    mv nexus-2.11.4-01 /usr/loca/java
    mv sonatype-work /usr/local/java
  • 最终效果如下
    Maven-Nexus-mvfile

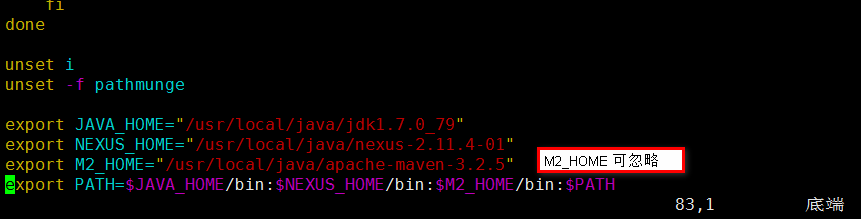
  • 编辑 /etc/profile,配置环境变量,在末尾添加以下 变量(vim不会用的下面不用看了)
    Maven-Nexus-path

  • 执行以下命令重新初始化环境变量,并测试是否成功

1
2
source /etc/profile
javac -version
  • 返回 javac 版本未成功,若出现 “command not found” 说明配置不成功,检查环境变量位置。
  1. 配置nexus

上面的估计玩过Linux的基本都能轻松搞定,说白了Nexus主要是下面的配置

  • 配置nexus启动文件

编辑 /usr/local/java/nexus-2.11.4-01/bin 下的 nexus 可执行文件,主要配置部分样例如下

1
2
3
4
5
6
7
8
9
10
11
12
13
14
15
16
17
18
19
20
21
22
23
24
25
26
27
28
29
30
31
32
33
34
35
36
37
38
39
#-----------------------------------------------------------------------------
# These settings can be modified to fit the needs of your application

# Set this to the root of the Nexus installation
# 设置 nexus 主目录,就是解压后的那个 nexus目录绝对路径
NEXUS_HOME="/usr/local/java/nexus-2.11.4-01"

# If specified, the Wrapper will be run as the specified user.

# IMPORTANT - Make sure that the user has the required privileges to write into the Nexus installation directory.

# NOTE - This will set the user which is used to run the Wrapper as well as
# the JVM and is not useful in situations where a privileged resource or
# port needs to be allocated prior to the user being changed.
# nexus官方不推荐以root 用户运行,如果你非要这么做,下面注释去掉 后面填写root
#RUN_AS_USER=

# Application
APP_NAME="nexus"
APP_LONG_NAME="Nexus OSS"

# Priority at which to run the wrapper. See "man nice" for valid priorities.
# nice is only used if a priority is specified.
# 这块我查了一下 好像是设置运行优先级,默认10,没太搞懂,可不填
PRIORITY=

#Location of the pid file.
# nexus pid 文件存放位置 不用改
PIDDIR="."

# If uncommented, causes the Wrapper to be shutdown using an anchor file.
# When launched with the 'start' command, it will also ignore all INT and
# TERM signals.
#IGNORE_SIGNALS=true

# The following two lines are used by the chkconfig command. Change as is
# appropriate for your application. They should remain commented.
# chkconfig: 2345 20 80
# description: Test Wrapper Sample Application
  • 配置 /usr/local/java/nexus-2.11.4-01/bin/jsw/conf 下的 wrapper.conf 文件

妈蛋,最坑的就是这货,配置样例如下

1
2
3
4
5
6
7
8
9
10
11
12
13
14
15
16
17
18
19
20
21
22
23
24
25
26
27
28
29
30
31
32
33
34
35
36
37
38
39
40
41
42
43
44
45
46
47
48
49
50
51
52
53
54
55
# JSW Configuration file
#
# For complete coverage of available configuration, please go here:
# http://wrapper.tanukisoftware.org/doc/english/properties.html
#
# Some "most often used" keywords are added to end of this file
# to be used as a "guideline". They are NOT the complete list of
# keywords.

# Set the JSW working directory (used as base for resolving relative paths)
# 设置wrapper的工作目录 其实也是指向 nexus 主目录即可
# 妈蛋的地址我就不说了,刚刚一个博主告诉我把他指向 /usr/local/java/nexus-2.11.4-01/bin/jsw/linux-x86-64
# 我进去一看 里面确实有个wrapper 可执行文件,就特么信了,结果各种报错
# 不凑巧,我特么居然还看懂了,就是找不到java类,然后我就根据错误各种改底下配置的绝对路径
# 改了半天我特么感觉不对啊...怎么其实都是基于默认值往上 跳了几层,妈的瞬间领悟...
wrapper.working.dir=/usr/local/java/nexus-2.11.4-01

# Set the JVM executable
# (modify this to absolute path if you need a Java that is not on the OS path)
# 配置 jdk中 java 可执行文件的位置(其实我感觉jre就可以,没测试,有兴趣的测试一下)
wrapper.java.command=/usr/local/java/jdk1.7.0_79/bin/java

# The main class that JSW will execute within JVM
# 这货不要动,目测这个玩意应该在下面的 wrapper-3.2.3.jar 里面
wrapper.java.mainclass=org.sonatype.nexus.bootstrap.jsw.JswLauncher

# The JVM classpath
# 如果你上面的 wrapper.working.dir 没问题这块就没问题...再次吐槽,坑爹博主,害得我第一次把这都改成绝对路径了
wrapper.java.classpath.1=bin/jsw/lib/wrapper-3.2.3.jar
wrapper.java.classpath.2=./lib/*.jar
wrapper.java.classpath.3=./conf/

# The library path
# 不需要动,一些依赖jar包 下面有路径配置的,默认值其实都是基于 wrapper.working.dir 的
# 也就是说一但你 wrapper.working.dir 错了,其他的就都得改
wrapper.java.library.path.1=bin/jsw/lib

# Additional JVM parameters (tune if needed, but match the sequence of numbers!)
# 一些 jvm 参数,默认即可,能玩明白的 可以自己调优啥的,下面的有能力可以设置一下,
# 搞不定的 就不用往下看了......
wrapper.java.additional.1=-XX:MaxPermSize=192m
wrapper.java.additional.2=-Djava.io.tmpdir=./tmp
wrapper.java.additional.3=-Djava.net.preferIPv4Stack=true
wrapper.java.additional.4=-Dcom.sun.jndi.ldap.connect.pool.protocol="plain ssl"
wrapper.java.additional.4.stripquotes=TRUE
#wrapper.java.additional.5=-Xdebug
#wrapper.java.additional.6=-Xnoagent
#wrapper.java.additional.7=-Djava.compiler=NONE
#wrapper.java.additional.8=-Xrunjdwp:transport=dt_socket,server=y,suspend=y,address=8000
#wrapper.java.additional.9=-XX:+HeapDumpOnOutOfMemoryError

wrapper.app.parameter.1=./conf/jetty.xml
wrapper.app.parameter.2=./conf/jetty-requestlog.xml

#下面的都无需更改,暂且省略......
  • 创建 nexus 用户

nexus 不推荐以root用户运行,所以我们创建一个 nexus 用户,安全性要求高的可以控制其是否可登录什么的,我这里只是自己玩玩,so 允许登录。

1
2
3
useradd nexus
passwd nexus
#输入2次密码
  1. 启动nexus

首先切换到 nexus 用户,然后启动nexus

1
2
3
su - nexus
# 由于配置了PATH变量,所以可在任意位置执行 nexus命令
nexus start
  • 查看是否启动成功&监测日志

访问 ip:8081/nexus ;启动成功的话会进入如下界面

Maven-Nexus-home-1024x436

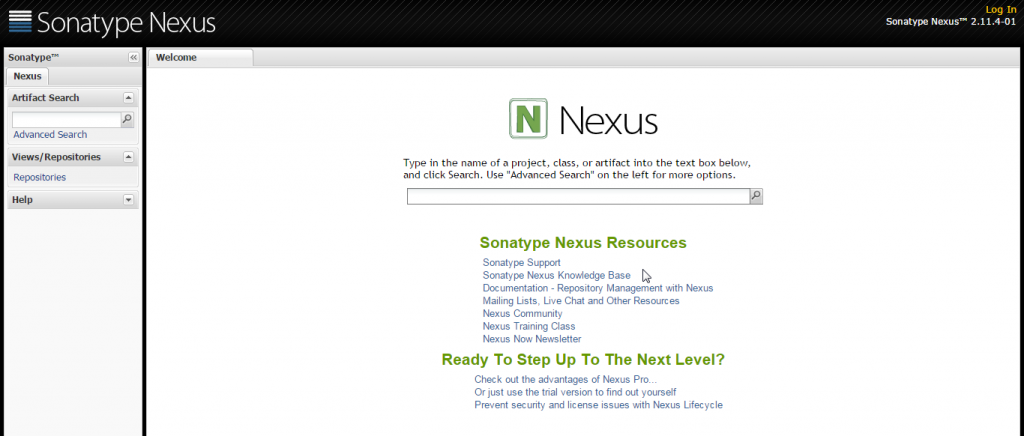
默认登陆账户密码为 admin/admin123 ;如启动不成功可查看日志

1
less /usr/local/java/nexus-2.11.4-01/logs/wrapper.log

到此结束,关于仓库使用啥的不管了…


Nexus 2.11 CentOS搭建教程
https://mritd.com/2015/12/29/set-up-nexus-on-centos/
作者
Kovacs
发布于
2015年12月29日
许可协议