一、Spring Hello World
1、新建 Mavne java 项目,POM 加入Spring Context
1 2 3 4 5 <dependency > <groupId > org.springframework</groupId > <artifactId > spring-context</artifactId > <version > 4.2.4.RELEASE</version > </dependency >
1
2
3
4
5
6
7
8
9
10
11
12
13
14
15
16
17
18
19
20
21
22
23
24
25
26
27
28
29
30
31
32
33
34
35
36
37
38
39
package me.mritd.beans;public class Persion {private String name;private int age;private String address;public String getName () {return name;public void setName (String name) {this .name = name;public int getAge () {return age;public void setAge (int age) {this .age = age;public String getAddress () {return address;public void setAddress (String address) {this .address = address;@Override public String toString () {return "Persion [name=" + name + ", age=" + age + ", address=" + address + "]" ;public Persion () {super ();public Persion (String name, int age, String address) {super ();this .name = name;this .age = age;this .address = address;
3、创建 Spring 配置文件 applicationContext.xml,并配置 Bean 信息
1
2
3
4
5
6
7
8
9
10
11
<?xml version="1.0" encoding="UTF-8" ?> <beans xmlns ="http://www.springframework.org/schema/beans" xmlns:xsi ="http://www.w3.org/2001/XMLSchema-instance" xsi:schemaLocation ="http://www.springframework.org/schema/beans http://www.springframework.org/schema/beans/spring-beans.xsd" > <bean id ="persion" name ="persion" class ="me.mritd.beans.Persion" > <property name ="name" value ="Hello World" > </property > <property name ="age" value ="20" > </property > <property name ="address" value ="伊拉克" > </property > </bean > </beans >
4、编写测试类测试 从Spring上下文获取一个Bean
1
2
3
4
5
6
7
8
9
10
11
12
13
14
15
16
17
18
19
20
21
22
23
24
25
26
27
28
29
package me.mritd.test;import org.junit.Test;import org.springframework.context.ApplicationContext;import org.springframework.context.support.ClassPathXmlApplicationContext;import me.mritd.beans.Persion;public class Test1 {@Test public void testHelloWorld () {ApplicationContext applicationContext = new ClassPathXmlApplicationContext ("applicationContext.xml" );Persion persion = (Persion) applicationContext.getBean("persion" );
二、Spring Bean配置
IOC(Inversion of Control):其思想是反转资源获取的方向.传统的资源查找方式要求组件向容器发起请求查找资源. 作为回应, 容器适时的返回资源. 而应用了 IOC 之后,则是容器主动地将资源推送给它所管理的组件,组件所要做的仅是选择一种合适的方式来接受资源. 这种行为也被称为查找的被动形式 DI(Dependency Injection) - IOC 的另一种表述方式:即组件以一些预先定义好的方式(例如: setter 方法)接受来自如容器的资源注入. 相对于 IOC 而言,这种表述更直接。
Spring通过在xml配置文件中的 <bean> 节点来配置放入IOC容器中的bean;
1 2 3 4 5 <bean id ="persion" name ="persion" class ="me.mritd.beans.Persion" > <property name ="name" value ="Hello World" > </property > <property name ="age" value ="20" > </property > <property name ="address" value ="伊拉克" > </property > </bean >
id: IOC容器中Bean的ID
在 IOC 容器中必须是唯一的
若 id 没有指定,Spring 自动 将全限定性类名 作为 Bean 的名字
id 可以指定多个名字,名字之间可用逗号、分号、或空格分隔
在 Spring IOC 容器读取 Bean 配置创建 Bean 实例之前,必须对它进行实例化. 只有在容器实例化后, 才可以从 IOC 容器里获取 Bean 实例并使用;Spring 提供了 两种类型 的 IOC 容器实现:
BeanFactory: IOC 容器的基本实现.
ApplicationContext: 提供了更多的高级特性. 是 BeanFactory 的子接口.
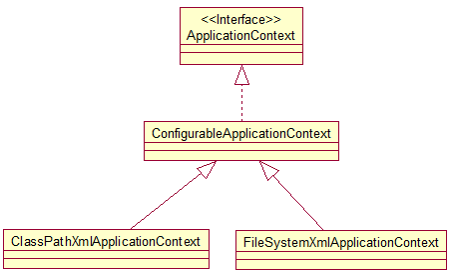
BeanFactory 是 Spring 框架的基础设施,面向 Spring 本身;ApplicationContext 面向使用 Spring 框架的开发者,几乎所有的应用场合都直接使用 ApplicationContext 而非底层的 BeanFactory;无论使用何种方式,配置文件时相同的. ApplicationContext UML 图示例如下
ApplicationContext 的主要实现类:
ClassPathXmlApplicationContext:从 类路径下加载配置文件
FileSystemXmlApplicationContext: 从文件系统中加载配置文件
ConfigurableApplicationContext 扩展于 ApplicationContext,新增加两个主要方法:refresh() 和 close(), 让 ApplicationContext 具有启动、刷新和关闭上下文的能力
ApplicationContext 在初始化上下文时就实例化所有单例的 Bean
WebApplicationContext 是专门为 WEB 应用而准备的,它允许从相对于 WEB 根目录的路径中完成初始化工作
首先定义两个 Java Bean
1 2 3 4 5 6 7 8 9 10 11 12 13 14 15 16 17 18 19 20 21 22 23 24 25 26 27 28 29 30 31 32 33 34 35 36 37 package me.mritd.beans;public class Car {private String carName;public String getCarName () {return carName;public void setCarName (String carName) {this .carName = carName;@Override public String toString () {return "Car [carName=" + carName + "]" ;public Car () {super ();public Car (String carName) {super ();this .carName = carName;
1 2 3 4 5 6 7 8 9 10 11 12 13 14 15 16 17 18 19 20 21 22 23 24 25 26 27 28 29 30 31 32 33 34 35 36 37 38 39 40 41 42 43 44 45 46 47 48 49 50 51 52 53 54 55 package me.mritd.beans;public class Persion {private String name;private int age;private String address;private Car car;@Override public String toString () {return "Persion [name=" + name + ", age=" + age + ", address=" + address + ", car=" + car + "]" ;public Persion () {super ();public Persion (String name, int age, String address, Car car) {super ();this .name = name;this .age = age;this .address = address;this .car = car;public String getName () {return name;public void setName (String name) {this .name = name;public int getAge () {return age;public void setAge (int age) {this .age = age;public String getAddress () {return address;public void setAddress (String address) {this .address = address;public Car getCar () {return car;public void setCar (Car car) {this .car = car;
配置 Bean 引用
1
2
3
4
5
6
7
8
9
10
11
12
13
14
15
16
17
18
19
20
21
22
23
24
25
26
27
28
29
<?xml version="1.0" encoding="UTF-8" ?> <beans xmlns ="http://www.springframework.org/schema/beans" xmlns:xsi ="http://www.w3.org/2001/XMLSchema-instance" xsi:schemaLocation ="http://www.springframework.org/schema/beans http://www.springframework.org/schema/beans/spring-beans.xsd" > <bean id ="car" class ="me.mritd.beans.Car" > <property name ="carName" value ="四个圈" > </property > </bean > <bean id ="persion" name ="persion" class ="me.mritd.beans.Persion" > <constructor-arg index ="0" value ="zhangsan" > </constructor-arg > <constructor-arg index ="1" value ="10" > </constructor-arg > <constructor-arg index ="2" > <null /> </constructor-arg > <constructor-arg index ="3" ref ="car" > </constructor-arg > </bean > <bean id ="persion1" name ="persion1" class ="me.mritd.beans.Persion" > <property name ="name" value ="zhangsan1" > </property > <property name ="age" value ="11" > </property > <property name ="address" value ="伊拉克" > </property > <property name ="car" ref ="car" > </property > </bean > </beans >
测试获取两个 Persion Bean,打印里面的 Car
1
2
3
4
5
6
7
8
9
10
11
12
13
14
15
16
17
18
19
20
21
22
23
24
25
26
27
28
29
30
31
package me.mritd.test;import org.junit.Test;import org.springframework.context.ApplicationContext;import org.springframework.context.support.ClassPathXmlApplicationContext;import me.mritd.beans.Persion;public class Test2 {@Test public void test2 () {ApplicationContext applicationContext = new ClassPathXmlApplicationContext ("applicationContext.xml" );Persion persion = (Persion) applicationContext.getBean("persion" );Persion persion1 = (Persion) applicationContext.getBean("persion1" );