WWDC16 苹果正式发出公告,2017年1月1号后所有 IOS 应用需要使用 HTTPS 配置,并且 HTTPS 还得符合 ATS 要求,以下记录一下 CentoS 7 下配置 nginx HTTPS 并满足 ATS 过程
一、Nginx HTTPS 最佳实践
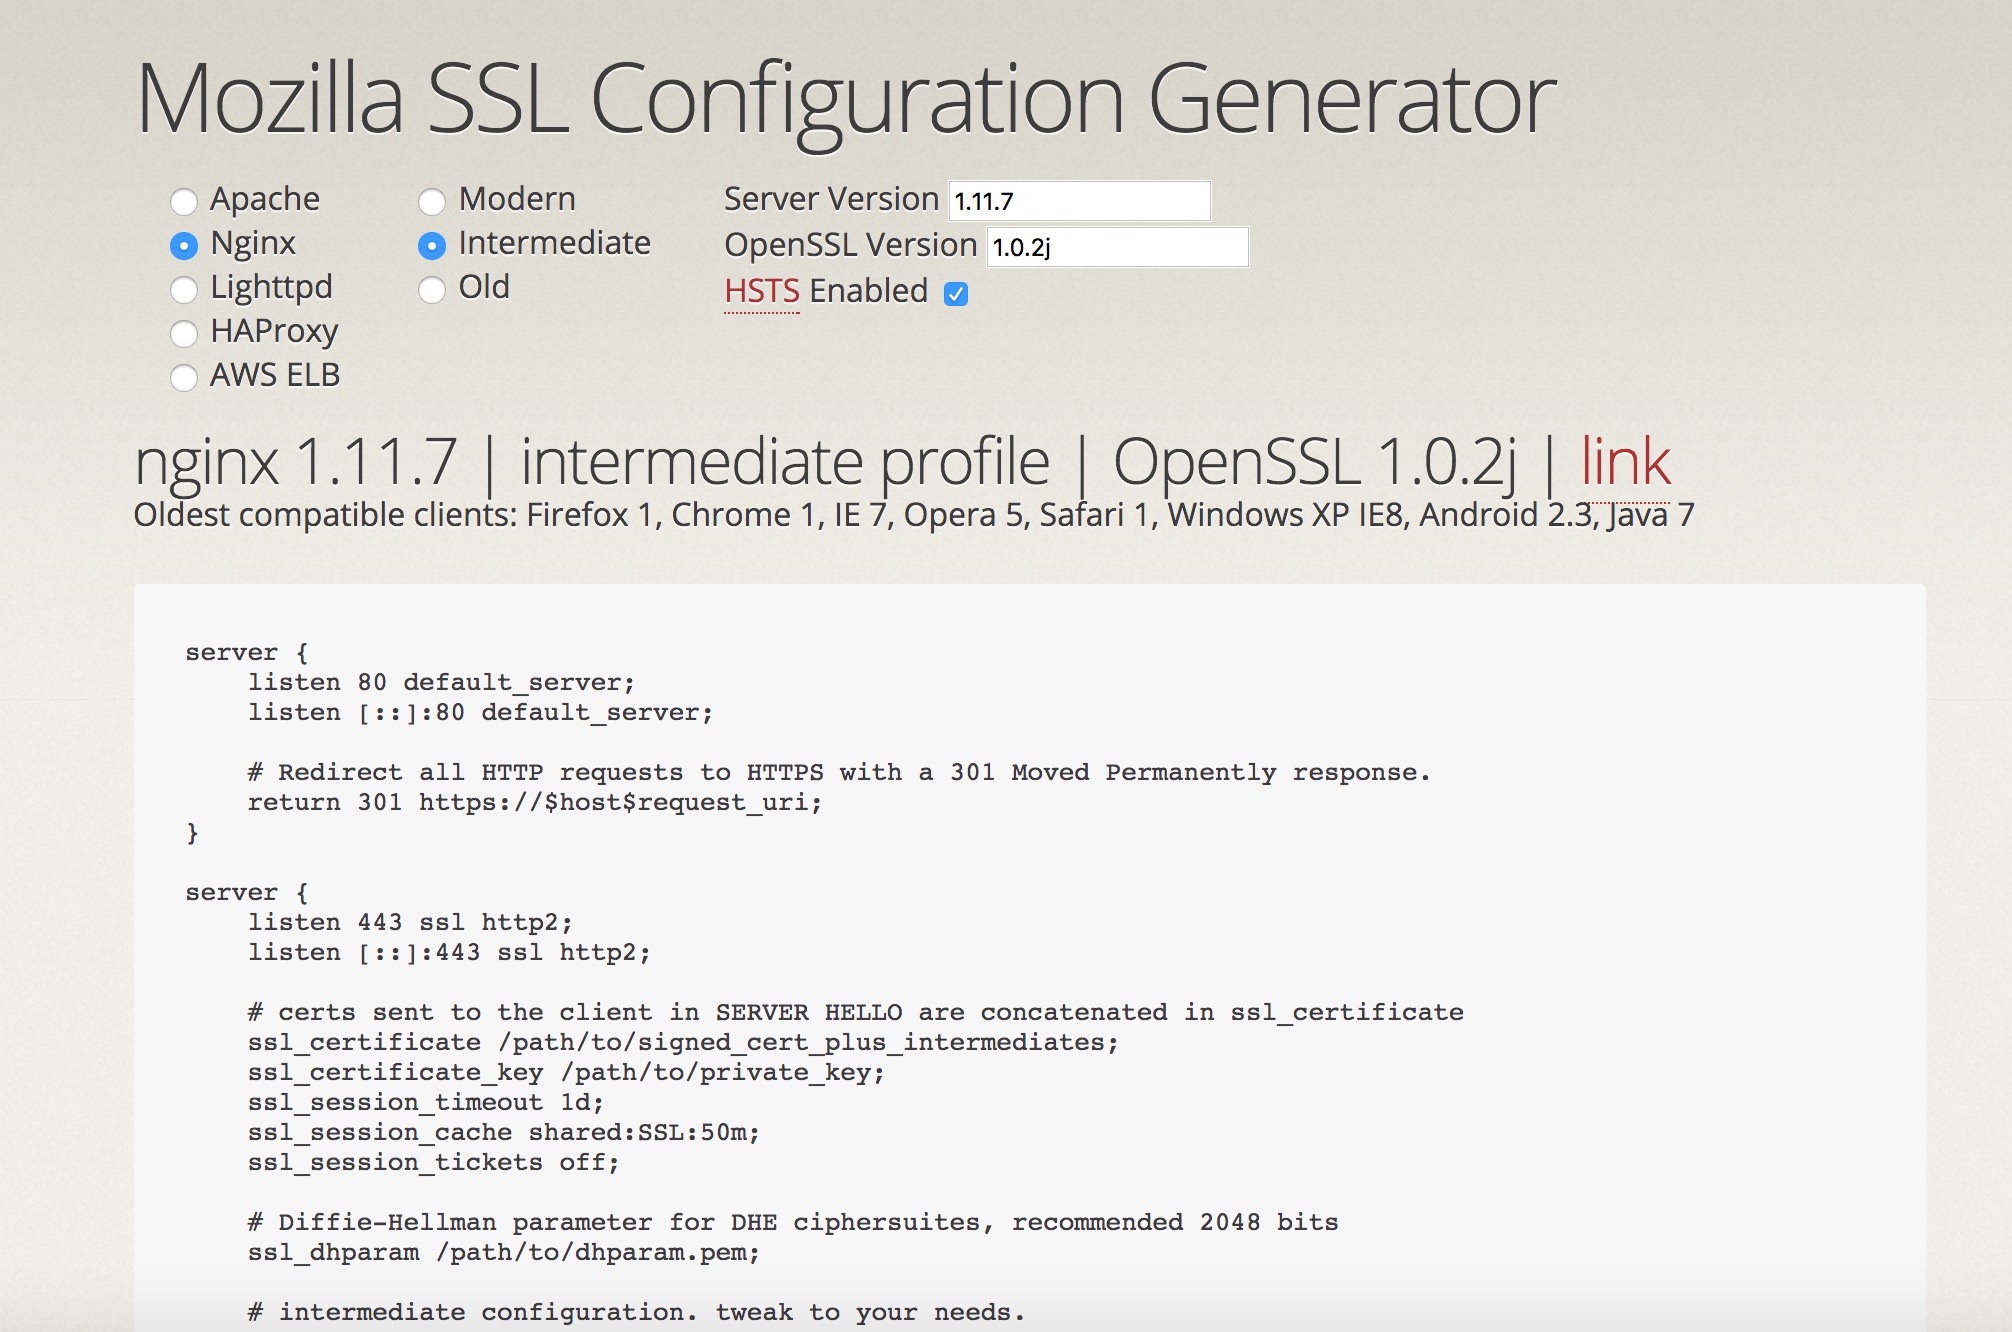
随着 HTTPS 呼声越来越高,web 站点 HTTPS 化必不可免;而使用 Nginx 作为前端反向代理服务器配置 HTTPS 时有很多复杂参数,这里采取偷懒办法,直接采用 mozilla 给出的最佳实践参数(如果自己玩的非常溜可以自己自定义);mozilla 给出了一个生成 HTTPS 配置的 web 页面,基本上给出的 HTTPS 配置已经是很好的最佳实践了,地址 –> Generate Mozilla Security Recommended Web Server Configuration Files
服务器选择 Nginx,输入对应 Nginx 版本号和 OpenSSL 版本号;注意:为了支持 HTTP2,OpenSSL版本必须大于等于 1.0.2,截图如下
二、升级 OpenSSL
2.1、基础准备
准备好配置参数以后,需要升级 CentOS 7 默认的 openssl(默认最新版本 1.0.1e),升级时最好打上 cloudflare 提供的用于支持对移动端比较友好的 chacha20 加密算法补丁,具体过程如下
1
2
3
4
5
6
7
8
9
10
11
12
13
14
15
16
17
18
19
|
yum install gcc glibc glibc-devel make pcre \
pcre-devel zlib zlib-devel kernel-devel \
curl gnupg libxslt libxslt-devel gd-devel \
geoip-devel perl-devel perl-ExtUtils-Embed \
lua lua-devel patch -y
wget https://www.openssl.org/source/openssl-1.0.2j.tar.gz
wget https://raw.githubusercontent.com/cloudflare/sslconfig/master/patches/openssl__chacha20_poly1305_draft_and_rfc_ossl102j.patch
tar -zxvf openssl-1.0.2j.tar.gz
mv openssl__chacha20_poly1305_draft_and_rfc_ossl102j.patch openssl-1.0.2j
cd openssl-1.0.2j && patch -p1 < openssl__chacha20_poly1305_draft_and_rfc_ossl102j.patch
|
2.2、编译安装
打过补丁以后就可以安装并进行替换了
1
2
3
4
5
6
7
8
9
10
11
12
13
14
15
16
17
18
19
20
21
22
23
|
./config shared zlib-dynamic
make && make install
mv /usr/bin/openssl /usr/bin/openssl.old
mv /usr/include/openssl /usr/include/openssl.old
ln -s /usr/local/ssl/bin/openssl /usr/bin/openssl
ln -s /usr/local/ssl/include/openssl /usr/include/openssl
ln -s /usr/local/ssl/lib/libssl.so /usr/lib/libssl.so
ln -s /usr/local/ssl/lib/libssl.so /usr/local/lib64/libssl.so
echo "/usr/local/ssl/lib" >> /etc/ld.so.conf
ldconfig -v
openssl version
strings /usr/local/lib64/libssl.so |grep OpenSSL
|
三、编译安装 Nginx
编译 Nginx 参数有很多,具体的可以自行更改,以下参考官方参数并且安装了 lua-nginx、headers-more、upstream_check、ngx_devel_kit
1
2
3
4
5
6
7
8
9
10
11
12
13
14
15
16
17
18
19
20
21
22
23
24
25
26
27
28
29
30
31
32
33
34
35
36
37
38
39
40
41
42
43
44
45
46
47
48
49
50
51
52
53
54
55
56
57
58
59
60
61
62
63
64
65
66
67
68
69
70
71
72
73
74
75
76
77
78
79
80
|
export NGINX_VERSION="1.11.6"
export NGINX_LUA_MODULE_VERSION="0.10.7"
export OPENSSL_VERSION="1.0.1t"
export HEADERS_MORE_VERSION="0.32"
export UPSTREAM_CHECK_VERSION="0.3.0"
export DEVEL_KIT_VERSION="0.3.0"
export LUAJIT_VERSION="2.0.4"
export LUAJIT_MAIN_VERSION="2.0"
export LUAJIT_LIB="/usr/local/lib"
export LUAJIT_INC="/usr/local/include/luajit-$LUAJIT_MAIN_VERSION"
wget http://nginx.org/download/nginx-${NGINX_VERSION}.tar.gz
wget https://github.com/openresty/lua-nginx-module/archive/v${NGINX_LUA_MODULE_VERSION}.tar.gz -O lua-nginx-module-v${NGINX_LUA_MODULE_VERSION}.tar.gz
wget https://github.com/openresty/headers-more-nginx-module/archive/v${HEADERS_MORE_VERSION}.tar.gz
wget https://github.com/yaoweibin/nginx_upstream_check_module/archive/v${UPSTREAM_CHECK_VERSION}.tar.gz
wget https://github.com/simpl/ngx_devel_kit/archive/v${DEVEL_KIT_VERSION}.tar.gz -O ngx_devel_kit-v${DEVEL_KIT_VERSION}.tar.gz
wget http://luajit.org/download/LuaJIT-$LUAJIT_VERSION.tar.gz
for tgzName in `ls *.tar.gz`;do
tar -zxvf $tgzName
done
CONFIG_ARGS="\
--prefix=${PREFIX:-/usr/local/nginx} \
--pid-path=/var/run/nginx.pid \
--lock-path=/var/run/nginx.lock \
--with-http_ssl_module \
--with-http_realip_module \
--with-http_addition_module \
--with-http_sub_module \
--with-http_dav_module \
--with-http_flv_module \
--with-http_mp4_module \
--with-http_gunzip_module \
--with-http_gzip_static_module \
--with-http_random_index_module \
--with-http_secure_link_module \
--with-http_stub_status_module \
--with-http_auth_request_module \
--with-http_xslt_module=dynamic \
--with-http_image_filter_module=dynamic \
--with-http_geoip_module=dynamic \
--with-http_perl_module=dynamic \
--with-threads \
--with-stream \
--with-stream_ssl_module \
--with-stream_ssl_preread_module \
--with-stream_realip_module \
--with-stream_geoip_module=dynamic \
--with-http_slice_module \
--with-mail \
--with-mail_ssl_module \
--with-file-aio \
--with-http_v2_module \
--with-openssl=/usr/src/openssl-${OPENSSL_VERSION} \
--add-module=/usr/src/headers-more-nginx-module-${HEADERS_MORE_VERSION} \
--add-module=/usr/src/nginx_upstream_check_module-${UPSTREAM_CHECK_VERSION} \
--add-module=/usr/src/ngx_devel_kit-${DEVEL_KIT_VERSION} \
--add-module=/usr/src/lua-nginx-module-${NGINX_LUA_MODULE_VERSION} \
--http-client-body-temp-path=/tmp/client_body_temp \
--http-proxy-temp-path=/tmp/proxy_temp \
--http-fastcgi-temp-path=/tmp/fastcgi_temp \
--http-uwsgi-temp-path=/tmp/uwsgi_temp \
--http-scgi-temp-path=/tmp/scgi_temp \
"
cd /usr/src/LuaJIT-$LUAJIT_VERSION
make -j$(getconf _NPROCESSORS_ONLN)
make install
cd /usr/src/nginx-$NGINX_VERSION
./configure $CONFIG_ARGS --with-debug
make -j$(getconf _NPROCESSORS_ONLN)
make install
|
四、配置 HTTPS
主配置参考步骤一的 HTTPS 最佳实践,以下只做简要说明
前向保密 dhparam.pem 文件通过 openssl dhparam 4096 > dhparam.pem 生成
ssl_trusted_certificate 需要 CA 根证书,请根据具体证书 CA 自行下载
五、验证 ATS
1
2
3
|
nscurl --ats-diagnostics --verbose https://mritd.me | grep FAIL
|