年后比较忙,所以 1.9 也没去折腾(其实就是懒),最近刚有点时间凑巧 1.10 发布;所以就折腾一下 1.10,感觉搭建配置没有太大变化,折腾了 2 天基本算是搞定了,这里记录一下搭建过程;本文用到的被 block 镜像已经上传至 百度云 密码: dy5p
一、环境准备 目前搭建仍然采用 5 台虚拟机测试,基本环境如下
IP
Type
Docker
OS
192.168.1.61
master、node、etcd
18.03.0-ce
ubuntu 16.04
192.168.1.62
master、node、etcd
18.03.0-ce
ubuntu 16.04
192.168.1.63
master、node、etcd
18.03.0-ce
ubuntu 16.04
192.168.1.64
node
18.03.0-ce
ubuntu 16.04
192.168.1.65
node
18.03.0-ce
ubuntu 16.04
搭建前请看完整篇文章后再操作,一些变更说明我放到后面了;还有为了尽可能的懒,也不用什么 rpm、deb 了,直接 hyperkube + service 配置,布吉岛 hyperkube 的请看 GitHub ;本篇文章基于一些小脚本搭建(懒),所以不会写太详细的步骤,具体请参考 仓库脚本 ,如果想看更详细的每一步的作用可以参考以前的 1.7、1.8 的搭建文档
二、搭建 Etcd 集群 2.1、安装 cfssl 说实话这个章节我不想写,但是考虑可能有人真的需要,所以还是写了一下;这个安装脚本使用的是我私人的 cdn,文件可能随时删除,想使用最新版本请自行从 Github clone 并编译
1
2
3
4
5
wget https://mritdftp.b0.upaiyun.com/cfssl/cfssl.tar.gzmv cfssl cfssljson /usr/local/binchmod +x /usr/local/bin/cfssl /usr/local/bin/cfssljsonrm -f cfssl.tar.gz
2.2、生成 Etcd 证书 etcd-csr.json 1 2 3 4 5 6 7 8 9 10 11 12 13 14 15 16 17 18 19 20 21 22 23 { "key" : { "algo" : "rsa" , "size" : 2048 } , "names" : [ { "O" : "etcd" , "OU" : "etcd Security" , "L" : "Beijing" , "ST" : "Beijing" , "C" : "CN" } ] , "CN" : "etcd" , "hosts" : [ "127.0.0.1" , "localhost" , "192.168.1.61" , "192.168.1.62" , "192.168.1.63" ] }
etcd-gencert.json 1 2 3 4 5 6 7 8 9 10 11 12 13 { "signing" : { "default" : { "usages" : [ "signing" , "key encipherment" , "server auth" , "client auth" ] , "expiry" : "87600h" } } }
etcd-root-ca-csr.json 1 2 3 4 5 6 7 8 9 10 11 12 13 14 15 16 { "key" : { "algo" : "rsa" , "size" : 4096 } , "names" : [ { "O" : "etcd" , "OU" : "etcd Security" , "L" : "Beijing" , "ST" : "Beijing" , "C" : "CN" } ] , "CN" : "etcd-root-ca" }
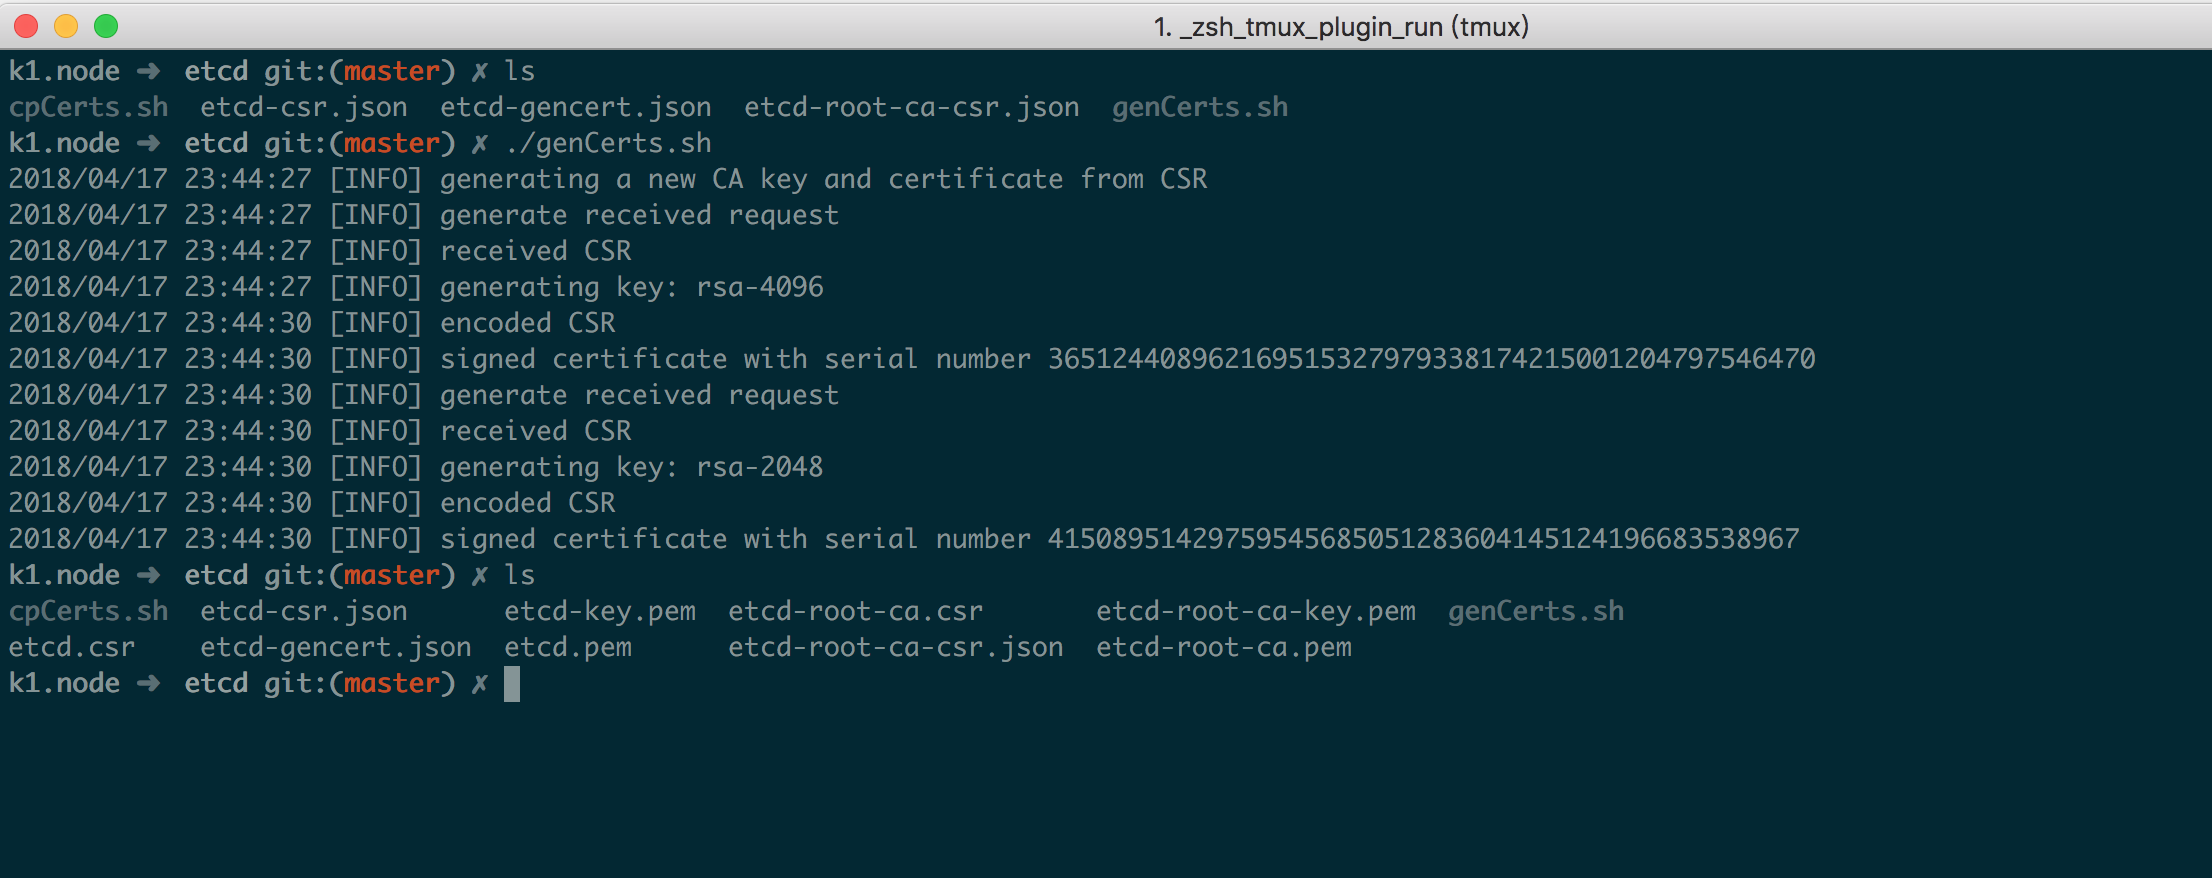
生成证书 1 2 cfssl gencert --initca=true etcd-root-ca-csr.json | cfssljson --bare etcd-root-ca
生成后如下
2.3、安装 Etcd Etcd 这里采用最新的 3.2.18 版本,安装方式直接复制二进制文件、systemd service 配置即可,不过需要注意相关用户权限问题,以下脚本配置等参考了 etcd rpm 安装包
etcd.service 1 2 3 4 5 6 7 8 9 10 11 12 13 14 15 16 17 18 [Unit]"GOMAXPROCS=$(nproc) /usr/local/bin/etcd --name=\"${ETCD_NAME} \" --data-dir=\"${ETCD_DATA_DIR} \" --listen-client-urls=\"${ETCD_LISTEN_CLIENT_URLS} \""
etcd.conf 1 2 3 4 5 6 7 8 9 10 11 12 13 14 15 16 17 18 19 20 21 22 23 24 25 26 27 28 29 30 31 32 33 34 35 36 37 38 39 40 41 42 43 44 45 46 47 48 49 50 51 "/var/lib/etcd/etcd1.etcd" "/var/lib/etcd/wal" "100" "100" "1000" "https://192.168.1.61:2380" "https://192.168.1.61:2379,http://127.0.0.1:2379" "5" "5" "https://192.168.1.61:2380" "etcd1=https://192.168.1.61:2380,etcd2=https://192.168.1.62:2380,etcd3=https://192.168.1.63:2380" "new" "etcd-cluster" "https://192.168.1.61:2379" "/etc/etcd/ssl/etcd.pem" "/etc/etcd/ssl/etcd-key.pem" "true" "/etc/etcd/ssl/etcd-root-ca.pem" "true" "/etc/etcd/ssl/etcd.pem" "/etc/etcd/ssl/etcd-key.pem" "true" "/etc/etcd/ssl/etcd-root-ca.pem" "true"
install.sh 1 2 3 4 5 6 7 8 9 10 11 12 13 14 15 16 17 18 19 20 21 22 23 24 25 26 27 28 29 30 31 32 33 34 35 36 37 38 39 40 41 42 43 44 45 46 #!/bin/bash set -e"3.2.18" function download if [ ! -f "etcd-v${ETCD_VERSION} -linux-amd64.tar.gz" ]; then ${ETCD_VERSION} /etcd-v${ETCD_VERSION} -linux-amd64.tar.gz${ETCD_VERSION} -linux-amd64.tar.gzfi function preinstall "etcd user" etcdfunction install echo -e "\033[32mINFO: Copy etcd...\033[0m" ${ETCD_VERSION} -linux-amd64.tar.gzcp etcd-v${ETCD_VERSION} -linux-amd64/etcd* /usr/local/binrm -rf etcd-v${ETCD_VERSION} -linux-amd64echo -e "\033[32mINFO: Copy etcd config...\033[0m" cp -r conf /etc/etcdchown -R etcd:etcd /etc/etcdchmod -R 755 /etc/etcd/sslecho -e "\033[32mINFO: Copy etcd systemd config...\033[0m" cp systemd/*.service /lib/systemd/systemfunction postinstall if [ ! -d "/var/lib/etcd" ]; then mkdir /var/lib/etcdchown -R etcd:etcd /var/lib/etcdfi
脚本解释如下:
download: 从 Github 下载二进制文件并解压
preinstall: 为 Etcd 安装做准备,创建 etcd 用户,并指定家目录登录 shell 等
install: 将 etcd 二进制文件复制到安装目录(/usr/local/bin),复制 conf 目录到 /etc/etcd
postinstall: 安装后收尾工作,比如检测 /var/lib/etcd 是否存在,纠正权限等
整体目录结构如下
1 2 3 4 5 6 7 8 9 10 11 12 13 14 15 etcd
请自行创建 conf 目录等,并放置好相关文件,保存上面脚本为 install.sh,直接执行即可;在每台机器上更改好对应的配置,如 etcd 名称等,etcd 估计都是轻车熟路了,这里不做过多阐述;安装后启动即可
1 2 systemctl start etcdenable etcd
注意: 集群 etcd 要 3 个一起启动,集群模式下单个启动会卡半天最后失败,不要傻等;启动成功后测试如下
1 2 export ETCDCTL_API=3
三、安装 Kubernets 集群组件
注意:与以前文档不同的是,这次不依赖 rpm 等特定安装包,而是基于 hyperkube 二进制手动安装,每个节点都会同时安装 Master 与 Node 配置文件,具体作为 Master 还是 Node 取决于服务开启情况
3.1、生成 Kubernetes 证书 由于 kubelet 和 kube-proxy 用到的 kubeconfig 配置文件需要借助 kubectl 来生成,所以需要先安装一下 kubectl
1 2 3 4 wget https://storage.googleapis.com/kubernetes-release/release/v1.10.1/bin/linux/amd64/hyperkube -O hyperkube_1.10.1chmod +x hyperkube_1.10.1cp hyperkube_1.10.1 /usr/local/bin/hyperkubeln -s /usr/local/bin/hyperkube /usr/local/bin/kubectl
admin-csr.json 1 2 3 4 5 6 7 8 9 10 11 12 13 14 15 16 17 { "CN" : "admin" , "hosts" : [ ] , "key" : { "algo" : "rsa" , "size" : 2048 } , "names" : [ { "C" : "CN" , "ST" : "BeiJing" , "L" : "BeiJing" , "O" : "system:masters" , "OU" : "System" } ] }
k8s-gencert.json 1 2 3 4 5 6 7 8 9 10 11 12 13 14 15 16 17 18 { "signing" : { "default" : { "expiry" : "87600h" } , "profiles" : { "kubernetes" : { "usages" : [ "signing" , "key encipherment" , "server auth" , "client auth" ] , "expiry" : "87600h" } } } }
k8s-root-ca-csr.json 1 2 3 4 5 6 7 8 9 10 11 12 13 14 15 16 { "CN" : "kubernetes" , "key" : { "algo" : "rsa" , "size" : 4096 } , "names" : [ { "C" : "CN" , "ST" : "BeiJing" , "L" : "BeiJing" , "O" : "k8s" , "OU" : "System" } ] }
kube-apiserver-csr.json 注意: 在以前的文档中这个配置叫 kubernetes-csr.json,为了明确划分职责,这个证书目前被重命名以表示其专属于 apiserver 使用;加了一个 *.kubernetes.master 域名以便内部私有 DNS 解析使用(可删除);至于很多人问过 kubernetes 这几个能不能删掉,答案是不可以的;因为当集群创建好后,default namespace 下会创建一个叫 kubenretes 的 svc,有一些组件会直接连接这个 svc 来跟 api 通讯的,证书如果不包含可能会出现无法连接的情况;其他几个 kubernetes 开头的域名作用相同
1 2 3 4 5 6 7 8 9 10 11 12 13 14 15 16 17 18 19 20 21 22 23 24 25 26 27 28 29 30 31 32 { "CN" : "kubernetes" , "hosts" : [ "127.0.0.1" , "10.254.0.1" , "192.168.1.61" , "192.168.1.62" , "192.168.1.63" , "192.168.1.64" , "192.168.1.65" , "*.kubernetes.master" , "localhost" , "kubernetes" , "kubernetes.default" , "kubernetes.default.svc" , "kubernetes.default.svc.cluster" , "kubernetes.default.svc.cluster.local" ] , "key" : { "algo" : "rsa" , "size" : 2048 } , "names" : [ { "C" : "CN" , "ST" : "BeiJing" , "L" : "BeiJing" , "O" : "k8s" , "OU" : "System" } ] }
kube-proxy-csr.json 1 2 3 4 5 6 7 8 9 10 11 12 13 14 15 16 17 { "CN" : "system:kube-proxy" , "hosts" : [ ] , "key" : { "algo" : "rsa" , "size" : 2048 } , "names" : [ { "C" : "CN" , "ST" : "BeiJing" , "L" : "BeiJing" , "O" : "k8s" , "OU" : "System" } ] }
生成证书及配置 1 2 3 4 5 6 7 8 9 10 11 12 13 14 15 16 17 18 19 20 21 22 23 24 25 26 27 28 29 30 31 32 33 34 35 36 37 38 39 40 41 42 43 44 45 46 47 48 49 50 51 52 53 54 55 56 57 58 59 60 61 62 63 64 65 66 67 68 69 true k8s-root-ca-csr.json | cfssljson --bare k8s-root-cafor targetName in kube-apiserver admin kube-proxy; do $targetName -csr.json | cfssljson --bare $targetName done "https://127.0.0.1:6443" head -c 16 /dev/urandom | od -An -t x | tr -d ' ' )echo "Tokne: ${BOOTSTRAP_TOKEN} " cat > token.csv <<EOF ${BOOTSTRAP_TOKEN},kubelet-bootstrap,10001,"system:bootstrappers" EOF echo "Create kubelet bootstrapping kubeconfig..." true \${KUBE_APISERVER} \${BOOTSTRAP_TOKEN} \echo "Create kube-proxy kubeconfig..." true \${KUBE_APISERVER} \true \cat >> audit-policy.yaml <<EOF # Log all requests at the Metadata level. apiVersion: audit.k8s.io/v1beta1 kind: Policy rules: - level: Metadata EOF
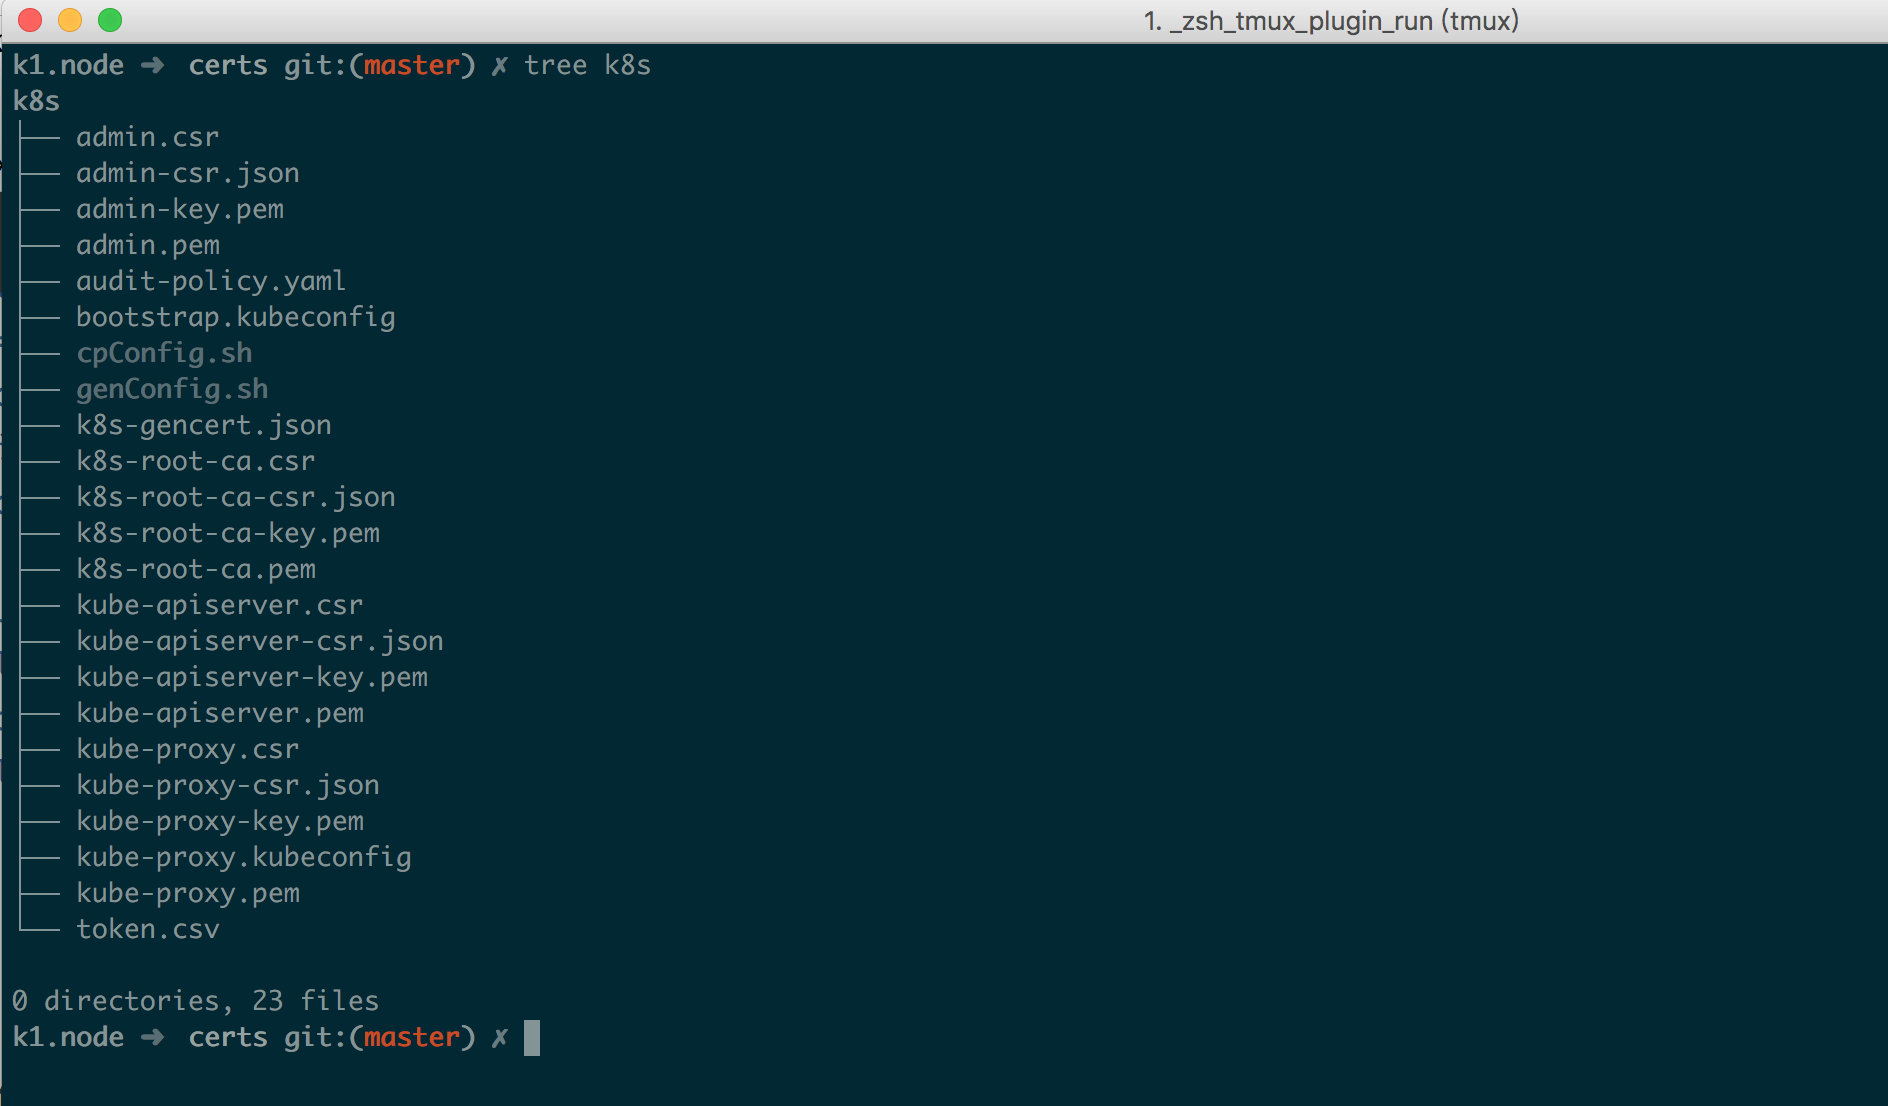
生成后文件如下
3.2、准备 systemd 配置 所有组件的 systemd 配置如下
kube-apiserver.service 1 2 3 4 5 6 7 8 9 10 11 12 13 14 15 16 17 18 19 20 21 22 23 24 25 26 27 [Unit]$KUBE_LOGTOSTDERR \$KUBE_LOG_LEVEL \$KUBE_ETCD_SERVERS \$KUBE_API_ADDRESS \$KUBE_API_PORT \$KUBELET_PORT \$KUBE_ALLOW_PRIV \$KUBE_SERVICE_ADDRESSES \$KUBE_ADMISSION_CONTROL \$KUBE_API_ARGS
kube-controller-manager.service 1 2 3 4 5 6 7 8 9 10 11 12 13 14 15 16 17 18 [Unit]$KUBE_LOGTOSTDERR \$KUBE_LOG_LEVEL \$KUBE_MASTER \$KUBE_CONTROLLER_MANAGER_ARGS
kubelet.service 1 2 3 4 5 6 7 8 9 10 11 12 13 14 15 16 17 18 19 20 21 22 23 24 [Unit]$KUBE_LOGTOSTDERR \$KUBE_LOG_LEVEL \$KUBELET_API_SERVER \$KUBELET_ADDRESS \$KUBELET_PORT \$KUBELET_HOSTNAME \$KUBE_ALLOW_PRIV \$KUBELET_ARGS
kube-proxy.service 1 2 3 4 5 6 7 8 9 10 11 12 13 14 15 16 17 18 [Unit]$KUBE_LOGTOSTDERR \$KUBE_LOG_LEVEL \$KUBE_MASTER \$KUBE_PROXY_ARGS
kube-scheduler.service 1 2 3 4 5 6 7 8 9 10 11 12 13 14 15 16 17 18 [Unit]$KUBE_LOGTOSTDERR \$KUBE_LOG_LEVEL \$KUBE_MASTER \$KUBE_SCHEDULER_ARGS
3.3、Master 节点配置 Master 节点主要会运行 3 各组件: kube-apiserver、kube-controller-manager、kube-scheduler,其中用到的配置文件如下
config config 是一个通用配置文件,值得注意的是由于安装时对于 Node、Master 节点都会包含该文件,在 Node 节点上请注释掉 KUBE_MASTER 变量,因为 Node 节点需要做 HA,要连接本地的 6443 加密端口;而这个变量将会覆盖 kubeconfig 中指定的 127.0.0.1:6443 地址
1 2 3 4 5 6 7 8 9 10 11 12 13 14 15 16 17 18 19 20 21 22 "--logtostderr=true" "--v=2" "--allow-privileged=true" "--master=http://127.0.0.1:8080"
apiserver apiserver 配置相对于 1.8 略有变动,其中准入控制器(admission control)选项名称变为了 --enable-admission-plugins,控制器列表也有相应变化,这里采用官方推荐配置,具体请参考 官方文档
1 2 3 4 5 6 7 8 9 10 11 12 13 14 15 16 17 18 19 20 21 22 23 24 25 26 27 28 29 30 31 32 33 34 35 36 37 38 39 40 41 42 43 44 45 46 47 48 49 50 51 52 53 54 "--advertise-address=192.168.1.61 --bind-address=192.168.1.61" "--secure-port=6443" "--etcd-servers=https://192.168.1.61:2379,https://192.168.1.62:2379,https://192.168.1.63:2379" "--service-cluster-ip-range=10.254.0.0/16" "--enable-admission-plugins=NamespaceLifecycle,LimitRanger,ServiceAccount,DefaultStorageClass,DefaultTolerationSeconds,MutatingAdmissionWebhook,ValidatingAdmissionWebhook,ResourceQuota,NodeRestriction" " --anonymous-auth=false \ --apiserver-count=3 \ --audit-log-maxage=30 \ --audit-log-maxbackup=3 \ --audit-log-maxsize=100 \ --audit-log-path=/var/log/kube-audit/audit.log \ --audit-policy-file=/etc/kubernetes/audit-policy.yaml \ --authorization-mode=Node,RBAC \ --client-ca-file=/etc/kubernetes/ssl/k8s-root-ca.pem \ --enable-bootstrap-token-auth \ --enable-garbage-collector \ --enable-logs-handler \ --enable-swagger-ui \ --etcd-cafile=/etc/etcd/ssl/etcd-root-ca.pem \ --etcd-certfile=/etc/etcd/ssl/etcd.pem \ --etcd-keyfile=/etc/etcd/ssl/etcd-key.pem \ --etcd-compaction-interval=5m0s \ --etcd-count-metric-poll-period=1m0s \ --event-ttl=48h0m0s \ --kubelet-https=true \ --kubelet-timeout=3s \ --log-flush-frequency=5s \ --token-auth-file=/etc/kubernetes/token.csv \ --tls-cert-file=/etc/kubernetes/ssl/kube-apiserver.pem \ --tls-private-key-file=/etc/kubernetes/ssl/kube-apiserver-key.pem \ --service-node-port-range=30000-50000 \ --service-account-key-file=/etc/kubernetes/ssl/k8s-root-ca.pem \ --storage-backend=etcd3 \ --enable-swagger-ui=true"
controller-manager controller manager 配置默认开启了证书轮换能力用于自动签署 kueblet 证书,并且证书时间也设置了 10 年,可自行调整;增加了 --controllers 选项以指定开启全部控制器
1 2 3 4 5 6 7 8 9 10 11 12 13 14 15 16 17 18 19 20 21 " --bind-address=0.0.0.0 \ --cluster-name=kubernetes \ --cluster-signing-cert-file=/etc/kubernetes/ssl/k8s-root-ca.pem \ --cluster-signing-key-file=/etc/kubernetes/ssl/k8s-root-ca-key.pem \ --controllers=*,bootstrapsigner,tokencleaner \ --deployment-controller-sync-period=10s \ --experimental-cluster-signing-duration=86700h0m0s \ --leader-elect=true \ --node-monitor-grace-period=40s \ --node-monitor-period=5s \ --pod-eviction-timeout=5m0s \ --terminated-pod-gc-threshold=50 \ --root-ca-file=/etc/kubernetes/ssl/k8s-root-ca.pem \ --service-account-private-key-file=/etc/kubernetes/ssl/k8s-root-ca-key.pem \ --feature-gates=RotateKubeletServerCertificate=true"
scheduler 1 2 3 4 5 6 7 8 9 " --address=0.0.0.0 \ --leader-elect=true \ --algorithm-provider=DefaultProvider"
3.4、Node 节点配置 Node 节点上主要有 kubelet、kube-proxy 组件,用到的配置如下
kubelet kubeket 默认也开启了证书轮换能力以保证自动续签相关证书,同时增加了 --node-labels 选项为 node 打一个标签,关于这个标签最后部分会有讨论,如果在 master 上启动 kubelet,请将 node-role.kubernetes.io/k8s-node=true 修改为 node-role.kubernetes.io/k8s-master=true
1 2 3 4 5 6 7 8 9 10 11 12 13 14 15 16 17 18 19 20 21 22 23 24 25 26 27 28 29 30 31 32 33 34 "--node-ip=192.168.1.61" "--hostname-override=k1.node" " --bootstrap-kubeconfig=/etc/kubernetes/bootstrap.kubeconfig \ --cert-dir=/etc/kubernetes/ssl \ --cgroup-driver=cgroupfs \ --cluster-dns=10.254.0.2 \ --cluster-domain=cluster.local. \ --fail-swap-on=false \ --feature-gates=RotateKubeletClientCertificate=true,RotateKubeletServerCertificate=true \ --node-labels=node-role.kubernetes.io/k8s-node=true \ --image-gc-high-threshold=70 \ --image-gc-low-threshold=50 \ --kube-reserved=cpu=500m,memory=512Mi,ephemeral-storage=1Gi \ --kubeconfig=/etc/kubernetes/kubelet.kubeconfig \ --system-reserved=cpu=1000m,memory=1024Mi,ephemeral-storage=1Gi \ --serialize-image-pulls=false \ --sync-frequency=30s \ --pod-infra-container-image=k8s.gcr.io/pause-amd64:3.0 \ --resolv-conf=/etc/resolv.conf \ --rotate-certificates"
proxy 1 2 3 4 5 6 7 8 "--bind-address=0.0.0.0 \ --hostname-override=k1.node \ --kubeconfig=/etc/kubernetes/kube-proxy.kubeconfig \ --cluster-cidr=10.254.0.0/16"
3.5、安装集群组件 上面已经准备好了相关配置文件,接下来将这些配置文件组织成如下目录结构以便后续脚本安装
1 2 3 4 5 6 7 8 9 10 11 12 13 14 15 16 17 18 19 20 21 22 23 24 25 26 27 28 29 30 31 32 33 34 35 36 37 38 k8s
其中 install.sh 内容如下
1 2 3 4 5 6 7 8 9 10 11 12 13 14 15 16 17 18 19 20 21 22 23 24 25 26 27 28 29 30 31 32 33 34 35 36 37 38 39 40 41 42 43 44 45 46 47 48 49 50 51 52 53 54 55 56 #!/bin/bash set -e"1.10.1" function download_k8s if [ ! -f "hyperkube_${KUBE_VERSION} " ]; then ${KUBE_VERSION} /bin/linux/amd64/hyperkube -O hyperkube_${KUBE_VERSION} chmod +x hyperkube_${KUBE_VERSION} fi function preinstall "Kubernetes user" kubefunction install_k8s echo -e "\033[32mINFO: Copy hyperkube...\033[0m" cp hyperkube_${KUBE_VERSION} /usr/local/bin/hyperkubeecho -e "\033[32mINFO: Create symbolic link...\033[0m" ln -sf /usr/local/bin/hyperkube /usr/local/bin/kubectlecho -e "\033[32mINFO: Copy kubernetes config...\033[0m" cp -r conf /etc/kubernetesif [ -d "/etc/kubernetes/ssl" ]; then chown -R kube:kube /etc/kubernetes/sslfi echo -e "\033[32mINFO: Copy kubernetes systemd config...\033[0m" cp systemd/*.service /lib/systemd/systemfunction postinstall if [ ! -d "/var/log/kube-audit" ]; then mkdir /var/log/kube-auditfi if [ ! -d "/var/lib/kubelet" ]; then mkdir /var/lib/kubeletfi if [ ! -d "/usr/libexec" ]; then mkdir /usr/libexecfi chown -R kube:kube /var/log/kube-audit /var/lib/kubelet /usr/libexec
脚本解释如下:
download_k8s: 下载 hyperkube 二进制文件
preinstall: 安装前处理,同 etcd 一样创建 kube 普通用户指定家目录、shell 等
install_k8s: 复制 hyperkube 到安装目录,为 kubectl 创建软连接(为啥创建软连接就能执行请自行阅读 源码 ),复制相关配置到对应目录,并处理权限
postinstall: 收尾工作,创建日志目录等,并处理权限
最后执行此脚本安装即可,此外,应确保每个节点安装了 ipset、conntrack 两个包,因为 kube-proxy 组件会使用其处理 iptables 规则等
四、启动 Kubernetes Master 节点 对于 master 节点启动无需做过多处理,多个 master 只要保证 apiserver 等配置中的 ip 地址监听没问题后直接启动即可
1 2 3 4 5 6 7 systemctl daemon-reloadenable kube-apiserverenable kube-controller-managerenable kube-scheduler
成功后截图如下
五、启动 Kubernetes Node 节点 由于 HA 等功能需要,对于 Node 需要做一些处理才能启动,主要有以下两个地方需要处理
5.1、nginx-proxy 在启动 kubelet、kube-proxy 服务之前,需要在本地启动 nginx 来 tcp 负载均衡 apiserver 6443 端口,nginx-proxy 使用 docker + systemd 启动,配置如下
注意: 对于在 master 节点启动 kubelet 来说,不需要 nginx 做负载均衡;可以跳过此步骤,并修改 kubelet.kubeconfig、kube-proxy.kubeconfig 中的 apiserver 地址为当前 master ip 6443 端口即可
1 2 3 4 5 6 7 8 9 10 11 12 13 14 15 16 17 18 19 20 21 22 23 [Unit]true rm -f nginx-proxy
1 2 3 4 5 6 7 8 9 10 11 12 13 14 15 16 17 18 19 20 21 22 23 24 error_log stderr notice;
启动 apiserver 的本地负载均衡
1 2 3 4 5 6 7 mkdir /etc/nginxcp nginx.conf /etc/nginxcp nginx-proxy.service /lib/systemd/systemenable nginx-proxy
5.2、TLS bootstrapping 创建好 nginx-proxy 后不要忘记为 TLS Bootstrap 创建相应的 RBAC 规则,这些规则能实现证自动签署 TLS Bootstrap 发出的 CSR 请求,从而实现证书轮换(创建一次即可);详情请参考 Kubernetes TLS bootstrapping 那点事
tls-bootstrapping-clusterrole.yaml(与 1.8 一样)
1 2 3 4 5 6 7 8 9 10 kind: ClusterRole apiVersion: rbac.authorization.k8s.io/v1 metadata: name: system:certificates.k8s.io:certificatesigningrequests:selfnodeserver rules: - apiGroups: ["certificates.k8s.io" ]resources: ["certificatesigningrequests/selfnodeserver" ]verbs: ["create" ]
在 master 执行创建
1 2 3 4 5 6 7 8 9 10 11 12 13 14 15 16 17 18 19 20 21
5.3、执行启动 多节点部署时先启动好 nginx-proxy,然后修改好相应配置的 ip 地址等配置,最终直接启动即可(master 上启动 kubelet 不要忘了修改 kubeconfig 中的 apiserver 地址,还有对应的 kubelet 的 node label)
1 2 3 4 5 systemctl daemon-reloadenable kubeletenable kube-proxy
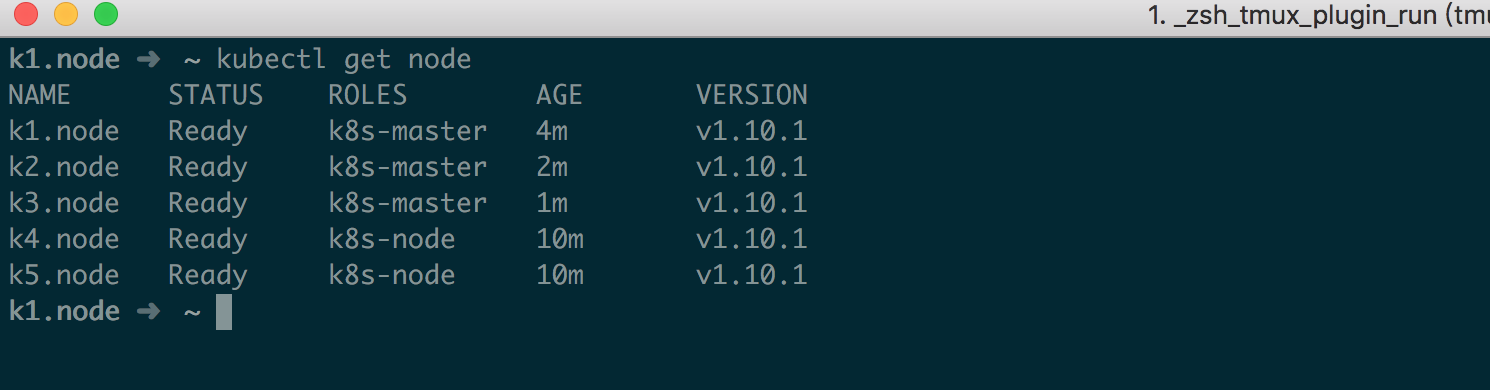
最后启动成功后如下
五、安装 Calico Calico 安装仍然延续以前的方案,使用 Daemonset 安装 cni 组件,使用 systemd 控制 calico-node 以确保 calico-node 能正确的拿到主机名等
5.1、修改 Calico 配置 1 2 3 4 5 6 7 8 9 10 11 12 13 14 15 16 17 18 19 20 21 wget https://docs.projectcalico.org/v3.1/getting-started/kubernetes/installation/hosted/calico.yaml -O calico.example.yamlcat /etc/etcd/ssl/etcd.pem | base64 | tr -d '\n' `cat /etc/etcd/ssl/etcd-key.pem | base64 | tr -d '\n' `cat /etc/etcd/ssl/etcd-root-ca.pem | base64 | tr -d '\n' `"https://192.168.1.61:2379,https://192.168.1.62:2379,https://192.168.1.63:2379" cp calico.example.yaml calico.yaml"s@.*etcd_endpoints:.*@\ \ etcd_endpoints:\ \"${ETCD_ENDPOINTS} \"@gi" calico.yaml"s@.*etcd-cert:.*@\ \ etcd-cert:\ ${ETCD_CERT} @gi" calico.yaml"s@.*etcd-key:.*@\ \ etcd-key:\ ${ETCD_KEY} @gi" calico.yaml"s@.*etcd-ca:.*@\ \ etcd-ca:\ ${ETCD_CA} @gi" calico.yaml's@.*etcd_ca:.*@\ \ etcd_ca:\ "/calico-secrets/etcd-ca"@gi' calico.yaml's@.*etcd_cert:.*@\ \ etcd_cert:\ "/calico-secrets/etcd-cert"@gi' calico.yaml's@.*etcd_key:.*@\ \ etcd_key:\ "/calico-secrets/etcd-key"@gi' calico.yaml'123,219s@.*@#&@gi' calico.yaml
5.2、创建 Systemd 文件 注意: 创建 systemd service 配置文件要在每个节点上都执行
1 2 3 4 5 6 7 8 9 10 11 12 13 14 15 16 17 18 19 20 21 22 23 24 25 26 27 28 29 30 31 32 33 34 35 36 37 38 39 40 41 42 43 44 45 46 47 48 49 K8S_MASTER_IP="192.168.1.61" cat /etc/hostname`"https://192.168.1.61:2379,https://192.168.1.62:2379,https://192.168.1.63:2379" cat > /lib/systemd/system/calico-node.service <<EOF [Unit] Description=calico node After=docker.service Requires=docker.service [Service] User=root Environment=ETCD_ENDPOINTS=${ETCD_ENDPOINTS} PermissionsStartOnly=true ExecStart=/usr/bin/docker run --net=host --privileged --name=calico-node \\ -e ETCD_ENDPOINTS=\${ETCD_ENDPOINTS} \\ -e ETCD_CA_CERT_FILE=/etc/etcd/ssl/etcd-root-ca.pem \\ -e ETCD_CERT_FILE=/etc/etcd/ssl/etcd.pem \\ -e ETCD_KEY_FILE=/etc/etcd/ssl/etcd-key.pem \\ -e NODENAME=${HOSTNAME} \\ -e IP= \\ -e IP_AUTODETECTION_METHOD=can-reach=${K8S_MASTER_IP} \\ -e AS=64512 \\ -e CLUSTER_TYPE=k8s,bgp \\ -e CALICO_IPV4POOL_CIDR=10.20.0.0/16 \\ -e CALICO_IPV4POOL_IPIP=always \\ -e CALICO_LIBNETWORK_ENABLED=true \\ -e CALICO_NETWORKING_BACKEND=bird \\ -e CALICO_DISABLE_FILE_LOGGING=true \\ -e FELIX_IPV6SUPPORT=false \\ -e FELIX_DEFAULTENDPOINTTOHOSTACTION=ACCEPT \\ -e FELIX_LOGSEVERITYSCREEN=info \\ -e FELIX_IPINIPMTU=1440 \\ -e FELIX_HEALTHENABLED=true \\ -e CALICO_K8S_NODE_REF=${HOSTNAME} \\ -v /etc/calico/etcd-root-ca.pem:/etc/etcd/ssl/etcd-root-ca.pem \\ -v /etc/calico/etcd.pem:/etc/etcd/ssl/etcd.pem \\ -v /etc/calico/etcd-key.pem:/etc/etcd/ssl/etcd-key.pem \\ -v /lib/modules:/lib/modules \\ -v /var/lib/calico:/var/lib/calico \\ -v /var/run/calico:/var/run/calico \\ quay.io/calico/node:v3.1.0 ExecStop=/usr/bin/docker rm -f calico-node Restart=always RestartSec=10 [Install] WantedBy=multi-user.target EOF
对于以上脚本中的 K8S_MASTER_IP 变量,只需要填写一个 master ip 即可,这个变量用于 calico 自动选择 IP 使用;在宿主机有多张网卡的情况下,calcio node 会自动获取一个 IP,获取原则就是尝试是否能够联通这个 master ip
由于 calico 需要使用 etcd 存储数据,所以需要复制 etcd 证书到相关目录,/etc/calico 需要在每个节点都有
1 cp -r /etc/etcd/ssl /etc/calico
5.3、修改 kubelet 配置 使用 Calico 后需要修改 kubelet 配置增加 CNI 设置(--network-plugin=cni),修改后配置如下
1 2 3 4 5 6 7 8 9 10 11 12 13 14 15 16 17 18 19 20 21 22 23 24 25 26 27 28 29 30 31 32 33 34 35 "--node-ip=192.168.1.61" "--hostname-override=k1.node" " --bootstrap-kubeconfig=/etc/kubernetes/bootstrap.kubeconfig \ --cert-dir=/etc/kubernetes/ssl \ --cgroup-driver=cgroupfs \ --network-plugin=cni \ --cluster-dns=10.254.0.2 \ --cluster-domain=cluster.local. \ --fail-swap-on=false \ --feature-gates=RotateKubeletClientCertificate=true,RotateKubeletServerCertificate=true \ --node-labels=node-role.kubernetes.io/k8s-master=true \ --image-gc-high-threshold=70 \ --image-gc-low-threshold=50 \ --kube-reserved=cpu=500m,memory=512Mi,ephemeral-storage=1Gi \ --kubeconfig=/etc/kubernetes/kubelet.kubeconfig \ --system-reserved=cpu=1000m,memory=1024Mi,ephemeral-storage=1Gi \ --serialize-image-pulls=false \ --sync-frequency=30s \ --pod-infra-container-image=k8s.gcr.io/pause-amd64:3.0 \ --resolv-conf=/etc/resolv.conf \ --rotate-certificates"
5.4、创建 Calico Daemonset 1 2 3 4 5 6
5.5、启动 Calico Node 1 2 3 4 5 6 7 systemctl daemon-reloadenable calico-nodesleep 20
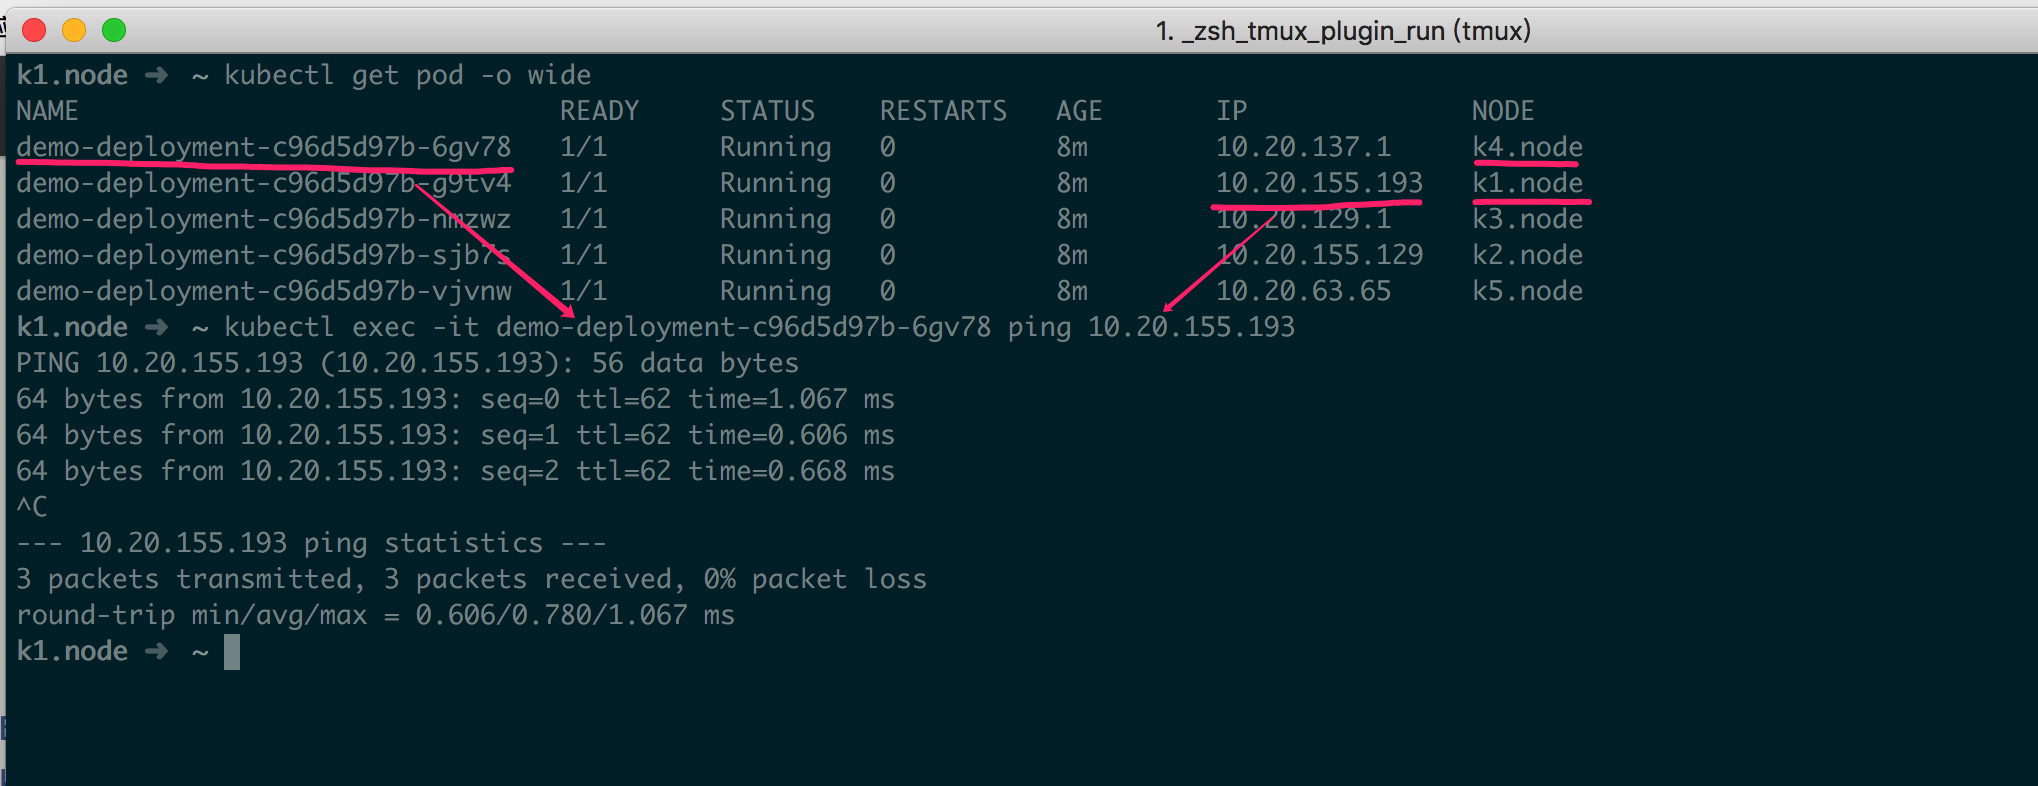
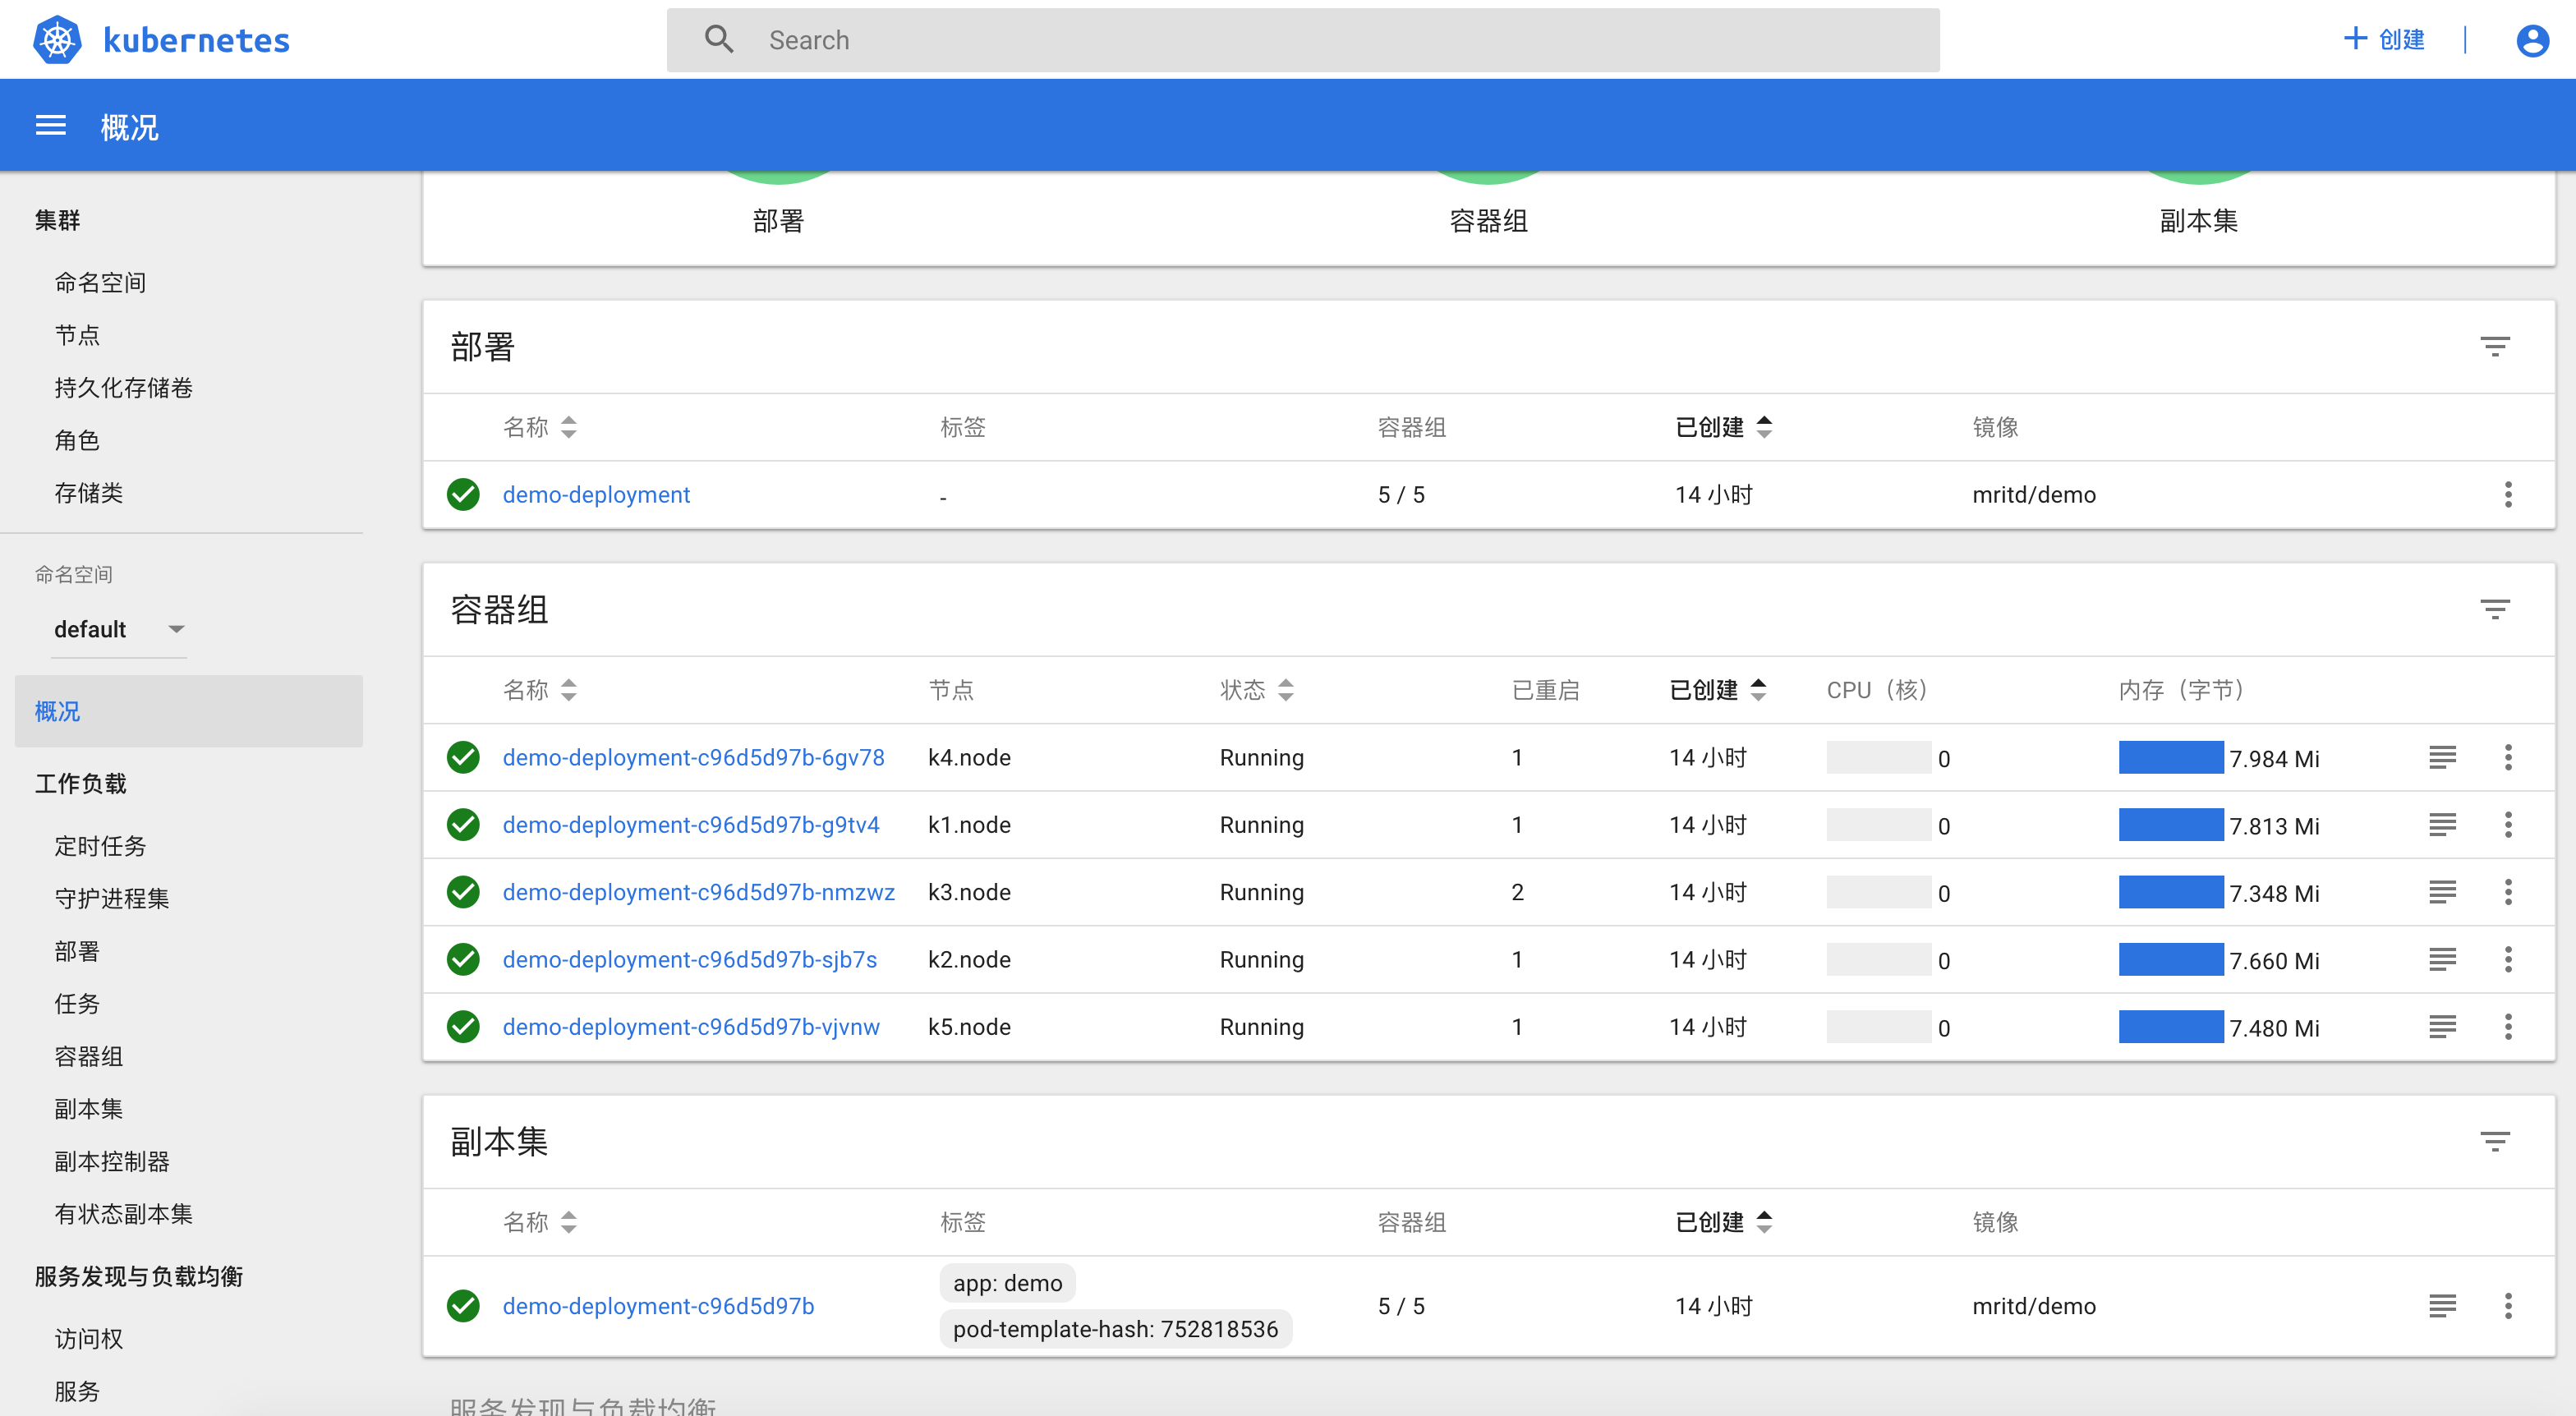
5.6、测试网络 网络测试与其他几篇文章一样,创建几个 pod 测试即可
1 2 3 4 5 6 7 8 9 10 11 12 13 14 15 16 17 18 19 20 21 22 23 24 cat << EOF >> demo.deploy.yml apiVersion: apps/v1 kind: Deployment metadata: name: demo-deployment spec: replicas: 5 selector: matchLabels: app: demo template: metadata: labels: app: demo spec: containers: - name: demo image: mritd/demo imagePullPolicy: IfNotPresent ports: - containerPort: 80 EOF
测试结果如图所示
六、部署集群 DNS 6.1、部署 CoreDNS CoreDNS 给出了标准的 deployment 配置,如下
1 2 3 4 5 6 7 8 9 10 11 12 13 14 15 16 17 18 19 20 21 22 23 24 25 26 27 28 29 30 31 32 33 34 35 36 37 38 39 40 41 42 43 44 45 46 47 48 49 50 51 52 53 54 55 56 57 58 59 60 61 62 63 64 65 66 67 68 69 70 71 72 73 74 75 76 77 78 79 80 81 82 83 84 85 86 87 88 89 90 91 92 93 94 95 96 97 98 99 100 101 102 103 104 105 106 107 108 109 110 111 112 113 114 115 116 117 118 119 120 121 122 123 124 125 126 127 128 129 130 131 132 133 134 135 136 137 138 139 140 141 142 143 144 145 apiVersion: v1"" "true" "CoreDNS" type : RollingUpdate"CriticalAddonsOnly" "Exists" "-conf" , "/etc/coredns/Corefile" ]"true" "true" "CoreDNS"
然后直接使用脚本替换即可(脚本变量我已经修改了)
1 2 3 4 5 6 7 8 9 10 11 #!/bin/bash ${1:-10.254.0.0/16} ${2:-10.20.0.0/16} ${3:-10.254.0.2} ${4:-cluster.local} ${5:-`pwd`/coredns.yaml.sed} $CLUSTER_DNS_IP /g -e s/CLUSTER_DOMAIN/$CLUSTER_DOMAIN /g -e s?SERVICE_CIDR?$SERVICE_CIDR ?g -e s?POD_CIDR?$POD_CIDR ?g $YAML_TEMPLATE > coredns.yaml
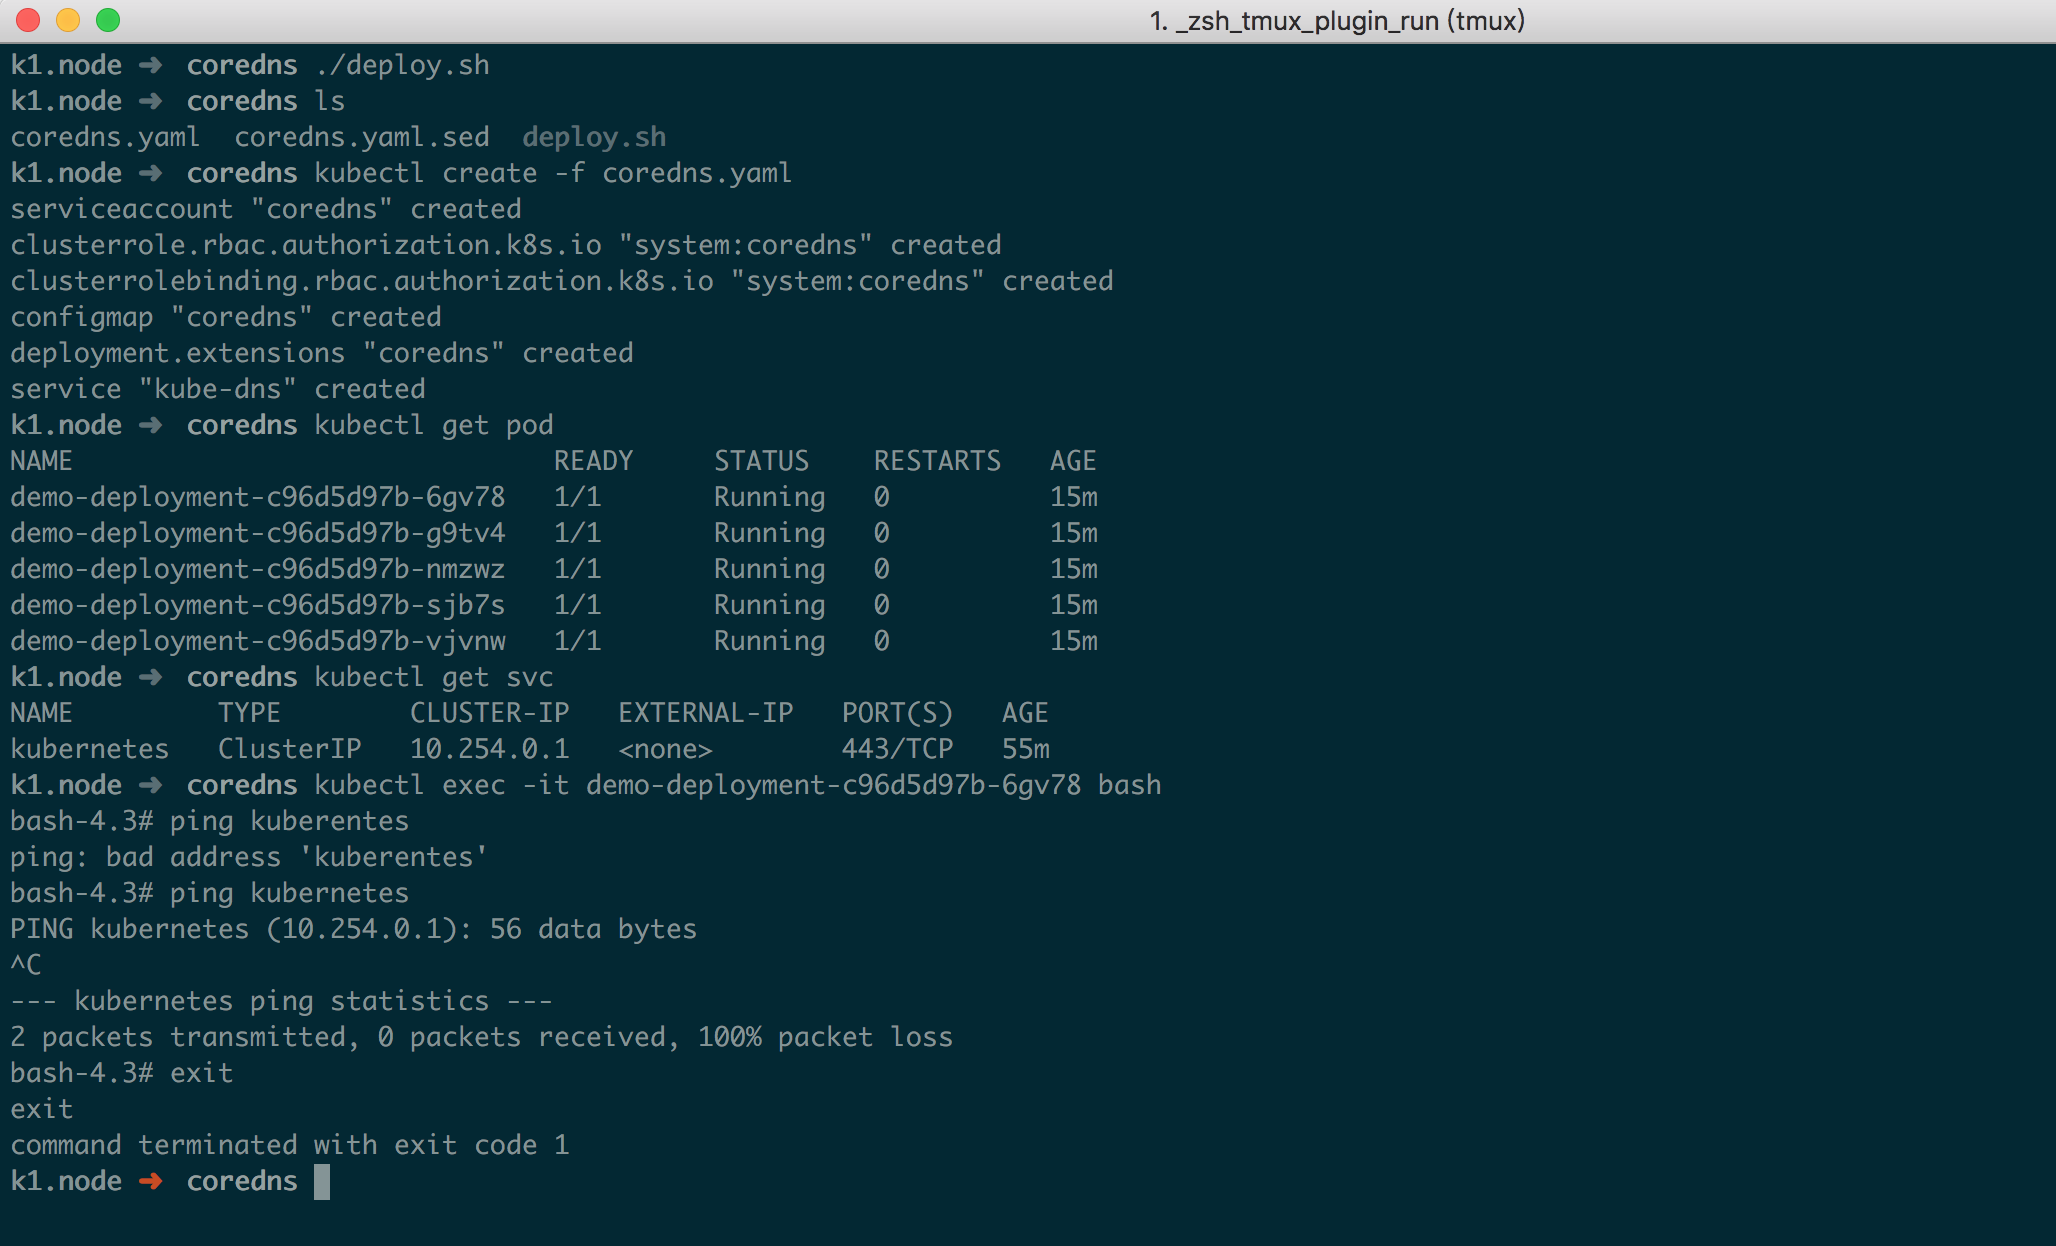
最后使用 kubectl 创建一下
1 2 3 4 5
测试截图如下
6.2、部署 DNS 自动扩容 自动扩容跟以往一样,yaml 创建一下就行
dns-horizontal-autoscaler.yaml
1 2 3 4 5 6 7 8 9 10 11 12 13 14 15 16 17 18 19 20 21 22 23 24 25 26 27 28 29 30 31 32 33 34 35 36 37 38 39 40 41 42 43 44 45 46 47 48 49 50 51 52 53 54 55 56 57 58 59 60 61 62 63 64 65 66 67 68 69 70 71 72 73 74 75 76 77 78 79 80 81 82 83 84 85 86 87 88 89 90 91 92 93 94 95 96 97 98 99 100 101 102 103 "" ]"nodes" ]"list" ]"" ]"replicationcontrollers/scale" ]"get" , "update" ]"extensions" ]"deployments/scale" , "replicasets/scale" ]"get" , "update" ]"" ]"configmaps" ]"get" , "create" ]"true" '' "20m" "10Mi" command :"linear" :{"coresPerReplica" :256,"nodesPerReplica" :16,"preventSinglePointFailure" :true }}true "CriticalAddonsOnly" "Exists"
七、部署 heapster heapster 部署相对简单的多,yaml 创建一下就可以了
1 2 3 4 kubectl create -f https://raw.githubusercontent.com/kubernetes/heapster/master/deploy/kube-config/influxdb/grafana.yaml
八、部署 Dashboard 8.1、部署 Dashboard Dashboard 部署同 heapster 一样,不过为了方便访问,我设置了 NodePort,还注意到一点是 yaml 拉取策略已经没有比较傻的 Always 了
1 wget https://raw.githubusercontent.com/kubernetes/dashboard/master/src/deploy/recommended/kubernetes-dashboard.yaml -O kubernetes-dashboard.yaml
将最后部分的端口暴露修改如下
1 2 3 4 5 6 7 8 9 10 11 12 13 14 15 16 17 18 19 kind: Service apiVersion: v1 metadata: labels: k8s-app: kubernetes-dashboard name: kubernetes-dashboard namespace: kube-system spec: type: NodePort ports: - name: dashboard-tls port: 443 targetPort: 8443 nodePort: 30000 protocol: TCP selector: k8s-app: kubernetes-dashboard
然后执行 kubectl create -f kubernetes-dashboard.yaml 即可
8.2、创建 admin 账户 默认情况下部署成功后可以直接访问 https://NODE_IP:30000 访问,但是想要登录进去查看的话需要使用 kubeconfig 或者 access token 的方式;实际上这个就是 RBAC 授权控制,以下提供一个创建 admin access token 的脚本,更细节的权限控制比如只读用户可以参考 使用 RBAC 控制 kubectl 权限 ,RBAC 权限控制原理是一样的
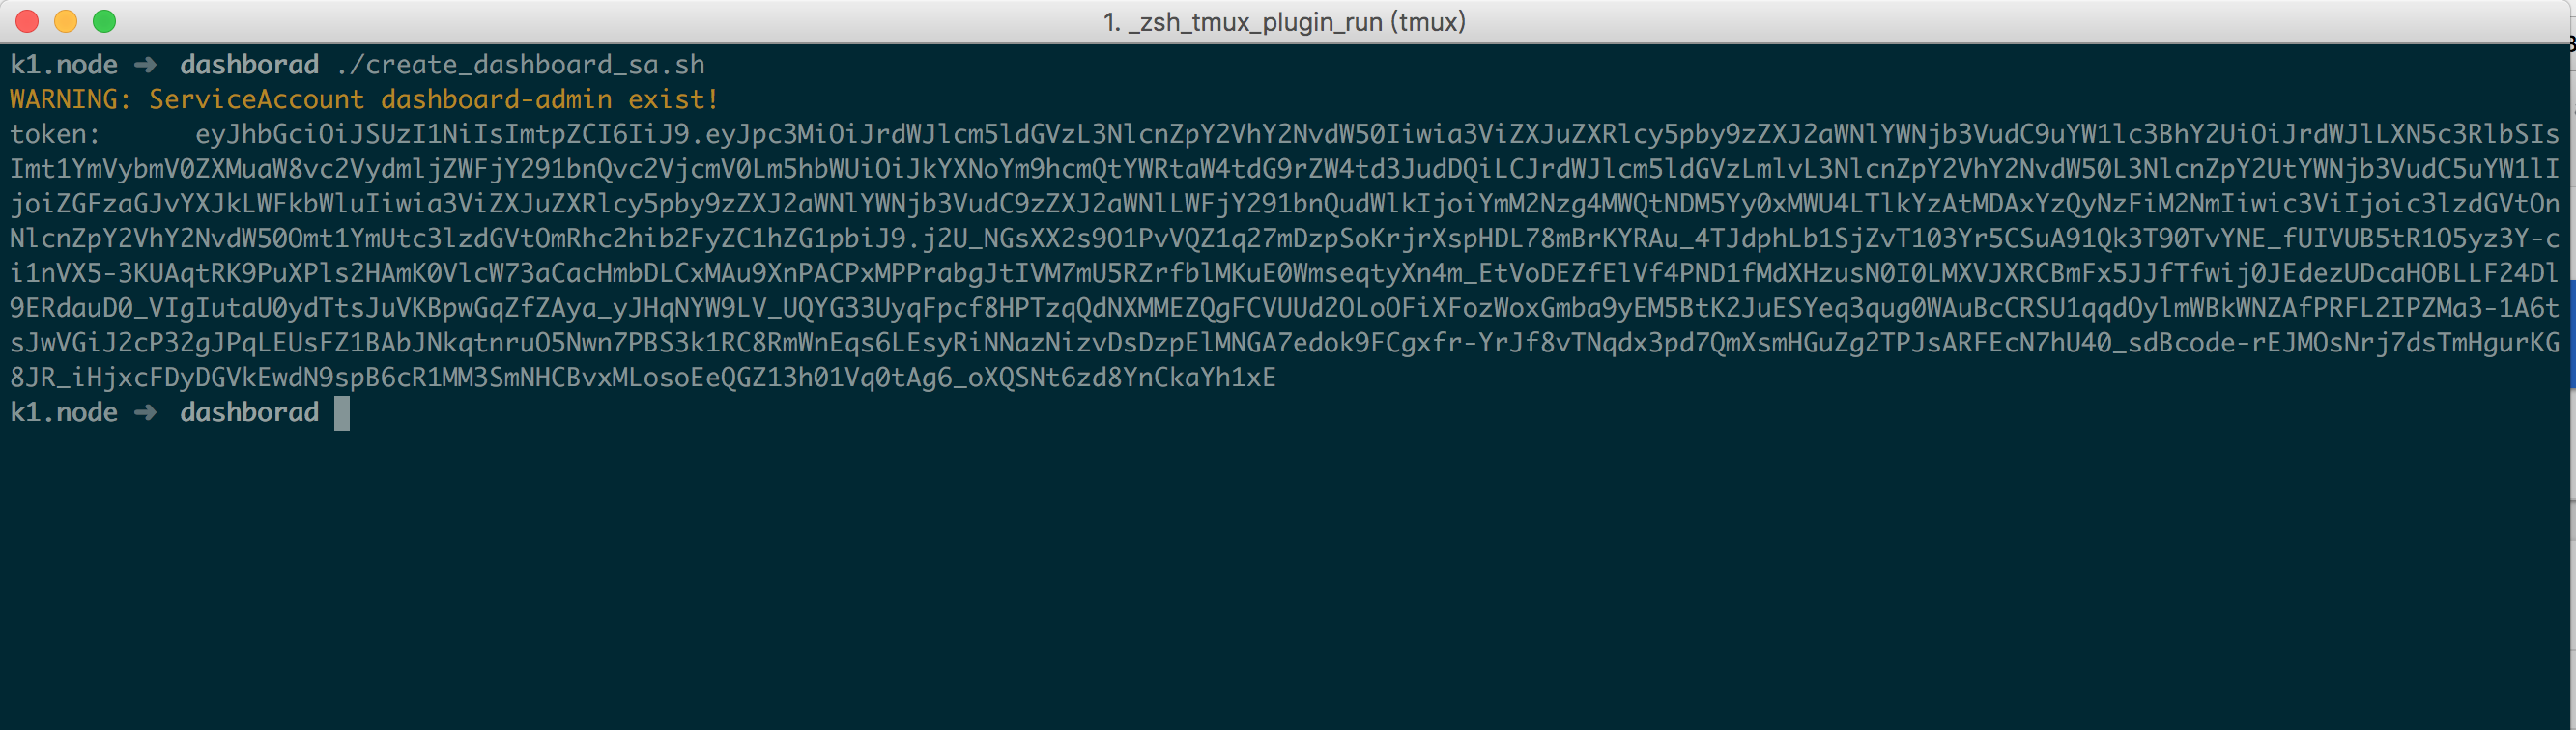
1 2 3 4 5 6 7 8 9 10 #!/bin/bash if kubectl get sa dashboard-admin -n kube-system &> /dev/null;then echo -e "\033[33mWARNING: ServiceAccount dashboard-admin exist!\033[0m" else fi cut -f1 -d ' ' ) | grep -E '^token'
将以上脚本保存为 create_dashboard_sa.sh 执行即可,成功后访问截图如下(如果访问不了的话请检查下 iptable FORWARD 默认规则是否为 DROP,如果是将其改为 ACCEPT 即可 )
九、其他说明 9.1、选项 label 等说明 部署过程中注意到一些选项已经做了名称更改,比如 --network-plugin-dir 变更为 --cni-bin-dir 等,具体的那些选项做了变更请自行对比配置,以及查看官方文档;
对于 Node label --node-labels=node-role.kubernetes.io/k8s-node=true 这个选项,它的作用只是在 kubectl get node 时 ROLES 栏显示是什么节点;不过需要注意 master 上的 kubelet 不要将 node-role.kubernetes.io/k8s-master=true 更改成 node-role.kubernetes.io/master=xxxx;后面这个 node-role.kubernetes.io/master 是 kubeadm 用的,这个 label 会告诉 k8s 调度器当前节点为 master,从而执行一些特定动作,比如 node-role.kubernetes.io/master:NoSchedule 此节点将不会被分配 pod;具体参见 kubespray issue 以及 官方设计文档
很多人可能会发现大约 1 小时候 kubectl get csr 看不到任何 csr 了,这是因为最新版本增加了 csr 清理功能,默认对于 approved 和 denied 状态的 csr 一小时后会被清理,对于 pending 状态的 csr 24 小时后会被清理,想问时间从哪来的请看 代码 ;PR issue 我忘记了,增加这个功能的起因大致就是因为当开启了证书轮换后,csr 会不断增加,所以需要增加一个清理功能
9.2、异常及警告说明 在部署过程中我记录了一些异常警告等,以下做一下统一说明
1 2 3 4 5 6 7 8 9 10 11 12 13 14 15 16 17 in actual state of world: Failed to set statusUpdateNeeded to needed true , because nodeName=...for "/kubepods" : failed to get cgroup stats for "/kubepods" : failed to get container info for "/kubepods" : unknown containe "/kubepods" for container /"allocatableMemory.available" error: system container "pods" not found in metrics