Kubernetes 1.8 kube-proxy 开启 ipvs

Kubernetes 1.8 发布已经好几天,1.8 对于 kube-proxy 组件增加了 ipvs 支持,以下记录一下 kube-proxy ipvs 开启教程

一、环境准备

目前测试为 5 台虚拟机,CentOS 系统,etcd、kubernetes 全部采用 rpm 安装,使用 systemd 来做管理,网络组件采用 calico,Master 实现了 HA;基本环境如下

IP组件
10.10.1.5Master、Node、etcd
10.10.1.6Master、Node、etcd
10.10.1.7Master、Node、etcd
10.10.1.8Node
10.10.1.9Node

二、注意事项

之所以把这个单独写一个标题是因为坑有点多,为了避免下面出现问题,先说一下注意事项:

2.1、SELinux

如果对 SELinux 玩的不溜的朋友,我建议先关闭 SELinux,关闭方法如下

1
2
3
4
5
6
7
8
9
10
11
12
13
14
# 编辑 /etc/selinux/config 文件;确保 SELINUX=disabled
docker1.node ➜ ~ cat /etc/selinux/config

# This file controls the state of SELinux on the system.
# SELINUX= can take one of these three values:
# enforcing - SELinux security policy is enforced.
# permissive - SELinux prints warnings instead of enforcing.
# disabled - No SELinux policy is loaded.
SELINUX=disabled
# SELINUXTYPE= can take one of three two values:
# targeted - Targeted processes are protected,
# minimum - Modification of targeted policy. Only selected processes are protected.
# mls - Multi Level Security protection.
SELINUXTYPE=targeted

然后重启机器并验证

1
2
docker1.node ➜  ~ sestatus
SELinux status: disabled

2.2、Firewall

搭建时尽量关闭防火墙,如果你玩的很溜,那么请在测试没问题后再开启防火墙

1
2
systemctl stop firewalld
systemctl disable firewalld

2.3、内核参数调整

确保内核已经开启如下参数,或者说确保 /etc/sysctl.conf 有如下配置

1
2
3
4
5
6
7
8
9
10
11
12
13
14
docker1.node ➜  ~ cat /etc/sysctl.conf
# sysctl settings are defined through files in
# /usr/lib/sysctl.d/, /run/sysctl.d/, and /etc/sysctl.d/.
#
# Vendors settings live in /usr/lib/sysctl.d/.
# To override a whole file, create a new file with the same in
# /etc/sysctl.d/ and put new settings there. To override
# only specific settings, add a file with a lexically later
# name in /etc/sysctl.d/ and put new settings there.
#
# For more information, see sysctl.conf(5) and sysctl.d(5).
net.ipv4.ip_forward=1
net.bridge.bridge-nf-call-iptables=1
net.bridge.bridge-nf-call-ip6tables=1

然后执行 sysctl -p 使之生效

1
2
3
4
docker1.node ➜  ~ sysctl -p
net.ipv4.ip_forward = 1
net.bridge.bridge-nf-call-iptables = 1
net.bridge.bridge-nf-call-ip6tables = 1

2.4、内核模块加载

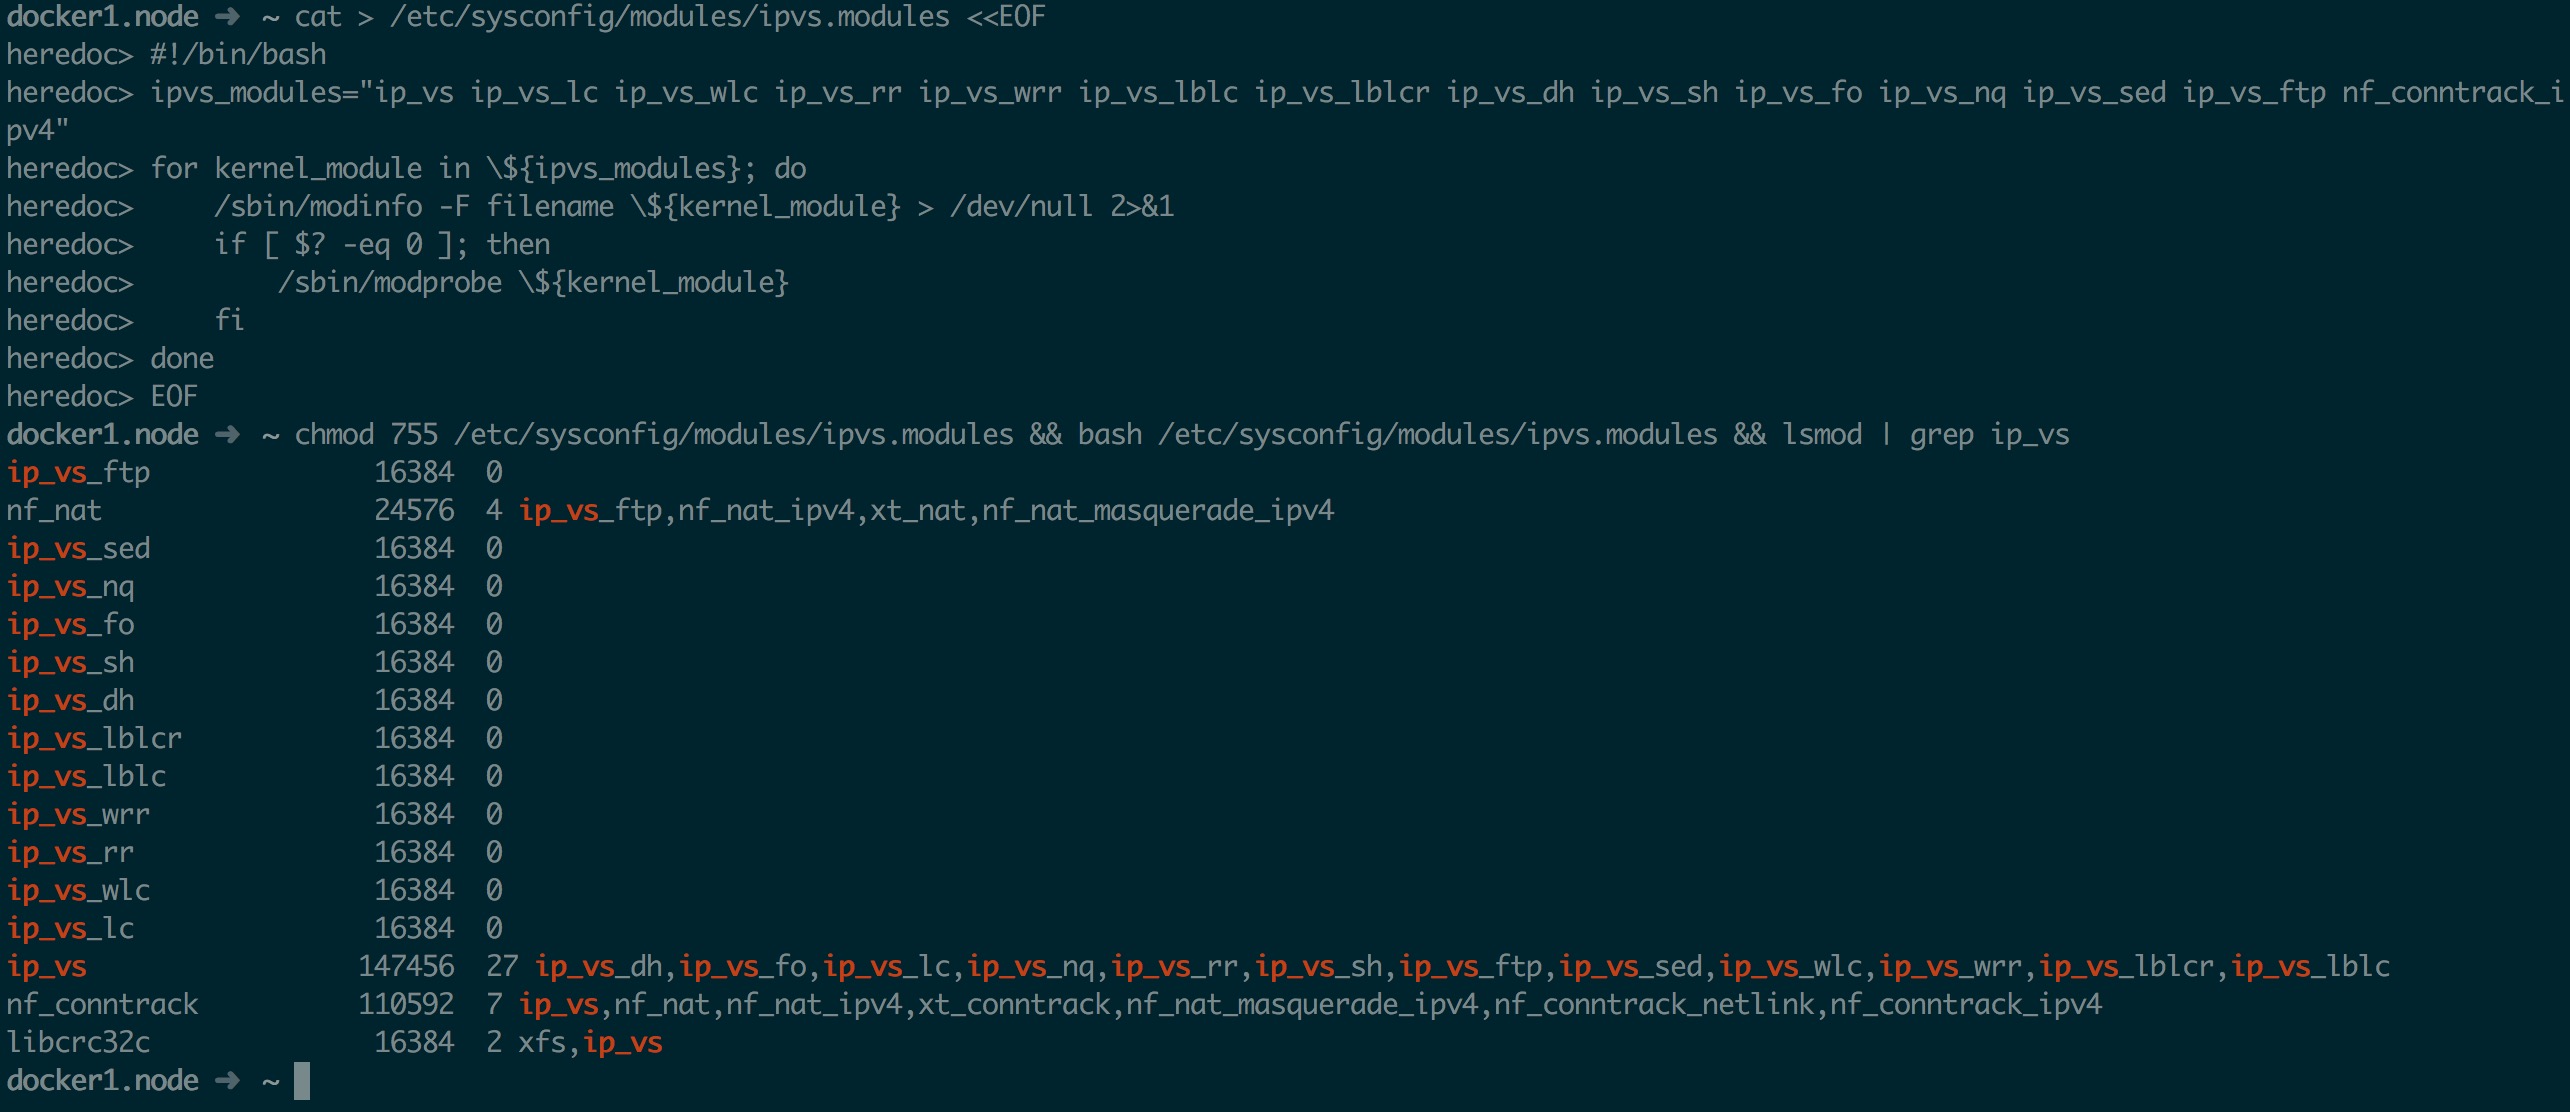
由于 ipvs 已经加入到内核主干,所以需要内核模块支持,请确保内核已经加载了相应模块;如不确定,执行以下脚本,以确保内核加载相应模块,否则会出现 failed to load kernel modules: [ip_vs_rr ip_vs_sh ip_vs_wrr] 错误

1
2
3
4
5
6
7
8
9
10
11
cat > /etc/sysconfig/modules/ipvs.modules <<EOF
#!/bin/bash
ipvs_modules="ip_vs ip_vs_lc ip_vs_wlc ip_vs_rr ip_vs_wrr ip_vs_lblc ip_vs_lblcr ip_vs_dh ip_vs_sh ip_vs_fo ip_vs_nq ip_vs_sed ip_vs_ftp nf_conntrack_ipv4"
for kernel_module in \${ipvs_modules}; do
/sbin/modinfo -F filename \${kernel_module} > /dev/null 2>&1
if [ $? -eq 0 ]; then
/sbin/modprobe \${kernel_module}
fi
done
EOF
chmod 755 /etc/sysconfig/modules/ipvs.modules && bash /etc/sysconfig/modules/ipvs.modules && lsmod | grep ip_vs

执行后应该如下图所示,如果 lsmod | grep ip_vs 并未出现 ip_vs_rr 等模块;那么请更换内核(一般不会,2.6 以后 ipvs 好像已经就合并进主干了)

Load kernel modules

三、开启 ipvs 支持

3.1、修改配置

修改 /etc/kubernetes/proxy 配置如下

1
2
3
4
5
6
7
8
9
10
11
12
13
14
15
16
###
# kubernetes proxy config

# default config should be adequate

# Add your own!
KUBE_PROXY_ARGS="--bind-address=10.10.1.8 \
--hostname-override=docker4.node \
--masquerade-all \
--feature-gates=SupportIPVSProxyMode=true \
--proxy-mode=ipvs \
--ipvs-min-sync-period=5s \
--ipvs-sync-period=5s \
--ipvs-scheduler=rr \
--kubeconfig=/etc/kubernetes/kube-proxy.kubeconfig \
--cluster-cidr=10.254.0.0/16"

启用 ipvs 后与 1.7 版本的配置差异如下:

  • 增加 --feature-gates=SupportIPVSProxyMode=true 选项,用于告诉 kube-proxy 开启 ipvs 支持,因为目前 ipvs 并未稳定
  • 增加 ipvs-min-sync-period--ipvs-sync-period--ipvs-scheduler 三个参数用于调整 ipvs,具体参数值请自行查阅 ipvs 文档
  • 增加 --masquerade-all 选项,以确保反向流量通过

重点说一下 --masquerade-all 选项: kube-proxy ipvs 是基于 NAT 实现的,当创建一个 service 后,kubernetes 会在每个节点上创建一个网卡,同时帮你将 Service IP(VIP) 绑定上,此时相当于每个 Node 都是一个 ds,而其他任何 Node 上的 Pod,甚至是宿主机服务(比如 kube-apiserver 的 6443)都可能成为 rs;按照正常的 lvs nat 模型,所有 rs 应该将 ds 设置成为默认网关,以便数据包在返回时能被 ds 正确修改;在 kubernetes 将 vip 设置到每个 Node 后,默认路由显然不可行,所以要设置 --masquerade-all 选项,以便反向数据包能通过

以上描述可能并不精准,具体请看 Google 文档

3.2、测试 ipvs

修改完成后,重启 kube-proxy 使其生效

1
2
systemctl daemon-reload
systemctl restart kube-proxy

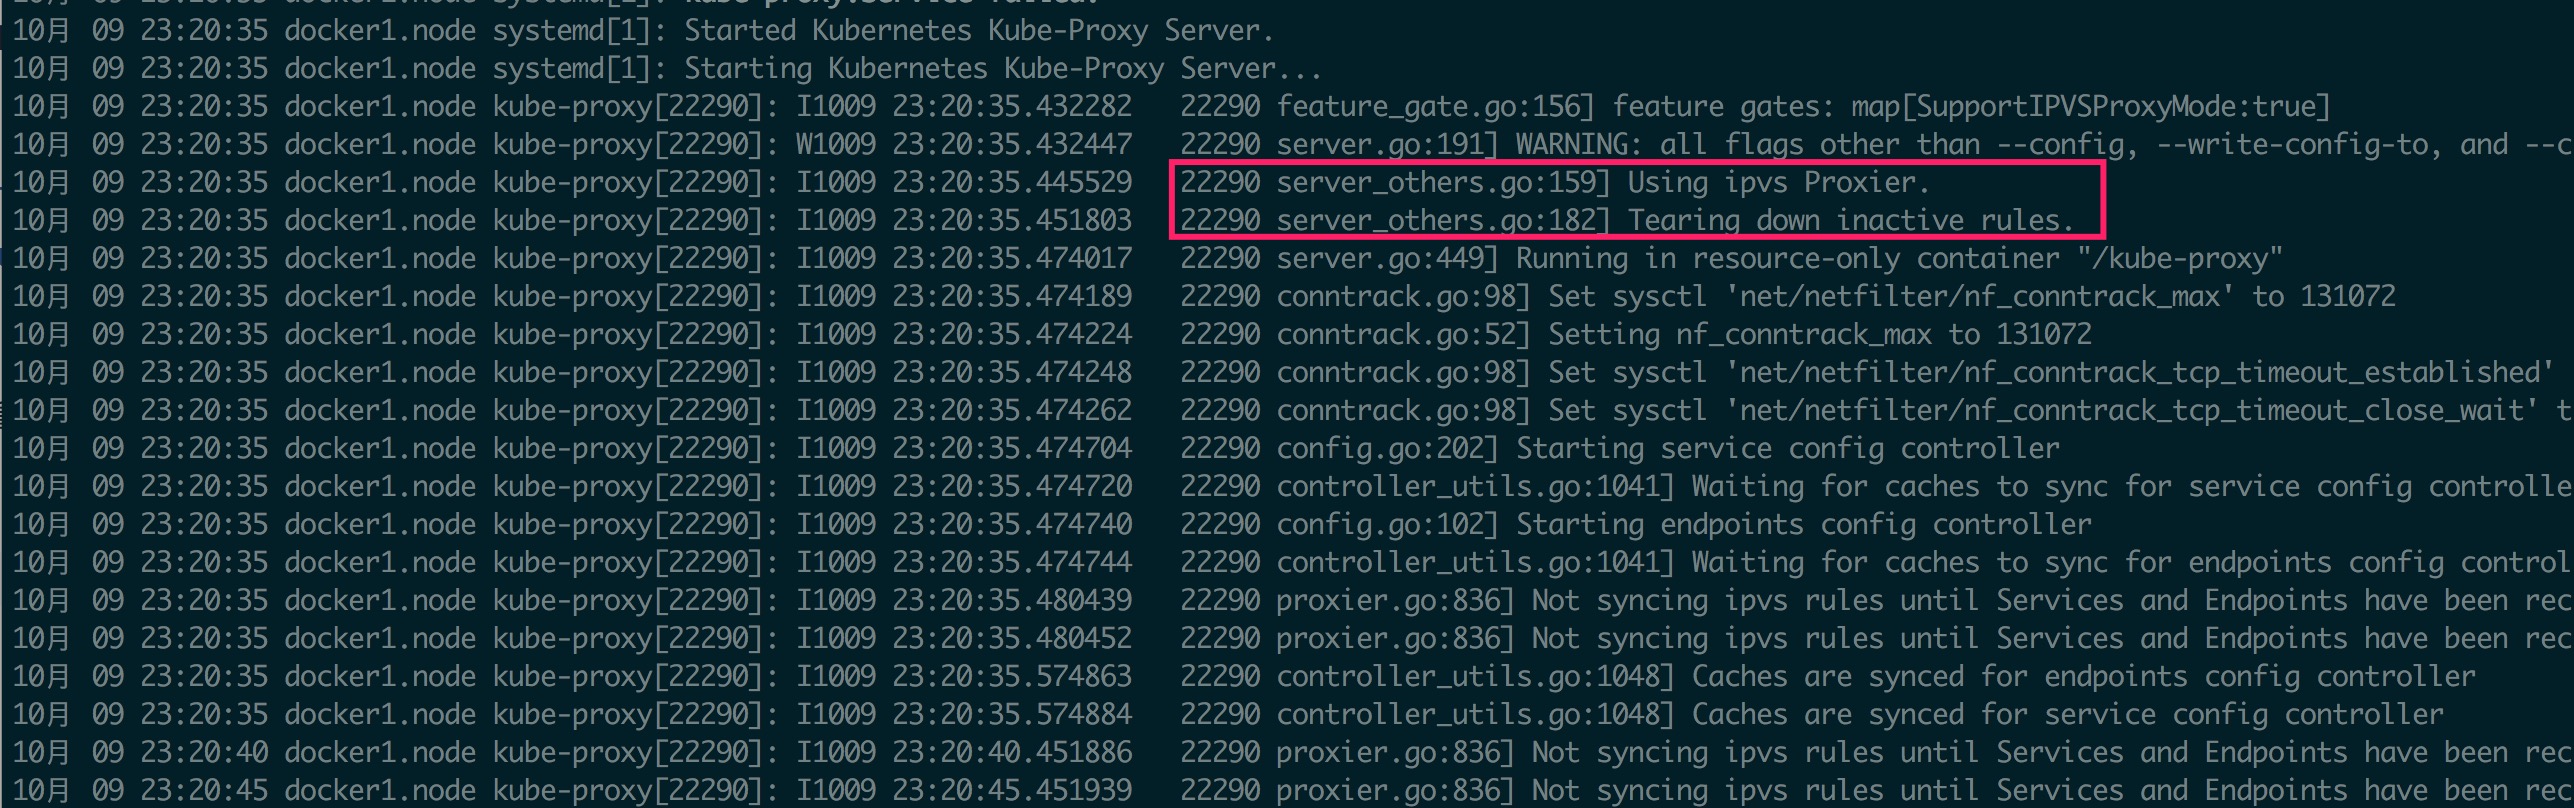
重启后日志中应该能看到如下输出,不应该有其他提示 ipvs 的错误信息出现

kube-proxy ipvs log

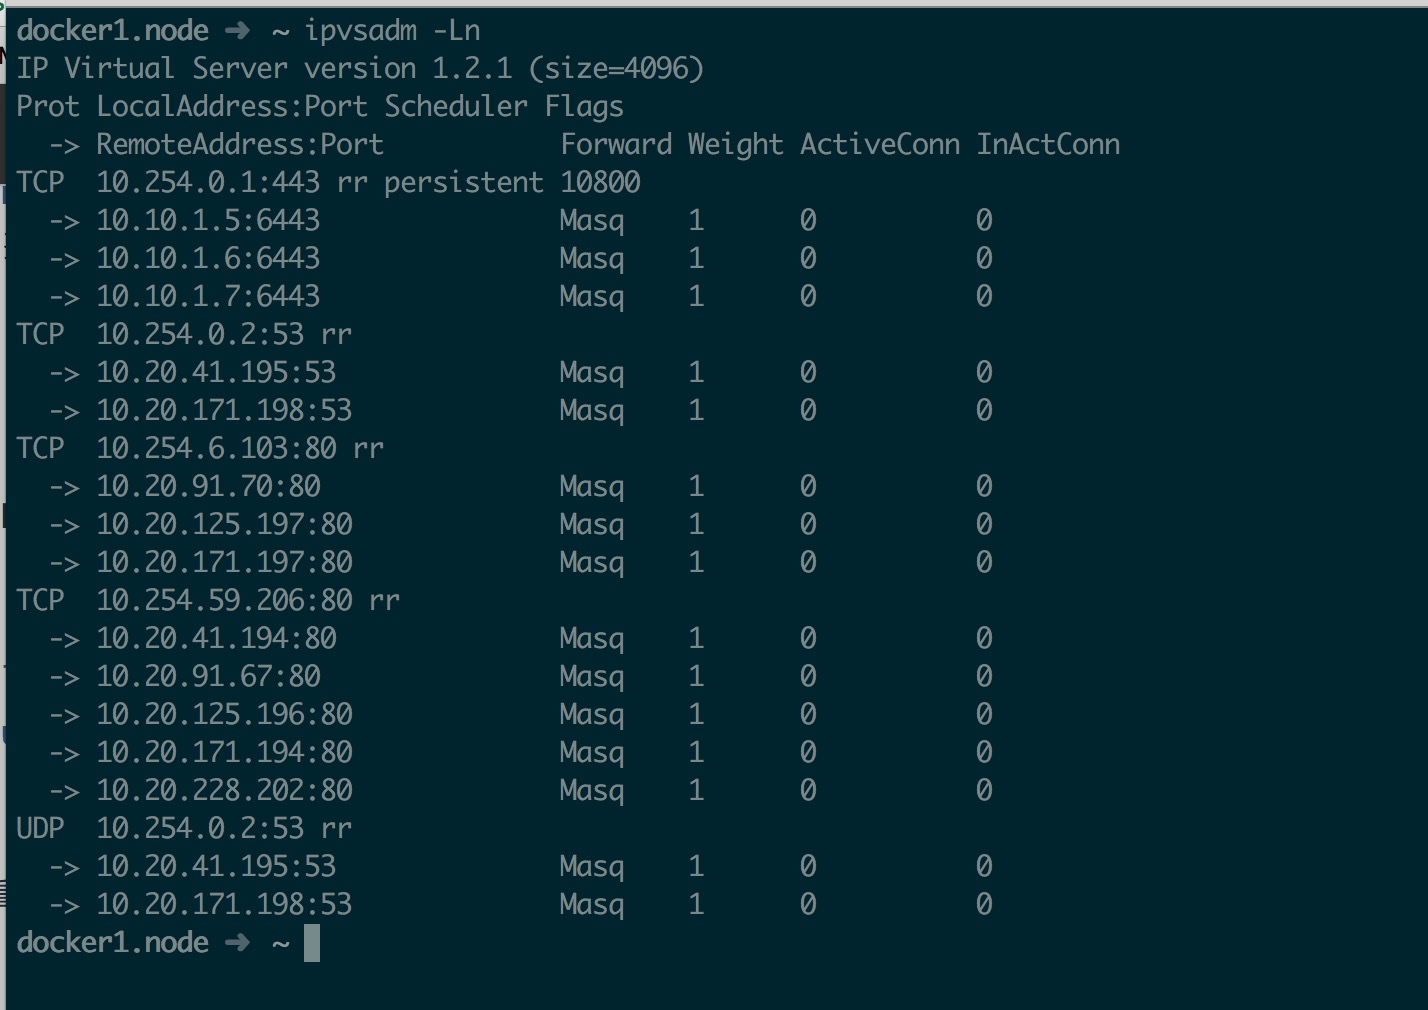
同时使用 ipvsadm 命令应该能看到相应的 service 的 ipvs 规则(ipvsadm 自己安装一下)
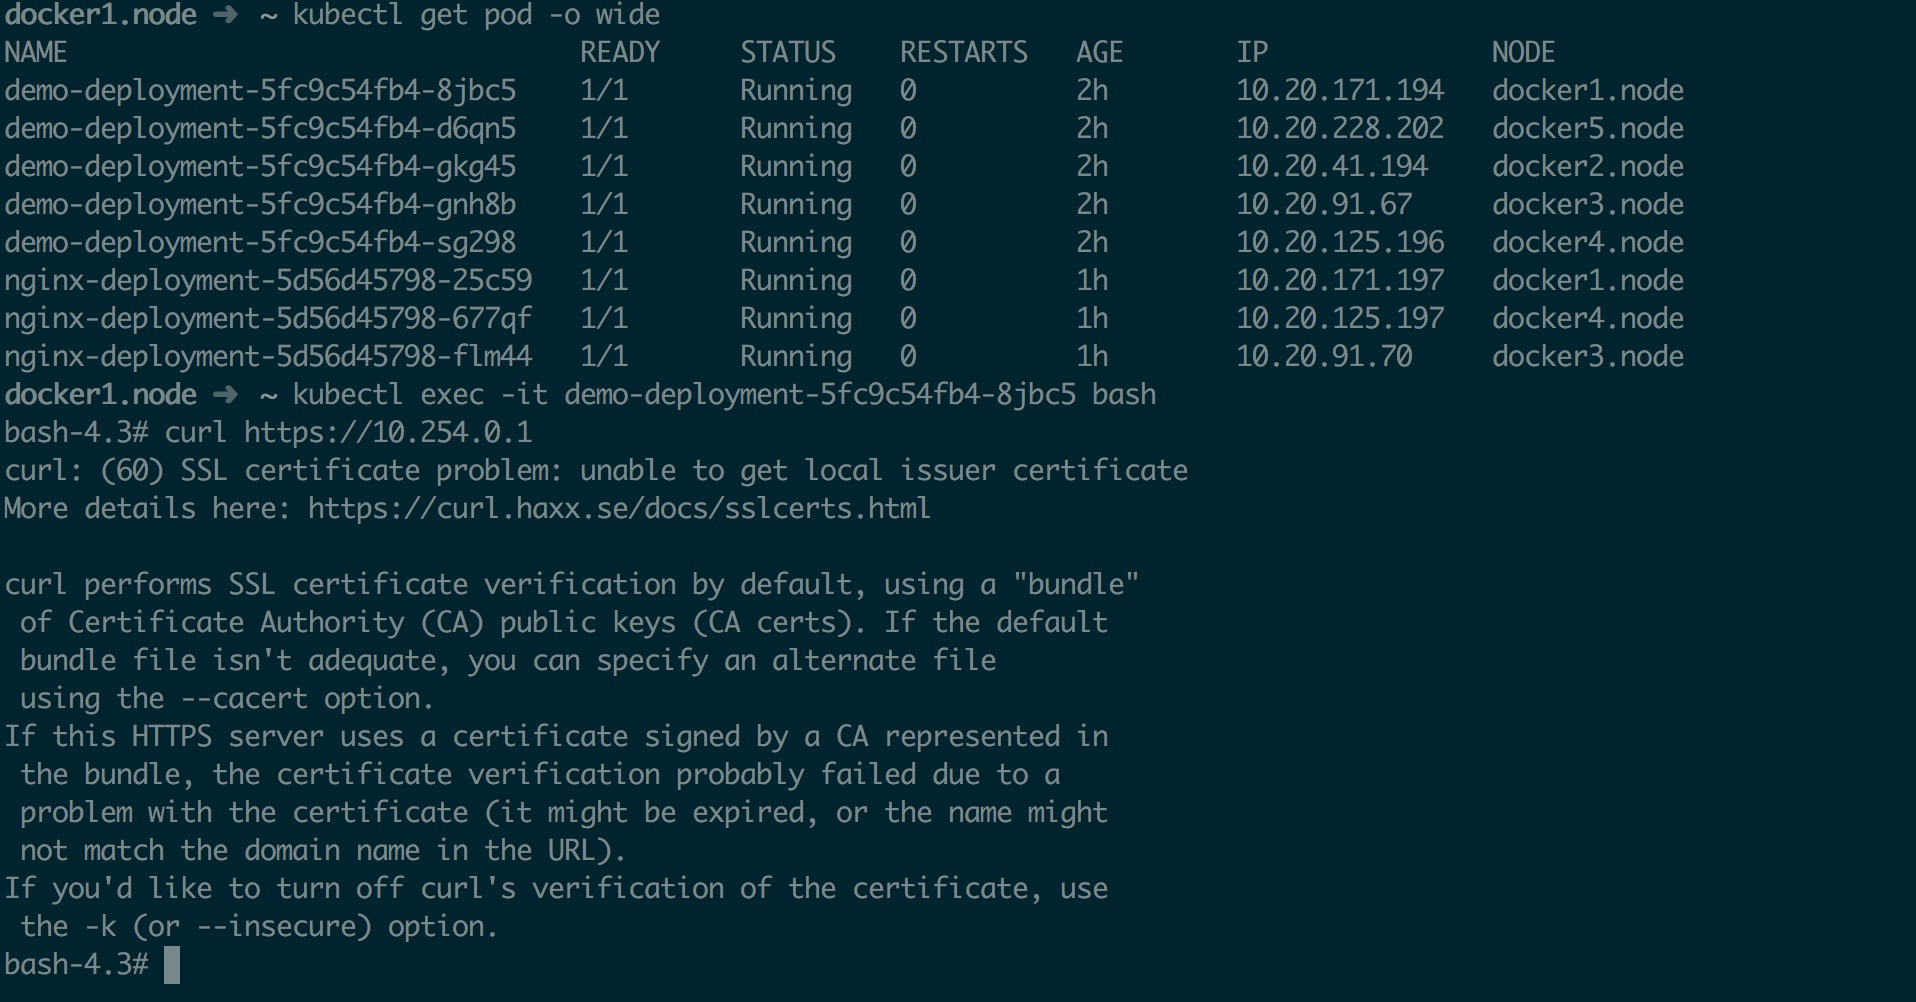
ipvs role

然后进入 Pod 测试

test ipvs1

最后说一点: ipvs 尚未稳定,请慎用;而且 --masquerade-all 选项与 Calico 安全策略控制不兼容,请酌情考虑使用(Calico 在做网络策略限制的时候要求不能开启此选项)


Kubernetes 1.8 kube-proxy 开启 ipvs
https://mritd.com/2017/10/10/kube-proxy-use-ipvs-on-kubernetes-1.8/
作者
Kovacs
发布于
2017年10月10日
许可协议